Section Navigation

Introduction
Animation is the process of quickly cycling through a series of frames to convey motion in an image. When animating in two dimensions, as with pixel art, it can often be difficult to convey a sense of depth. Generally, sprites move across a flat plane, and any depth is implied by smaller images in the background that give a sense of perspective. However, there are techniques you can use to increase the sense of depth in a 2D animated scene. One of these techniques, parallax scrolling, employs multiple layers of images moving at different rates to enhance the illusion of a sprite moving through a scene with layers of depth.
Learning Goals
Students can use the techniques introduced in this module to improve the quality of their pixel art graphics. They will gain a better understanding of how to use image editing software to create animated graphics and use layers to enhance depth.
Vocabulary
Animation - A series of images displayed in quick succession to create an illusion of movement.
Keyframe - An image representing a main point of movement in an animation.
Layers - A section of an image file that can be edited independently from the rest of the image.
Parallax Scrolling - Moving separate layers of an image at different speeds to give the illusion of depth.
Guiding Questions
- When in motion, do objects pass more quickly when they are closer, or farther away?
- How is colour affected by distance?
- How is size affected by distance?
Curriculum Links
This module can be connected to an Arts curriculum, as students learn new methods of computer animation, and use their creativity to make their own animation. Through the use of the GraphicsGale software, students will learn new computer skills, and add to their repertoire of new technologies and digital skills.
Materials
- GraphicsGale – Download GraphicsGale
- Art Assets – Download Assets Folder (ZIP)
- Flip-books/notepads/post-it pads
- Pencils or pens
Non-Computer Activity
Due to the more technical aspects of this exercise, this module focuses primarily on the Computer Activity. Parallax scrolling can be and is used in traditional animation, but the process is just as laborious to complete.
Computer Activity
Working with the walk cycle created in the Animation Basics module, or with the premade walk cycle in the attached resources, scrolling background elements will be added to create a fully animated scene.
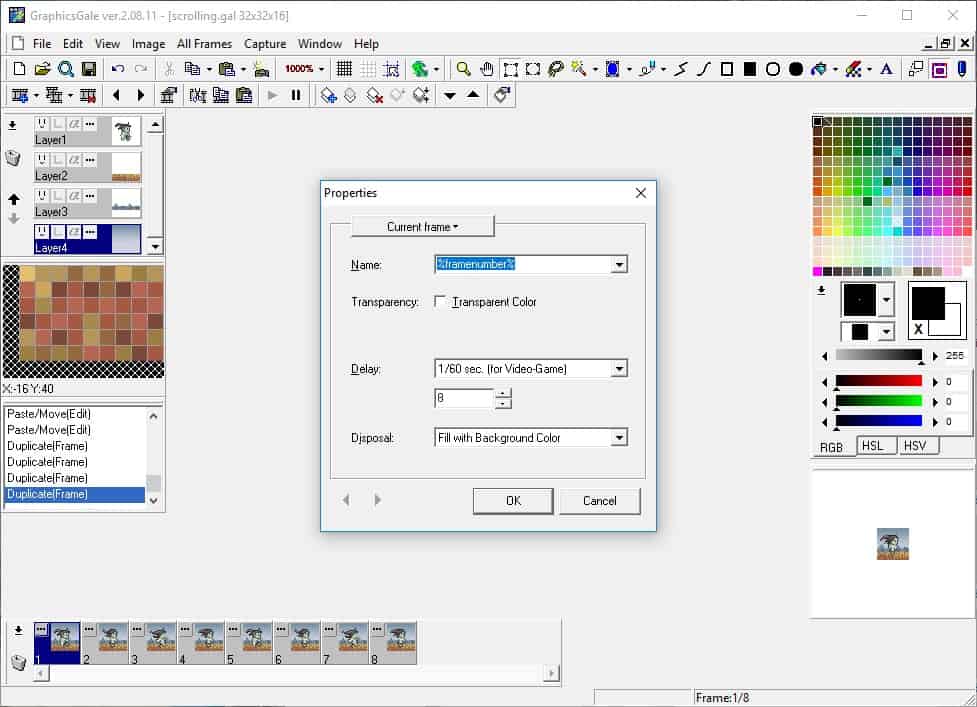
To begin, open GraphicsGale and create a new file (File>New) that is 32x32px with 16-bit colour.

To bring an existing image into GraphicsGale, it needs to be imported. To do this, go to Edit>Import, find and select the file you want to open (mahaha1.png), and click Open. Right-click to commit the image to the layer.
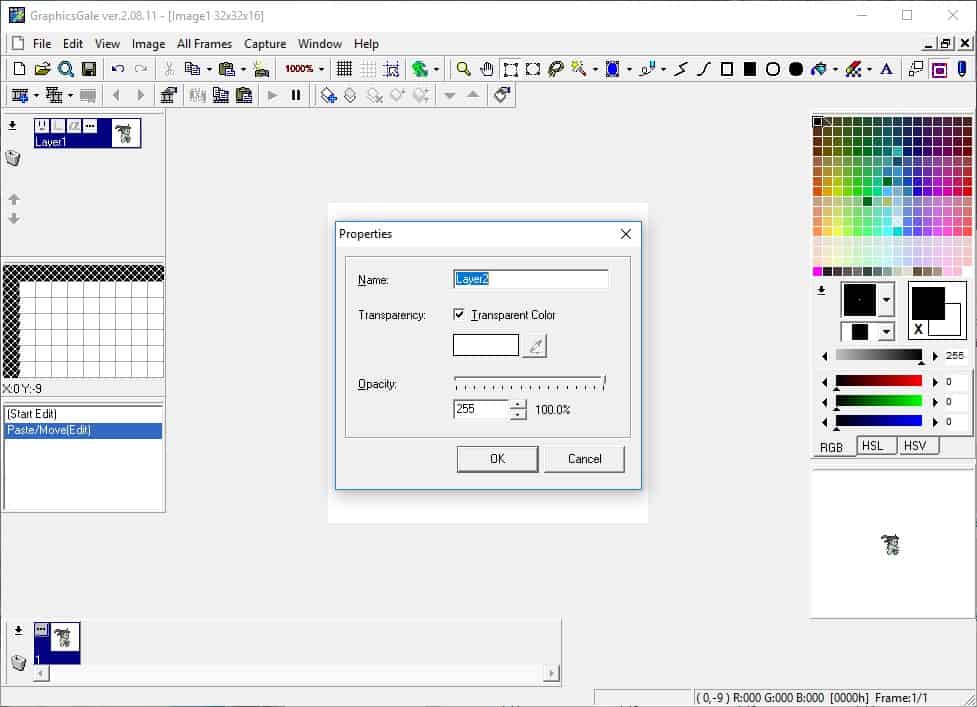
To bring more images into the same frame, without pasting over the existing image, we need to use layers. Layers are like transparent slices of a frame, much like acetate animation cells, that allow you to work on multiple images within the same space, without affecting other elements in that space. To add a new layer to the frame, click the Add Layer button

in the lower central area of the toolbar. In the Layers Panel on the left, there will now be two layers in the frame, with the new empty layer sitting above the imported image (“Layer 1”).
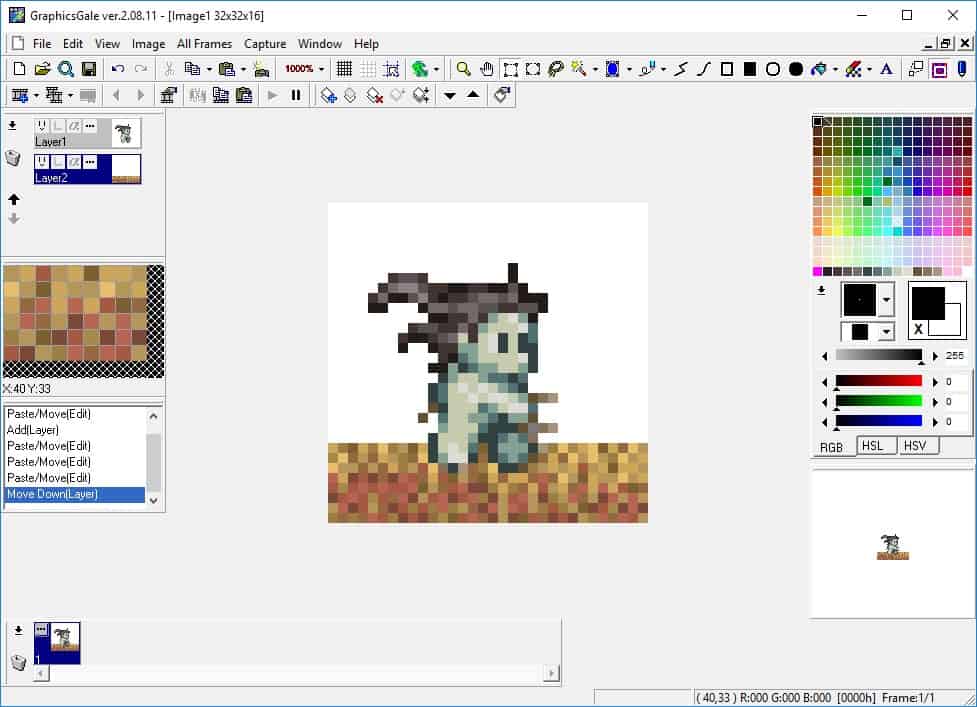
Left-click “Layer 2” (or whatever you named the newly created empty layer) in the Layers Panel to make it the active layer. Any changes to the image will be made in whatever layer is currently active. We want to import our background assets into this new empty layer, so navigate to Edit>Import, choose ground.png, and click Open.
Before an imported asset is committed to a layer it can be moved around within the canvas space. Depending upon the position of the cursor, it will change to allow different functions:
- Move: When the cursor is positioned over the main area of the asset, it changes to a ‘move’ cursor (a crosshair with arrows). The move cursor allows the asset to be clicked and dragged around the canvas.
- Resize: When the cursor is over the squares along the perimeter of the asset it will change to a ‘resize’ cursor (bi-directional arrow). Clicking and dragging the resize cursor scales the asset along whichever axis is clicked (top, bottom, sides, or diagonals).
- Rotate: Clicking the square on the little handle in the centre of an asset changes the cursor to a ‘rotate’ cursor (pointing hand). The rotate cursor allows the asset to be rotated around a central axis.
For now, use the move cursor to position the ground layer at the bottom of the screen. Right-click off the asset to commit it to the layer. Currently, the ground is above the top layer, overlapping the character sprite. To change the order of the layers, use the up and down arrows in the Layers Panel. Clicking the arrows adjusts the position of the currently active layer. With Layer 2 selected, click the down arrow to move it to the bottom.
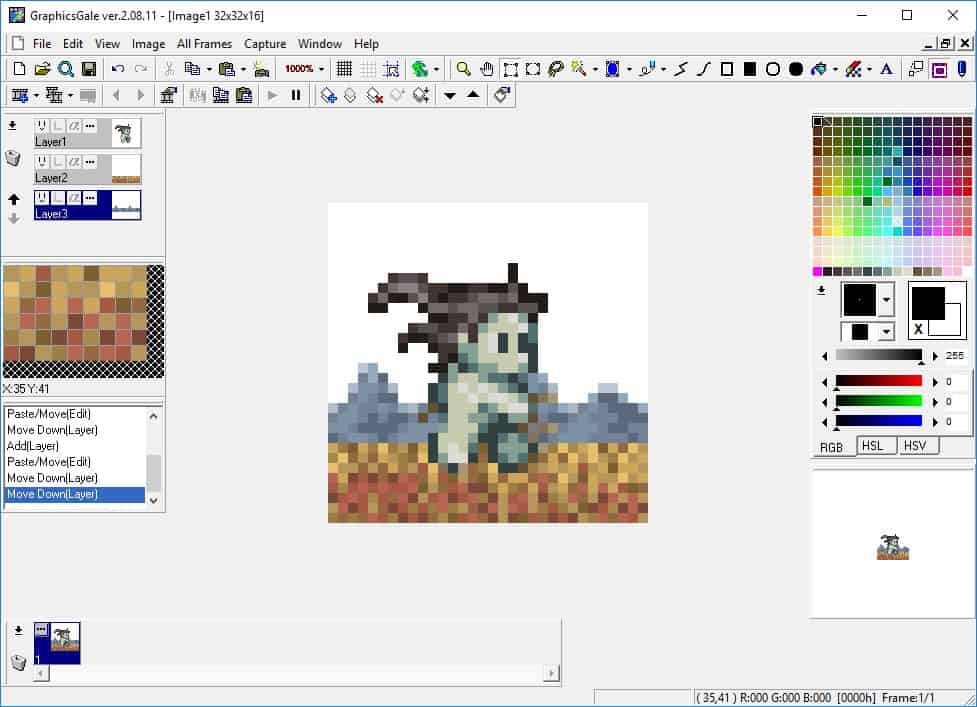
There are two more assets to import to complete the scene. Each need to be imported to separate layers. Click the New Layer button to make a third layer. Go to Edit>Import, select mountains.png, and click Open. Position the mountains so they sit on top of the ground tiles, then right-click off of them to commit them to the layer. Again, this layer is currently above everything else in the frame, so use the down arrow in the Layers Panel to move it to the bottom of the stack.
Notice that even though there are only a few layers, the colours in the image become desaturated (less intense) as they recede farther into the background. This is an example of atmospheric perspective. Though it looks transparent, air is actually composed of a mixture of molecules. The further away an object is, the greater the amount of molecules to see through, which start to obscure the colours. This is easier to observe on a foggy day, or if when snorkelling underwater. Size also visibly reduces with distance, which is why the mountains appear small in relation to the sprite. Both size and saturation can be used to enhance the illusion of depth in your images.
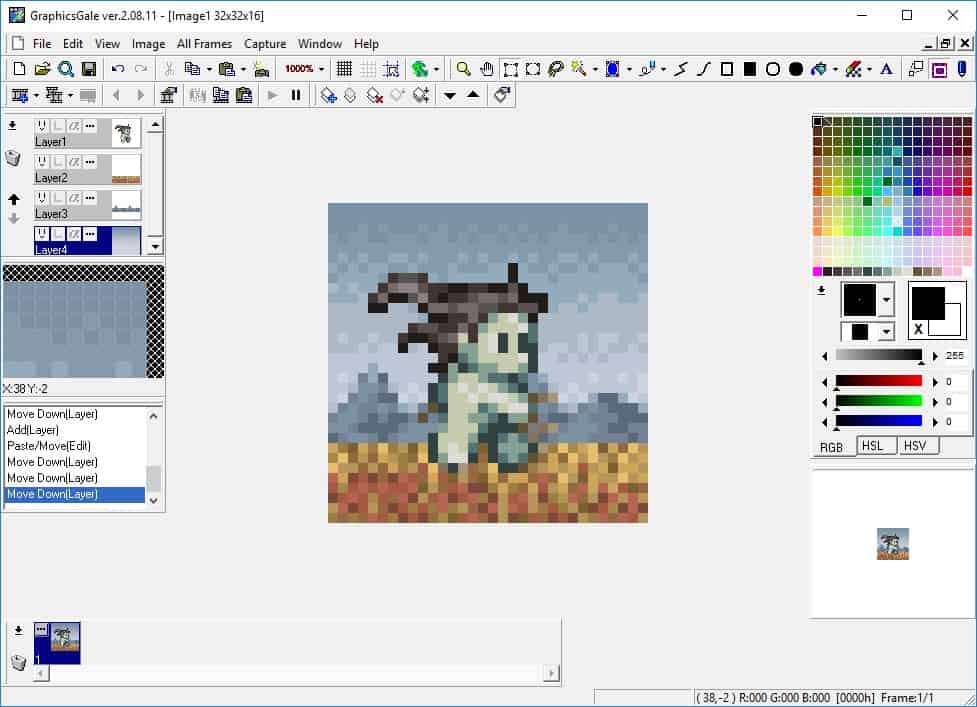
Create another layer for the final asset we need to import, then go to Edit>Import, select background.png, and click Open. The background image should take up the entirety of the canvas, so make sure it’s centred, then right-click off of it to commit it to the layer. Use the down arrow in the Layers Panel to move the layer to the bottom of the stack to finish the first frame.
To add frames to a file use the Add Frame button

in the bottom-left of the toolbar. This adds a frame to the timeline at the bottom of the screen. However, instead of starting with a new blank frame and having to import all of the layers again, we use the Duplicate Frame

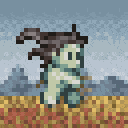
button to make a copy of the currently selected frame, along with all of its layers. After duplicating the frame, select the layer with the character sprite (which should be Layer 1, by default). Press CTRL+A to select all of the canvas, then press Delete. Now go to Edit>Import, select mahaha2.png, and click Open. This completes the second frame.
Repeat the process for frame three, duplicating the frame, selecting and deleting the character layer, then importing mahaha3.png. Duplicate the frame one last time, select and delete the character layer, and import mahaha4.png. These four frames compose the base of your animation.
Parallax Scrolling
Parallax scrolling is generally handled programmatically within the code of a game or application. When working with parallax scrolling in a single image, the size of the frame is important to ensure the background elements scroll properly and wrap around without any timing issues. Our image is 32×32 pixels, so the rates at which the background elements are moved by should be a factor of 32. To keep the frame count lower, we will move the mountains by 4 pixels (4px), and the ground by 8 pixels (8px). 32 divided by 4 is 8, so a total of eight total frames are needed to properly loop the background animation.
We’ve already established the four frames we need for our walking sequence, so we’ll duplicate those one at a time. Select Frame 1 from the bottom timeline, then press the duplicate frame button. By default, the duplicated frame is added to the end of the timeline. That’s exactly where we want it, but if you ever have frames that are out of order, simply click and drag them within the timeline to adjust their order. Now select and duplicate Frame 2, then Frame 3, and lastly Frame 4.
The process gets a bit tricky now, as we start shifting the background layers by precise amounts and filling in the gaps created by moving them. It’s not difficult, but you do need to pay attention, otherwise you can end up with jerky or stuttering motion in your animation.
Frame 1 is our baseline, this frame will not change at all. It is both the start and endpoint of our loop. We will start animating on Frame 2, working on the ground layer first. Select Frame 2 from the Timeline and then select the ground layer from the Layers Panel. Press CTRL+A to select the entire layer, CTRL+C top copy it, then use the move cursor to drag the ground tiles 4px to the left. Use the info panel in the bottom right of the screen to see how far the image has moved. The movement is displayed in X/Y coordinates, so it should read (-4,0), showing it has moved four pixels to the left and not up or down at all. Right-click off of the image to commit the placement change.
Now that the ground tiles have been moved in the frame, there is a 4 pixel gap on the right. Press CTRL+V to paste a copy of the ground tiles into the layer, then use the move cursor to align the copied tiles to the right edge of the ground tiles you just moved. Again, right-click to commit the changes.
Repeat this process, selecting each successive frame, selecting the ground layer, selecting the contents of the layer (CTRL+A), copying the layer contents (CTRL+C), using the move cursor to shift the tiles to the left, right-clicking to commit the change, pasting a copy of the ground tiles (CTRL+V), aligning the edges of the ground tiles, and right-clicking again to commit.
Move the ground tiles 16px to the left (-8,0) in Frame 3, and 24px to the left (-24,0) in Frame 4. In Frame 5 the ground does not move, so this can be skipped. Move the ground tiles to the left 8px in Frame 6, 16px in Frame 7, and 24px in Frame 8.
Once the ground tiles have been moved across all of the frames, look at the preview animation to the lower right. Is the ground scrolling smoothly across the canvas? If there are any awkward spots in the motion use the Next Frame/Previous Frame

arrows in the bottom of the toolbar to shuffle through the frames and locate which frame is causing problems. If you’ve identified a problem, select that frame in the Timeline, select the ground tiles in the Layers Panel, and make adjustments.

At this point you should have a decently animated scene, but by adding parallax scrolling we can make it better. Select Frame 2 and select the mountains layer. Because this layer is meant to be further in the distance it should move more slowly. Using the same process we did for the ground tiles, shift the mountains to the left as follows: Frame 2: -4px (-4,0); Frame 3: -8px (-8,0); Frame 4: -12px (-12,0); Frame 5: -16px (-16,0); Frame 6: -20px (-20,0); Frame 7: -24px (-24,0); and Frame 8: -28px (-28,0). Now your animation should look like this:
If you are satisfied with the animation or short on time you can end here, as you’ve successfully created an animated GIF with a parallax scrolling background! Go to File>Save As and choose GIF as your file type, name and save your file. If you want to resize the image before saving, go to All Frames>Resample, uncheck Smooth, and change the size to 200% or 400%.
If you’d like, you can push the animation one step further by repeating the process for the background layer, moving the background 2 pixels to the left each time. Frame 2: -2px (-2,0); Frame 3: -4px (-4,0); Frame 4: -6px (-6,0); Frame 5: -8px (-8,0); Frame 6: -10px (-10,0); Frame 7: -12px (-12,0); and Frame 8: -14px (-14,0). This should be your final output:

Conclusion
Parallax scrolling lends a sense of depth to scenes within a game or application. Scrolling is not limited to side-to-side movement. Vertical shooters and flight games often use parallax moving from top to bottom, some platforming games have multiple layers that will move at different rates in all directions depending upon the player’s input. Combined with atmospheric perspective and distance scaling the effect can be quite stunning and lend a level of polish to your games. The number of layers used is ultimately up the the artists’ taste and time constraints. You could even have animated elements within your scrolling layers to really make the scene feel alive. Play around with layers and scrolling and see what you can create!
Resources
Additional Resources
- Lessmilk Pixel Art Run Cycle
- Game Development Parallax Scrolling
- Luis Zuno – Parallax Forest Timelapse
Social Media Resources
- PixelJoint
- Pixelation
- Reddit – /PixelArt
