
Introduction
Note: This tutorial builds off of a technique used in the tutorial Working with clones in Scratch: Making fancy text that reads text and printed it out using clones in Scratch. If you have not yet completed that tutorial, it is strongly recommended that you do so before continuing with this one.
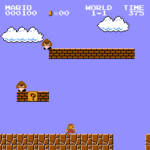
Numbers play an important role in games and game design. From simulating physics to dialogue choices, numbers are used behind the scenes to define and structure gameplay and game mechanics. They also play an important role for the player, providing information about the player’s status and progress. Consider the screenshot below from Nintendo’s Super Mario Bros.:

Source: Retrieved from Super Mario Wiki
You can see a handful of numbers at the top that tell the player:
- their current score (status)
- number of coins they’ve collected (status)
- which world and level they’re on (progress)
- how much time is remaining (status/progress)
Presenting information to the player helps them make choices about how they will play. With the information in the example above, the player might decide to go out of their way to grab an extra coin or two if they’re close to reaching 100 coins for the 1-UP; or skip trying to gather coins altogether if they’re running low on time.

Scratch offers three built-in styles to display numbers: Two of them are the Looks blocks “Say text” and “Think text” and the third is the variable display itself, which can be a small readout or a large readout. While this basic functionality is useful, a custom display would be aesthetically preferable and potentially more functional than what is already offered.
In this tutorial, you will learn how to parse numbers in Scratch so that they can be written out in a custom font, using clones, to create such a custom number display. You can use this technique as the basis for creating better looking readouts for things like timers and counters (for example, score or “lives” counters) that you might want to use in your game. You will also learn how to trace a program’s execution to help you understand how it runs and how existing code might be adapted for your purposes.
A starter project has been prepared that has a sprite with custom art costumes for the numbers 0 to 9. This will be used as the starting point for the tutorial, though if you wanted to, you could make your own custom number art. The starter project also contains code that was used previously to write out fancy letters. You can adapt this code to fit this tutorial or you can create it yourself.
Vocabulary
Decrement (programming) - Decrementing is the opposite operation of incrementing and means decreasing a variable by 1. See “Increment (programming)” for more details.
Increment (programming) - As seen in the often-used phrase “incrementing a/the variable”, incrementing means to increase by one. This is a common operation in coding, being used with a counter variable to keep track of the number of times that code runs or to read through text character-by-character. Decrementing is the opposite operation and means decreasing by one.
Parsing (programming) - Parsing (from the verb “to parse”) means reading and understanding something. Computers often are required to parse data, such as numbers and text, in order to be able to do something with it.
Tracing (programming) - Tracing the execution of a program means to run code “manually” and keep track of the results. Tracing is done to understand what a program does (if you’re unable to run the program) and how it does it and also to track down bugs that might occur.
Materials
- Scratch (online or desktop)
- Fancy numbers in Scratch (starter project)
- Fancy numbers in Scratch (completed project)
Computer Activity
Starter project
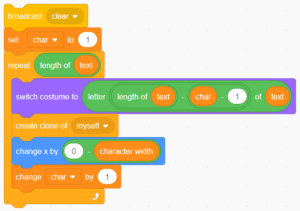
The starter project for this activity provides you with a sprite with costumes for the numbers 0 to 9 as well as the code below, the development of which can be reviewed in the Working with clones in Scratch: Making fancy text tutorial. As an exercise, look at the code and try to explain to yourself what it does.

Being able to read code and determine its function is an important skill to develop so that you can learn from, use, and repurpose code that others have written. It’s useful to be able to do this both overall—i.e., figuring out what an entire block of code is supposed to accomplish—and in smaller chunks—i.e., figuring out what individual lines or blocks do or how they contribute to fulfilling the purpose of the code.
Being able to read and understand code is based on both knowledge and experience: the more you know about the language the code is written in (in this case, Scratch blocks), the easier it is to understand what it’s supposed to do; likewise, the more code that you’ve seen and the more ways you’ve seen it used allow you to compare new code to previous code and make it easier to understand. Knowing that the code was from a previous tutorial on fancy text, you might have determined (or guessed) that the overall purpose of this code was to write out a piece of text using sprite clones and custom costume art. For line-by-line explanations, I’ve provided an annotated version of the code below, using the Scratch “comment” feature:

From text to numbers
Since the goal of this tutorial is to learn to create fancy/custom numbers in Scratch, you first need to think about the similarities and differences between numbers and text, especially where it might mean changing the code that you already have. I’ve listed some important similarities and differences below, but before reading them, I want you to think about it and come up with some of your own. Compare the ones you came up with to the ones I have below. Did you miss something? Did I miss something? How might you plan for the impact of the similarities and differences?
- Numbers can be treated as text in Scratch so the same basic structure for reading data, whether it’s a number or a line of text, should stay the same. The starter project already includes code that we can use for this purpose. ✔
- Text (letters) and numbers look different so new costumes for the sprite will be needed. Luckily, the starter project covers this difference. ✔
- Numbers used in timers and score counters don’t usually have blank spaces, so accounting for blank spaces shouldn’t be needed. ✔
- Because of how numbers are conventionally read, counters and timers tend to be right-hand aligned, that is, the rightmost digit stays in the same place and the numbers are added relative to it, on the left. This means that the numbers should be read and placed right-to-left, starting with the “ones” digit on the far right.
- Timers may include a decimal point, and if they have a decimal point, a specific number of numbers after the decimal needs to be set. This is a special case that will not be addressed, so timers for now will be limited to whole numbers only. ✘
I’ve put checkmarks (✔) beside the ones I think are mostly or already addressed. I put an ex (✘) beside #5 to indicate that while it is an important consideration, I will not be addressing it in this solution. Figuring out how to address #4—reading and displaying digits in reverse order—means adapting the code that we already have and changing it so that it does what we want.
Reading numbers right-to-left
To change from left-to-right to right-to-left, you first need to figure out what part of the code controls what character is being read. In the code I’m using, the current character is selected by the “Letter # of text” Operator block:

As I’ve currently set up the loop, it increments “char” each time it runs, such that the character that is being selected moves from left to right. To help illustrate this, I will do what’s called “tracing”: manually simulating or keeping track of the values of variables in a program as it runs. I will use a table to help organize this information. I will record the value of “char”, the number of times the repeat block has run, and the letter that is being selected out of the word “Pinnguaq” as part of my trace:
| Repeat block count | char (variable) | text (variable) | Letter (char) of (text) |
| 0 (not yet run) | 1 (initial value) | Pinnguaq | — (not yet run) |
| 1 | 1 | Pinnguaq | Letter 1 of Pinnguaq = P |
| 2 | 2 | Pinnguaq | Letter 2 of Pinnguaq = i |
| 3 | 3 | Pinnguaq | Letter 3 of Pinnguaq = n |
| 4 | 4 | Pinnguaq | Letter 4 of Pinnguaq = n |
| 5 | 5 | Pinnguaq | Letter 5 of Pinnguaq = g |
I only ran the Repeat block 5 times, but I think you get the idea. You can use this understanding of how the “Letter # of text” Operator works to express the question or questions you will need to answer. With the example text of Pinnguaq, one way to express the question would be:
q = Letter ? of Pinnguaq
Or, broken down:
- What character number is the q?
- And then, looking at the table above, once you figure out that number, how can you decrement that number—to move left—as another number increases?
Try to answer these two questions yourself before continuing.
For #1, the answer seems obvious when written, but might not be immediately apparent: the last letter of a given text is the same as the number of characters in the text (that is, the length of the text). So in my example, “Pinnguaq” is 8 letters long, so the letter “q” is the 8th character. Thus:
| text (variable) | Letter # of (text) | # | Length of text − ? = # |
| Pinnguaq | Letter 8 of Pinnguaq = q | 8 | 8 − 0 = 8 |
| Pinnguaq | Letter 7 of Pinnguaq = a | 7 | 8 − 1 = 7 |
| Pinnguaq | Letter 6 of Pinnguaq = u | 6 | 8 − 2 = 6 |
| … | … | … | … |
| Pinnguaq | Letter 1 of Pinnguaq = P | 1 | 8 − 7 = 1 |
So all you would need is a counter that runs from 0 to 7 (the length of the text − 1) to be able to go from the last letter of Pinnguaq to the first, since Scratch has an Operator that can tell you how long a word is, “Length text”:

This is actually already being used in the starter project to set the number of times the Repeat block runs. In terms of repurposing code, the “char” variable in the starter project already runs from 1 to the length of the text, so it’s just a matter of subtracting 1 from it when it is used to make it run from 0 to the length of the text − 1.
Try making the modifications to your code for it to read text backwards yourself, before looking at the solution below.

In my solution, there are only two changes between the left-to-right parsing and the right-to-left parsing:
- The “Letter # of text” operator now selects from the last character (which is the same as the length of text) to the first character.
- The “Change x by” block that’s used to space out the characters as they’re written uses a Subtraction operator to convert a positive number (character width) into a negative number as “left = negative x” is the Scratch coordinate convention.
Conclusion
In this tutorial, you learned how to adapt existing code to serve a new purpose and learned about program tracing and how it can help you understand new code. Your adapted code can be used as the basis for creating number readouts in your Scratch projects. There are at least three issues still outstanding, though:
- How can a number readout be refreshed or updated?
- How fast or how often does a number readout need to be refreshed or updated?
- Related to #2, as more and more digits are written, the display takes longer to update. How can a number readout be displayed all at once?
Are there other issues that you can think of? While #2 and #3 require a more in-depth discussion than will be covered in this tutorial, as an extension, I want you to think about how you might solve #1. Keep in mind how we’re creating the readouts (using clones) and what tools exist to work with clones, namely:

Since this tutorial is building off of code from the Working with clones in Scratch: Making fancy text tutorial, I want you also think about how a solution you come up with for this problem might later be used to enhance the custom text writer that you developed in that tutorial.
Additional Resources
- Scratch
- Scratch Wiki (Cloning)
- Learn Scratch with Pinnguaq! (Scratch Studio)
You might also like
Fancy numbers in Scratch: Deleting clones and using custom blocks
 Middle – Grade 12
In this tutorial, you will learn to create an updatable number readout using custom numbers in Scratch, through learning to manage Scratch clones as well as through using Scratch’s custom block (“My Blocks) feature.
Working with clones in Scratch: Making fancy text
Middle – Grade 12
In this tutorial, learners will explore using clones to display text using a custom font in Scratch.
Player control in Scratch: Adding acceleration, speed, and friction
Grade 7 – Grade 12
In this lesson students will be introduced to the techniques of adding acceleration, speed, and friction in Scratch!
