
Section Navigation

Introduction
Students will learn what is involved in developing an app, and the basics of app programming using App Lab on code.org. They will add different elements to their app and learn how to change and customize their properties. Students will have an opportunity to brainstorm how and where different elements can be used in the creation of an app.
Learning Goals
By the end of this module students will have a basic understanding of app development, and specifically, how to program an app using App Lab. They will know how to add elements and adjust their properties.
Vocabulary
Screen - Displays what your app looks like on a mobile device
Toolbox - Contains various blocks and elements needed for coding your app
Workspace - Where you place your coding blocks to program the different elements in your app
Element - A part that can be programmed or interacted with
Property - Qualities and characteristic of elements
Hex (Hexadecimal) Colour Code - A 6-digit value that represents and specifies colour; often used with HTML
Guiding Questions
- Do you use apps on your mobile devices?
- Have you ever wondered how apps are made?
- Have you ever used an app and wanted to modify it to make it better?
Curriculum Links
This module aligns with the Computer Science curriculum as it teaches basic programming skills and app development. It aligns with the English curriculum as students draw on their writing, language and critical thinking skills to plan their app in a wireframe, noting what the app will do, who it is for, the needs and desires of their audience.
Materials
Code.org Account – Sign up for Code.org (email required)
Non-Computer Activity
Begin the module by watching the Intro to App Lab video. It will give students an idea of what is possible and inspire them to think about what they would like to design. This video has been screened and is appropriate for all ages.
Brainstorm different ideas for apps as a class. List things that should be considered when making an app (purpose, audience, appearance, etc.).
Computer Activity
Students will use App Lab on Code.org to create a simple app. After learning some basics about programming in App Lab, they will have time to play with and explore various elements. At the end of the module they will share their apps with their classmates.
Getting Started
- After logging in, selecting “Projects” from the upper navigation bar takes you to a page that lists your projects.
- Continue working on a previous project under “My Projects”, or start a new project by clicking the “App Lab” button.
- With a project open, select “Rename” from the upper navigation bar to rename your project, then select “Save”.
- Across the top of the mobile device screen are three tabs: Code, Design and Data.
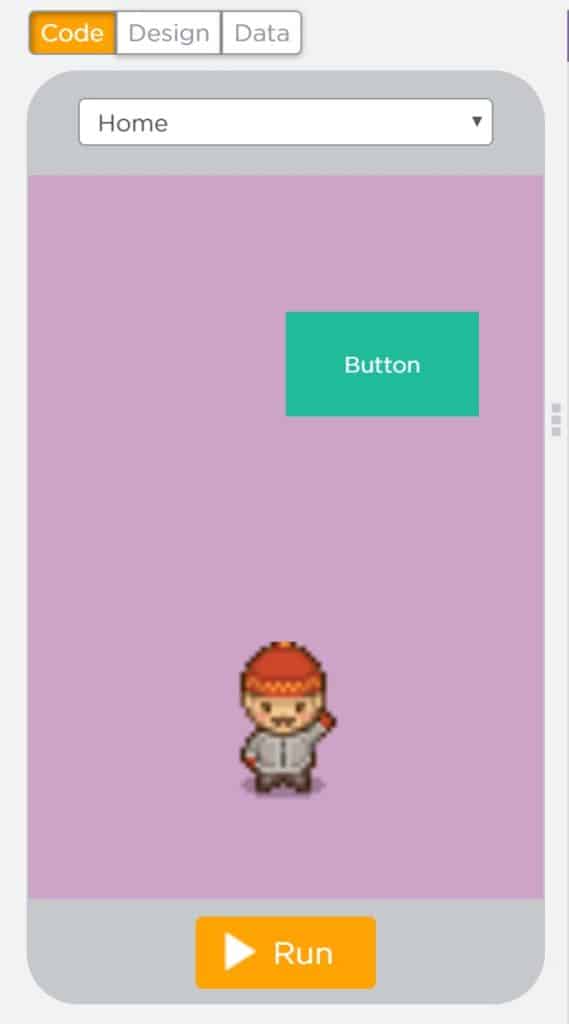
- The Code tab is where you program elements of your app. The Design tab is where you add elements to your app. The Data tab is where you collect and manipulate data from your app.
- App Lab automatically saves your work, so there is no need to save while working on your project.
- To use coding blocks, drag them from the “Toolbox” to the Workspace. To remove a coding block, drag it out of the Workspace.
- To adjust the position of elements on your mobile screen, click and drag them while in the Design tab.
- The screen width is 320 px and the height is 450 px. The position of elements is set using x and y coordinates measured in pixels.
- When your mouse is on the screen it displays the location in pixels.
- The (0,0) position is the upper left corner of the screen.
- Positions are measured from the upper left corner of the element.
- In the upper right corner of the Workspace, the “ Show Text” button changes the programming from blocks to text. App Labuses HTML and CSS coding.
Changing Element Properties
There are two ways to change the properties of your screen and other elements. One method involves coding and the other method involves changing the properties in the Design tab.
Using coding blocks:
- Click the “Code” tab.
- Under “UI Controls”, click and drag the “setProperty” block to the Workspace.
- There are three drop-down menus on the block that will change based on the elements you have in your app.
- The first menu lists the various elements you have added to your app, the second menu lists properties that can be modified, and the third menu lists specific qualities, and changes depending upon which property was selected from the second drop-down menu.
- The code below is changing the “Home” screen’s background colour to yellow.

- The font size, height, width, and location for items like buttons or text is adjusted using the second drop-down menu.
Using built-in property settings:
- Click the “Design” tab.
- The “Properties” tab opens by default, and contains the field “id” where you change the name of an element.
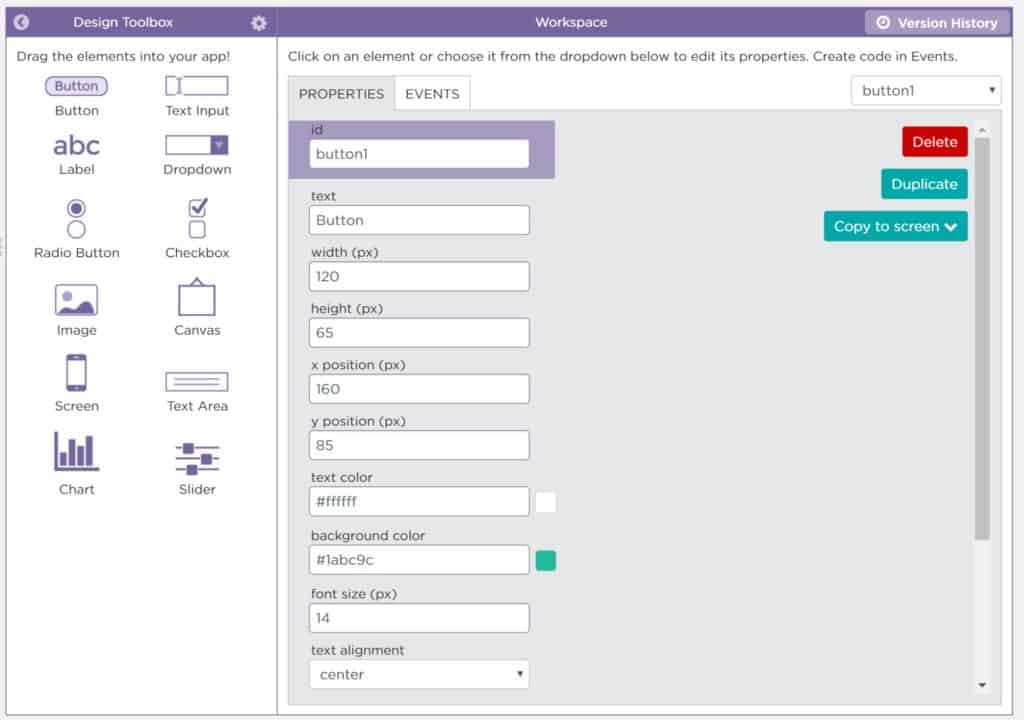
- Under “background color” enter the Hex code (6-digit value following a hashtag) of a colour.
- Alternatively, click the coloured square to the right of the “background color” field to select a colour using the colour picker.
- To switch what element is being adjusted, select it on the mobile screen display.
- For items like buttons or text you can adjust font size, width, height, and position on the screen by typing in the values.
- Element size and position can be adjusted by dragging the element, and dragging the corners to change the size.
- The “depth” of an element adjusts its layer position in relation to other elements on the screen.
Events
To make your app interactive you will need to program events such as when elements are clicked.
- Click the “Code” tab.
- Under “UI Controls” drag an “onEvent” block to the Workspace.
- The “onEvent” block has two drop-down menus. The first menu lists the elements you have in your app by their “id” name, and the second menu lists interactions.
- The “onEvent” block is a loop that waits for the interaction to happen then performs the instructions inside the function loop.

- Different blocks can be added within the loop. You can change the element you are interacting with or other elements.
- To change the screen, use the “setScreen” block and select a screen from the drop-down menu.
- To add a new screen, drag a “Screen” element onto the mobile display screen from the “Design” tab.
- Elements can be hidden or shown using the “hideElement” and“showElement” blocks.
- If you are unsure how to program an element, add a preset code from the “Design” tab:
- In the Workspace click the “Events” tab then click the hyperlink “Insert and show code”.
- You should now see a block of code that will program the added element. Depending on the element you will see different properties that you can change and adjust.
Elements
Have students experiment and play with the different elements, and explore what each element is capable of when programmed. Students can be assigned specific elements or given time to explore. Below is a brief description of what each element does.
- Button – A graphical element that allows users to trigger an event, or interact with.
- Text Input – An area where users can input type. You can program your app to collect this information for later analysis.
- Label – Allows you to add any text that can be purely for display or information, but can also be programmed to be interactive.
- Drop-down – A list of options from which users may select one.
- Radio Button – A circular icon that accompanies each option in a list of options, of which users may select one.
- Checkbox – A rounded edge square icon that accompanies each option in a list of options. It is similar to a radio button, except that users may select multiple items.
- Image – Allows you to add images to your app. These could be background images, or could be programmed to be interactive.
- Canvas – Creates an area where users may draw on the app.
- Screen – Adds a new screen to the app, much like adding a blank page.
- Text Area – Similar to the Text Input element but provides more space for text entry.
- Chart – Displays a graphical representation of data that has been provided.
- Slider – Allows users to set a value by moving the indicator. The value from this can be collected and used in other locations in the app.
Conclusion
Students will share their apps with their classmates, explaining how the app works, and what elements they used, and why. Allow these student presentations to lead to a discussion about other ways these elements could be used.
Writing activity: write a plan for an app you would like to create. Include information that needs to be considered (using the list the class created at the start of the module). Draw a wireframe (app storyboard) that shows the different screens on your app and what functions they will have.
Resources
- Creative Spirits has a page of sorted Indigenous apps that summarizes the app and includes links.
- Biznessapps explains the process of building an app in detail.
- Code.org has a studio where students can post projects they have made. Some projects were made using App Lab and could be helpful inspiration for students.
- Hongkait has a variety of technology resources. This is a link to an article about teenage app developers.
You might also like

Game & App Development
Our games and apps provide unique learning experiences tailored to teach digital skills and promote culture.

App Lab Personality Quiz
 Grade 9 – Grade 12
Learn how to use App Lab to create a personality quiz! Students will generate questions to reach target audiences and create an app.
