Section Navigation

Introduction
Audacity is a free program that allows you to record and edit audio. Audacity can be used to record songs, audiobooks, podcasts, and lessons. Oral Communication is an important aspect of Indigenous tradition and culture. Bringing Audacity into the community can provide new opportunities to preserve and document communications.
Learning Goals
Students will learn how to navigate Audacity, and will understand key concepts and terms. After completing this module, students will be able to perform and accomplish various recording and editing tasks using the Audacity software. The main objective is to give students the resources and recording knowledge they need to go into their communities and record their culture and traditions.
Vocabulary
Gathered by referencing the Los Senderos Studio’s glossary.
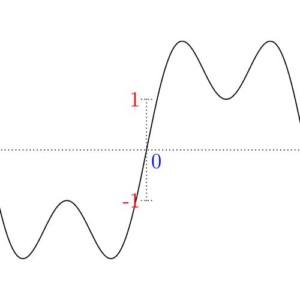
Amplitude - The level or magnitude of a signal
Audio Signal - Information such as sound waves
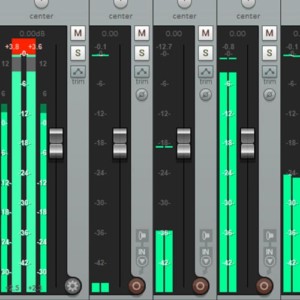
Channel - A path in a device through which data or an audio signal can be routed
Compress - To reduce the dynamic range of an audio signal using a compressor
Effects - Functions or processes that enhance or modify sound using signal processors
Frequency - The number of cycles per second of a waveform measured in hertz (Hz)
Gain - An increase in audio signal level
Mute - The button or control used to silence an audio signal
Normalize - To adjust the level of an audio signal to maintain a consistent level of loudness
Pitch - The musical quality of a tone as determined by its frequency
Soundwave - The periodic variations radiating from a sound source. The sound source is something vibrating
Tone - A musical note
Trim - To remove a portion of an audio clip or region
Audio File Formats
A method for storing digital audio data as a file on a computer system. Information gathered from the Audacity Manual Glossary.
AUP - File extension for a project file used by Audacity audio software
Mp3 - A standard technology and format for compressing a sound sequence into a very small file while preserving the original level of sound quality when it is played
WAV - A Microsoft and IBM audio file format standard for storing an audio bitstream on PCs
Guiding Questions
- What do you know about sound recording?
- If you had recording skills, knowledge and tools, what types of things would you record?
- What kind of stories would record in your community?
Curriculum Links
This module aligns with a number of curricula: Language Arts, English, Computer Studies, and Technology through the use of the program itself, and any other curriculum depending on the content students produce and record. On her blog, Digital Literacy Coach Keri-Lee Beasley shares some great suggestions on how to use Audacity with students, such as recording speeches, creating sound stories, or recording class singing, to name a few.
Materials
- Audacity – Download Audacity
- Transport Toolbar Worksheet, Toolbars and Functions Worksheet and Labelled Toolbar Handout – Download Assets Folder (ZIP)
Non-Computer Activity
Label Toolbar Worksheet
Allow students to review the Labelled Toolbar Handout (available to download in this lesson’s assets folder (ZIP)) and then explore Audacity to begin familiarizing themselves with the various tools. Once students have explored the program for a few minutes, have them complete the labeling worksheets.
Computer Activity
Recording audio is very useful for preserving a community’s history and culture. Stories, legends, historical information, and songs can be saved for future generations to hear.
After reviewing the basics of Audacity, write a short story about one page in length, and then record it using Audacity.
How To Record
1. Plug in your recording device
Plug your microphone or recording device into your computer, or use the built-in microphone if your computer has one. A built-in microphone creates a lower sound quality, as it allows for more ambient noise, but it would suffice for this exercise if a proper microphone is not available.
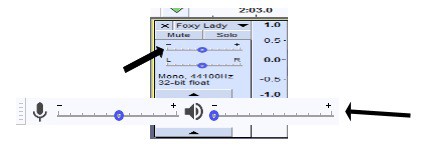
2. Selecting your recording device
Select your device from the drop-down menu beside the microphone icon in the Device toolbar at the top right of your screen. If you are using the built-in microphone in your laptop select ‘Built-in Microphone’.

3. Recording
For the best quality, find a quiet environment to work in (some podcasters record in a closet)! To ensure a clear recording, keep a distance of two fists between the microphone and your mouth. Before pressing record, turn on monitoring in the Recording Meter toolbar.

When you are ready to record, click the Record button on the Transport toolbar. When you are done recording, click the Stop button in the Transport toolbar.
4. Editing track
Once your recording is done, you can adjust the gain (an increase in the audio level).
5. Save and Export your project
When you have completed your recording go to ‘file’ and press save. This will save your project as an .aup file which can be edited at any time. Then export your file as a WAV or MP3 file so you can listen to your track on other devices.
Conclusion
To conclude this module, have students complete the Toolbars and functions worksheet (the Audacity Manual can be used as a reference). It is a more complex worksheet requiring a brief description. It includes all the toolbars covered in the module.
Resources
- Audacity Manual
- Audacity Manual – Getting Started
- Audacity Wiki – Tutorial Category
- Free Audacity Tutorials – Beginner Tutorials
You might also like
Signal Processing 1
 Grade 10 – Grade 12
Students will be introduced to signal processing and the theoretical behaviours needed to interpret pattering within a physical world.
Introduction To Sound Design With Reaper
Grade 6 – Grade 9
This lesson introduces students to sound design with Reaper as well as how to edit basic audio.
Introduction To Sound
Grade 6 – Grade 9
Students will be introduced to how sound works, how to describe it, and understand the different aspects of sound.
