
Section Navigation

Introduction
Students will be introduced to 3D modeling using Blender. This module will teach students some of the basic menus and modes used in Blender. Students will be encouraged to take these skills and model their own ideas.
Learning Goals
With this course students will learn how to:
- Navigate in 3D space and tools
- Create and model a mesh
Curriculum Links
This module provides an opportunity to address curriculum expectations in the Arts, Computer Studies and Math Grades 9 to 12 expectations. In particular, students will have an opportunity to develop spatial thinking skills, investigate geometric relationships and use a new software programme (Blender). This assignment will also demonstrate how art and engineering come together to create 3D characters and objects when telling a story.
Guiding Questions
- What is 3D modeling?
- Where do you see 3D modeling being used today?
- What is the difference between 3D and 2D?
Vocabulary
ViewPort - This is where you see all of the objects of your scene.
Axis - Axis’ are imaginary lines that help us and the computer navigate 3D space.
Orbiting - Rotating your view around a fixed point or object.
Panning - Sliding the view up down left and right.
Pivot Point - The red blue and green arrows that appear on an object when it is selected. Usually the center of an object and is where the object is moved, rotated or scaled from.
Translate - Sliding an object in 3D space.
Rotating - Turning an object in 3D space.
Scale - Manipulating the size of an object in 3D space.
Mesh - A mesh is a collection of vertices, edges, and faces that describe the shape of a 3D object.
Vertex - A vertex is a single point (the plural of vertex is “vertices”).
Edge - An edge is a straight line segment connecting two vertices.
Face - A face is a flat surface enclosed by edges (some other applications call these “polygons”).
UV Mapping - UV mapping is the 3D modeling process of projecting a 2D image to a 3D model’s surface for texture mapping. The letters “U” and “V” denote the axes of the 2D texture because “X”, “Y” and “Z” are already used to denote the axes of the 3D object in model space.
Materials
- Blender – Download Blender
- Paper with dice map
- Scissors
- Tape
- Coloured pencils or markers
Computer Activity
Part 1 – Exploring Blender’s Interface
To begin set Blender to Factory Settings. Under File (top left of your screen) select Load Factory Settings. This should display a camera, light, cube, and a grid.

You will notice there is a blue, green, and red line. These are your axis , you can remember these by:
- Blue = Z
- Red = Y
- Green = X
There is different Modes you can work in.

- user can add and view an object.
- user can edit an object.

- user can sculpt the object.

- paint mode where the user can paint only on the created objects vertices.

- this mode is used to rig meshes and add weight to an object.

- a mode the user can paint directly on your 3D model.
For this activity we will only use ‘Object Mode’, ‘Texture Paint Mode’ and ‘Edit Mode.’ The other Modes are used for intermediate to advanced users.
For new Blender users the interface can be confusing. To demonstrate how to use the interface to your advantage, we are going to close and move some windows.
- Left side of the screen: Our toolbar. This is used to edit and create objects. For this we won’t be needing it open. You can close it by hitting T on your keyboard.
- Right side of the screen: This is our properties and Layers tab. We also won’t be using these for this project. To do this drag the triangle in the corner of your 3D viewport into the properties tab.
- Bottom of the screen: another toolbar. To demonstrate how this works we can move the toolbar to the top of the page by right clicking inside of the toolbar and selecting “flip to top”
Moving in your scene is easier than you think. It’s all in your mouse.
- Left click: 3D cursor in Object Mode, you can also move parts of your object with left click in Edit Mode.
- Middle Mouse Button: Orbits around the object.
- Right click: Select parts of your object in Edit Mode, free move in Object Mode.
- Zoom: You can zoom in and out with the middle mouse wheel and scrolling.
- Strafe: Holding Middle Mouse Button and Shift you can move vertically and horizontally across the screen.
Part 2 – Modeling
- For this lesson we are going use our cube.
- If you hit X you can delete your object. If you use shift+A you can add an object.
- Lets hit tab on our keyboards and enter into Edit Mode. Here we can see that our object is selected. If you look at the top of our screen on our toolbars, you can see three boxes. Those three boxes are different parts of our object.

- Vertex: the meeting of two edges.

- Edge: the meeting of two faces.

- Face: the full side of an object.
You can see that when you go into one of these selection modes, you can right click on the edges or faces to see what each mode does.
I find the best way to understand modeling is to model something. So, to begin we are going to model a bookcase. This will be very low-poly and nothing too difficult.
- Start in Object Mode. You can use “tab” on your keyboard to hop between Object Mode and Edit Mode.
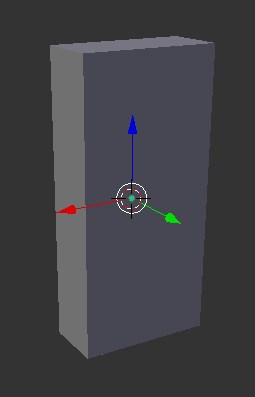
- Scale your object by hitting “S” on the keyboard, then hitting “X” “Y” or “Z”. Use “S, X” to make your cube wider. Then use “Z” to make your cube tall. This is what the basic shape of the bookcase should look like:
- Now go into Edit Mode. Here we are going to use loop cuts to make our case. Loop cuts is a way to make more edges in your object. Loop cuts add more geometry to your shape. To make loop cuts you can use “Ctrl+R” on your keyboard. Depending on where your mouse is on a shape you can add a loop cut going horizontally or vertically.
- When you make a loop cut you click on your object to confirm the loop cut, then drag your mouse to move it where you want.
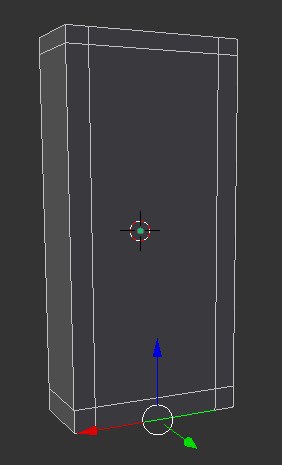
- Here is what the beginning loop cuts should look like for the outer case:
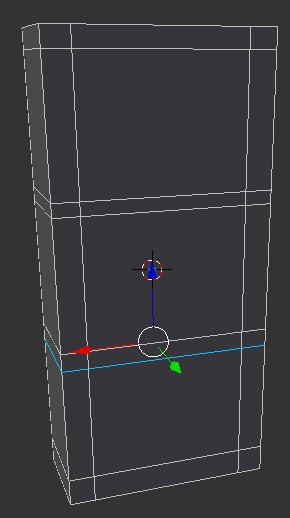
- Now to make the shelves we need to add loop cuts in the middle. Here is what the shelf loop cuts should look like:
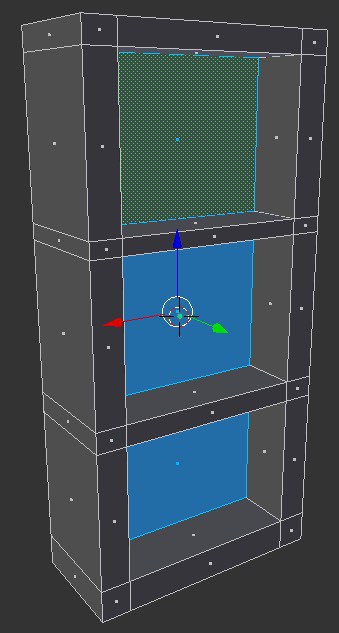
- Now we are going to extrude our shelves inwards. Extruding faces on your shapes allows you to add more shapes or invert shapes. Today we are going to invert the shelves. To do this select the three shelves using shift + right click. Then hit “E” on your keyboard and drag your mouse forward to make the faces inverted.
- Here is what your shelves should look like now:
That’s it! But now we need to unwrap our bookcase and paint it!
Part 3 – Unwrapping and Painting
- We are going to continue using Edit Mode. At the top corner we are going to add another window by using the triangle.

- and dragging it over. Then we need to change our 3D View into our UV Editor. This is what the menu looks like on your screen:

- remember to choose UV/Image Editor.
- Back in our 3D View we are going to hit “A” twice on our keyboard. This should select you whole entire bookcase. Then hit “U” on your keyboard, this will bring up a menu with all the unwrap options.
- Use “Smart UV” unwrap. This will bring up the cleanest UV map for us to be able to paint on our bookcase.
- Now back in our 3D View we are going to go into Texture Paint Mode. Make sure that you are viewing your Texture.

- Our object will be bright white, to fix this bring up your tool bar menu by hitting “T” on our keyboard. It will say a UV map is missing, so we are going to add one by adding a “diffuse map” in the dropdown. Our object will now be black.
- In Texture Paint Mode you will see a colour wheel and different brush types. Choose a colour and click and drag your mouse across your object. You can make your brush bigger or smaller by hitting “F” on your keyboard and dragging your mouse in or out. If you mess up you will have to use “Ctrl+Z” on your keyboard, unfortunately there is no eraser. You will need to move around to be able to paint parts of your object.
- When you paint on your object it shows up on your UV Map.
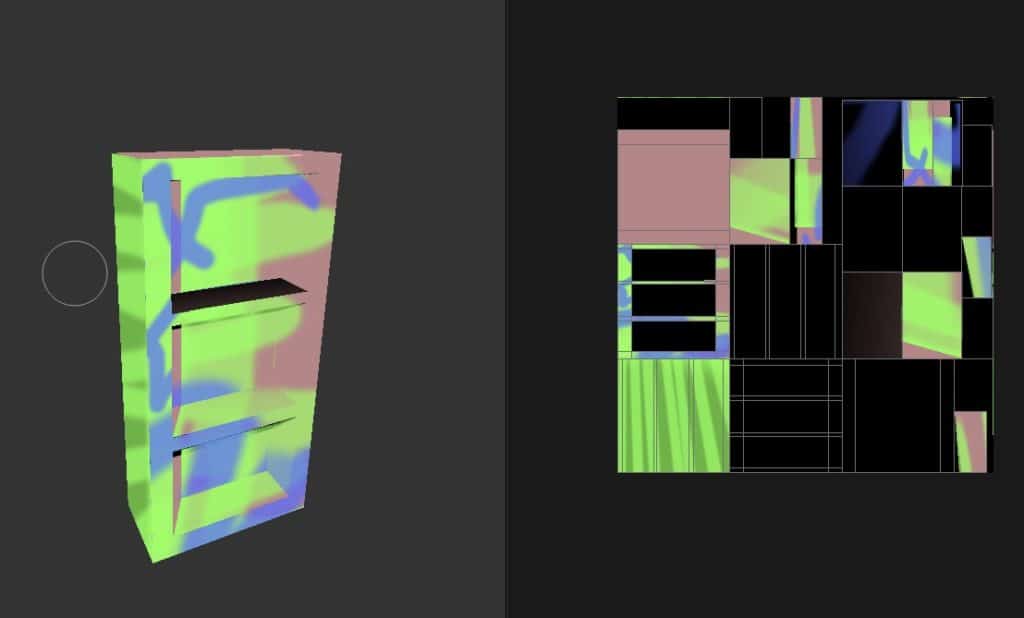
- You can always look between the two to see how your UV map looks.
- Go ahead and paint all over your bookcase!
Conclusion
Learning Blender takes time to explore and practice. Introduction to Blender Part 1 explores basic tools in Blender. To put these tools to use and continue working on your bookcase, check out the module Introduction to Blender Part 2.
Resources
Additional Resources
- Blender Tutorials are great for beginners.
Social Media Resources
- Blender on Twitter – @blender_org
- Blender News on Twitter – @BlenderToday
You might also like

Building A House In Unreal 4 Series
In this lesson plan series, author Leah Jackett takes students and teachers through a introduction to Unreal 4, how to plan and build a house in Unreal, and add assets into your created scene.
Introduction To Blender: Part 2
 Grade 9 – Grade 12
This lesson introduces new tools in Blender. Students will create a final project in Blender.
Intermediate 3D Modeling In Blender
Grade 9 – Grade 12
Learn how to 3D model an object using a plane, the knife tool, and modifiers in Blender!
