
Introduction
Scratch is an amazing way to introduce children to coding and instill an intrinsic motivation to use code in different ways, such as creating animated stories, interactive games, exciting simulations, and beautiful artwork. In using Scratch, children are developing their computational thinking skills while having the ability to develop their own ideas and bring them to life. In this lesson, learners will be introduced to coding concepts and computational thinking by creating a simple computer game.
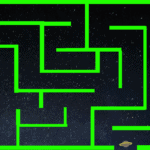
This is a beginner level lesson introducing learners to game development in Scratch. They will design a simple maze game in Scratch where an alien is lost in space and must move through the maze to return to its home planet. Mazes have been around for many years and are a series of pathways and dead ends with one entrance and one exit.
The students will explore how to create their own maze backdrop, how to move their alien sprite with the keyboard arrows, and how to stop the alien from going through the maze walls.
Through creating this game, the learner will use:
- Keyboard inputs
- Touch sensors
- Conditional statements
- Loops
- Movement blocks
- The Dropper Tool
Scratch makes it easy on learners who are just starting out on their coding journey by eliminating the need to write any code script. Instead it uses code blocks that are grouped by category, such as Motion, Events, Controls, Sensing, and much more. These code blocks can be pieced together in the scripts area like clipping lego pieces together. Students can easily test their code and debug problems with their code by having the script area and the stage both visible at the same time.
By learning to code, learners can turn their love of playing games into a passion for making their own games to play and to share. Game design can help develop computational thinking skills and can encourage learners to learn how to program.
What You Will Do
This lesson will teach you how to design a simple maze game in Scratch using keyboard inputs, touch sensors, conditional statements, and different movement blocks, where an alien must move through the maze to return to his home planet.
You will explore how to create your own backdrop, how to move your alien with the keyboard arrows, and how to stop the alien from going through the maze walls.
Step by Step Instructions
Create Your Maze Backdrop:
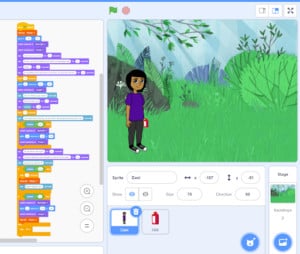
- Delete the cat sprite.
- You are going to start with a space backdrop and then draw your maze on top of it. Add a Space Backdrop by clicking on the Scratch Backdrop Menu, and then clicking on the Space Menu Tab. I chose the Stars background.


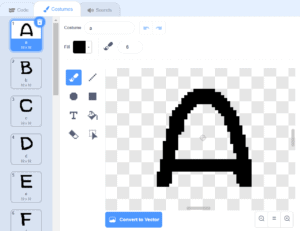
- Click on the paint backdrops tab which will bring you to the area with all of the tools that will allow you to design your own backdrop.

- Use the rectangle tool to draw your maze walls. Click and drag out the rectangles to make your walls.

- Once you’ve created the rectangle, release it and a blue outline will appear around it. You can then click on the blue circles to change the length and width of the rectangle. You can click on the double sided arrow at the bottom of the outline to change your wall from vertical to horizontal, and you can also drag the rectangle anywhere on the background.

- Clicked the filled box to make sure that the walls will be coloured in, and press the colour drop down menu to choose the colour of your walls. Make sure you only use one colour, as that will become important later on when we add code.

- Before you begin creating your maze in Scratch, design a maze that is as simple or complicated as you’d like on paper first. The Pinnguaq Learning Space also has a great lesson on creating a paper maze in the first lesson of the Pathfinder series, which you can access through this link: https://stg.pinnguaq.com/learn/pathfinder-series/paper-pathfinder

- Once you have a design down on paper, you can design it in Scratch.

Add Your Alien and Plant Sprites
- Add an alien sprite and a planet sprite by clicking on the sprites menu. Click the fantasy tab to find an alien, and then type planet into the search bar to find a planet.


- Change the size of your sprites so that they fit inside your maze.

- Click on the sprites on the stage area to move the alien to the beginning of your maze, and the planet to the end of your maze.

Code Your Alien Sprite to Move Using the Arrow Keys:
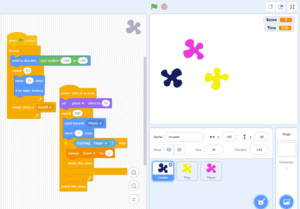
- You are going to add code to the alien sprite. You will know that you are coding the alien sprite because there will be a faded picture of it in the top right corner of the scripts area.
- You want your program to move the alien around whenever the player pressed the arrow keys. To do this you will use keyboard inputs. An input is an action that tells a computer to do something. For your inputs you will go to the yellow events group in the toolbox and choose a “when key pressed” block. Click the drop down menu and change it to the “up arrow”. This means that when you press the up arrow, the code you add underneath it will run. Do this for all the arrow keys.
- Now choose the point in direction block from the blue motion command group and add one under each of the “when key pressed” blocks. This block allows you to pick the direction that your sprite faces.
- Click on the white bubble in the “point towards” motion block and move the arrow dial around to face in the direction of the arrow key you’ve chosen in the “when key pressed” event block. For the up arrow, the dial should be moved to face upwards. Set the direction for every arrow key.
- Now test your code by clicking on the arrow keys. You will notice that the alien sprite will face in the same direction of the arrow key that you press on your keyboard, but the alien isn’t moving anywhere. You need to add a “move 10 steps” movement block under each program. This will make the sprite also move in the direction of each arrow key.
Prevent Your Alien From Going Through the Maze Walls:
- Right now the alien can move through walls. In order to stop this we must add more code. Add a “when green flag clicked” event block.

- Add a “forever loop” control block underneath the “when green flag clicked” events block. This means that whatever code we put inside the “forever loop” will keep running over and over again.


- Next, grab the “if…then” block from the controls command group. This is a conditional statement block that means if one certain thing happens, then something else will happen. Put the “if…then” conditional block right inside the forever block.

- You want the alien to turn around and go backwards away from the maze ONLY if it touches the maze wall. Add a “touching color” sensing block to check whether the alien is touching the wall. Drag this block in between the if and the then of your conditional statement block.


- To change the colour, click on the bubble and then choose the dropper tool. Hover the tool over your stage until the outline of the dropper tool turns to the colour of your maze walls and then click. This will change the colour in the “touching colour” sensing block.


- Now your conditional “if….then” statement says that if the alien touches the green wall, then something else will happen. You want the something else to be the alien jumping back from the wall to make it look that he cannot walk through the walls. Add the “turn right 15 degrees” movement block into the “if…then” block and change the 15 to 180. This will make the alien sprite turn around.

- Now add the in a “move 10 steps block” underneath the turn block so that the alien will move backwards away from the wall.

Test your code! Now you’ve made it so that the alien cannot move through the walls.
Code Your Alien to Start At the Entrance of The Maze Every Time You Play Your Game:
- You want your alien to always start at the beginning of the maze everytime you play the game. So make sure the alien is at the entrance of the maze and then add a “go to x: y:” movement block underneath the “when green flag clicked” events block. The numbers beside the x and the y will measure the exact location of the alien on your stage.

Now your game is complete!
Video Tutorial
Part 1
Part 2
Share your work with us! We want to see the awesome things you’re creating with Pinnguaq. Share online with us and tag @pinnguaq on Facebook, Twitter or Instagram for your work to be featured. Don’t forget to include the hashtag #LearnWithPinnguaq! Keep tuning into Pinnguaq for more lessons and fun activities!
You might also like
Player control in Scratch: Adding acceleration, speed, and friction
 Grade 7 – Grade 12
In this lesson students will be introduced to the techniques of adding acceleration, speed, and friction in Scratch!
Responsibilities to Mother Earth: Interactive Storytelling with Scratch
Grade 7 – Grade 12
Learning how to make interactive stories in Scratch.
Scratch Remix: Make your own game
Middle – Grade 12
These two Scratch video tutorials will walk you through a couple of ways to create a new game in Scratch by remixing an existing game.

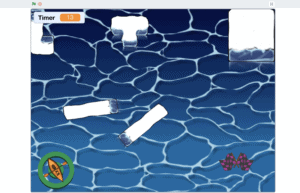
Hungry Shark Scratch Game for Beginner Game Designers
Grade 1 – Grade 6
Learners will design a predator-prey style game in Scratch where a shark sprite will move around the screen gobbling up a bunch of fish!
Learn to make a “Colour Hunt” Scratch Game
Grade 7 – Grade 12
Students will learn how to build a simple Scratch game from start to finish.
Working with clones in Scratch: Making fancy text
Middle – Grade 12
In this tutorial, learners will explore using clones to display text using a custom font in Scratch.
