Section Navigation

Introduction
There are several techniques in traditional animation that can be used when creating pixel art to enhance your work. Using techniques like motion blur, fades, and flashes can reduce your workload and the number of frames to draw, as well as improving the overall quality of your animation. In this lesson we’ll explore some of those techniques.
Learning Goals
This module is designed to introduce students to additional concepts and tools when developing their Pixel Art. The techniques introduced in this module can help improve the quality of student’s final pixel art graphics. Students will gain a better understanding of using image editing software to create graphics as well as some common mistakes to avoid.
Curriculum Links
This module provides an opportunity to address curriculum expectations in the Arts and Computer Studies in grade 9 – 12. In particular, students will be introduced to the software Graphicsgale. This assignment will also demonstrate how to use image editing software to create graphics.
Vocabulary
Motion Blur - Drawing a stretched area in a keyframe to suggest fast movement.
Deformation - Intentional stretching or flattening an object or figure to exaggerate motion.
Potential Energy - Loaded energy available for release, in animation this appears as tension in a figure or object.
Kinetic Energy - Energy an object possesses because of motion, in animation this is represented by the movement of a figure or object, and can be aided by motion blur or deformation.
Fade - Reducing or increasing opacity of a visual element.
Flash - A rapid shift in contrast to suggest shock or impact.
Frame Delay - The timing, in milliseconds, that a single frame of an animation is displayed.
Guiding Questions
- When you create a Pixel Art graphic can you consider how you might be able to make that graphic better?
- What is something that you could do to take it to the next level?
Materials
GIMP (Gnu Image Manipulation Program) – Download GIMP
Computer Activity
Opening Activity
Using skills developed previously, we’ll examine a pre-made animated GIF, looking at different elements within it and trying to improve others. Open GIMP and then open punch_template.gif.
GIMP has arranged all of the layers as frames, complete with a frame delay in the layer name. This shows how long each frame will be displayed when the animation is played back. Go to Filters > Animation > Playback and click Play to see how it looks. The animation should be reasonably smooth, but we can make it better. By changing some of the frame delays we can add a sense of potential energy and kinetic energy. Currently, all of the frames have a 100ms delay, which makes the punch feel rushed, and the breaking block feel floaty.

Click on the eye icon in the layers tab to hide the layers above Frame 3. This is the point of the characters wind-up before the punch. It’s the point where the body has stored potential energy ready for release. To increase the visual tension at this point in the animation, we can increase the frame delay, so that the character holds this pose a little longer. Double-click on the layer name “Frame 3 (100ms)” in the Layers tab. Change (100ms) to (200ms). This doubles the time the character holds the wind-up. Open the Animation Playback tool and see how this change affects the motion.
Let’s do the opposite with Frame 4, where that potential energy is released as kinetic energy. We want this motion to be faster, and more powerful. Click the eye icon on the layer to make it visible, then double-click the layer name, and change the frame delay to (50ms). Those pieces of the breaking block are still appear to float a little bit, so let’s change the frame delay on Frames 5, 6, and 7 to (75ms). Playback the animation to test it again.
Notice how the block in Frame 4 is entirely white? This is a flash. It helps to symbolize the transfer of kinetic energy in the punch to the block. A flash is often used in games when one character hits another character or object. The effect is similar to the visual flash you might get when you bump your head, get hit with a ball, or have a similar impact. The rapid flash to an all white (or sometimes black, then white) state, then back to colour simulates this experience.
In Frames 9 and 10, the block fades back in so the animation loops smoothly, rather than having the block just pop back into existence. To achieve this, we paste the block in a layer above each frame, but prior to merging it, reduce the opacity, using the Opacity slider in the Layers tab of the Toolbar. The block in Frame 9 is at 33% opacity, and at 66% opacity in Frame 10. In Frame 1 it is back to 100%; by increasing the opacity by ⅓ in each successive frame the final effect is a smooth fade in.
Let’s also create a brief pause between the start and finish of the animation, to give the viewer a moment to properly process the full cycle. Change the delay on Frame 1 to (500ms) and Frame 8 to (300ms). Test the animation and observe the cycle. Does it feel more engaging and dramatic? Let’s make it bigger before we export, so that it’s easier to view. This same process can be used on any of your previously animated GIFs.
Go to Image > Scale Image. In the dialogue that opens we will change the dimensions. Currently, the image is 32x32px. In order to maintain the integrity of our pixels (to avoid creating a distorted image) keep the new size as a multiple of the current size. To increase the image 4x, set the width to 128px and hit Enter. Notice that the height also changed automatically to 128px? The linked icon (the little chain) binds the width and height so that both values are changed simultaneously to the same number. With the linked icon off, width and height can be adjusted independently, but that can cause your image to appear squished or stretched. Under Interpolation select “None”. When scaling images, interpolation can blend and blur images to give a smoother appearance. But with pixel art we want to retain the hard edges of our pixels, so None is best. Now click Scale. If your image zoomed in too far, press 1 to view it at 100%. Export as an animated GIF file, making sure to click “As Animation” and “Loop Forever.”
Connector
Now that you’ve learned the basics of creating animation using pixel art, we’ll try combining that with these new effect techniques. Let’s make a simple animation of a blob fading in, jumping over an obstacle, and fading out. We’ll work with some premade assets for the background and basic blob sprite, and then design the animation of the blob within the scene.
Activity
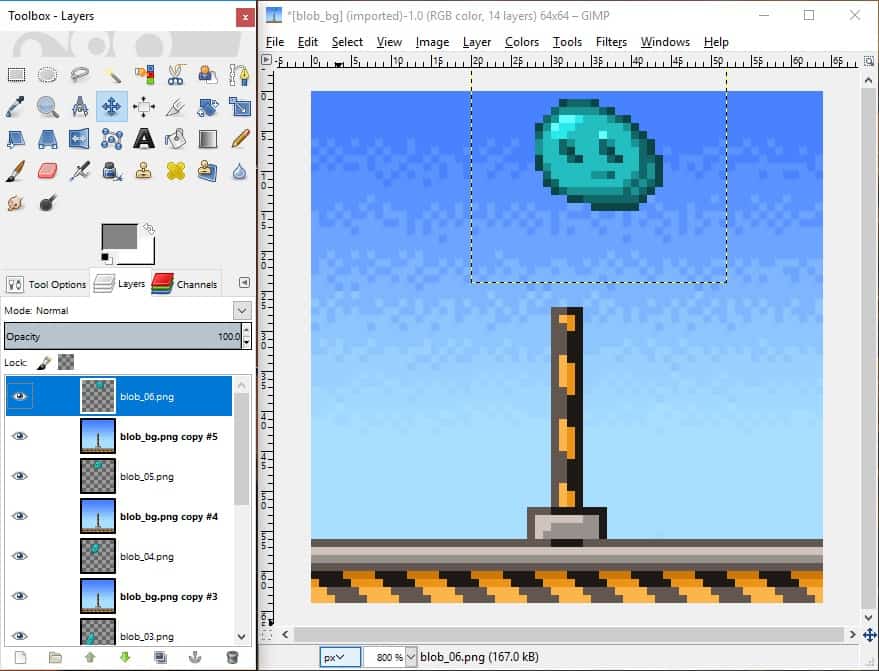
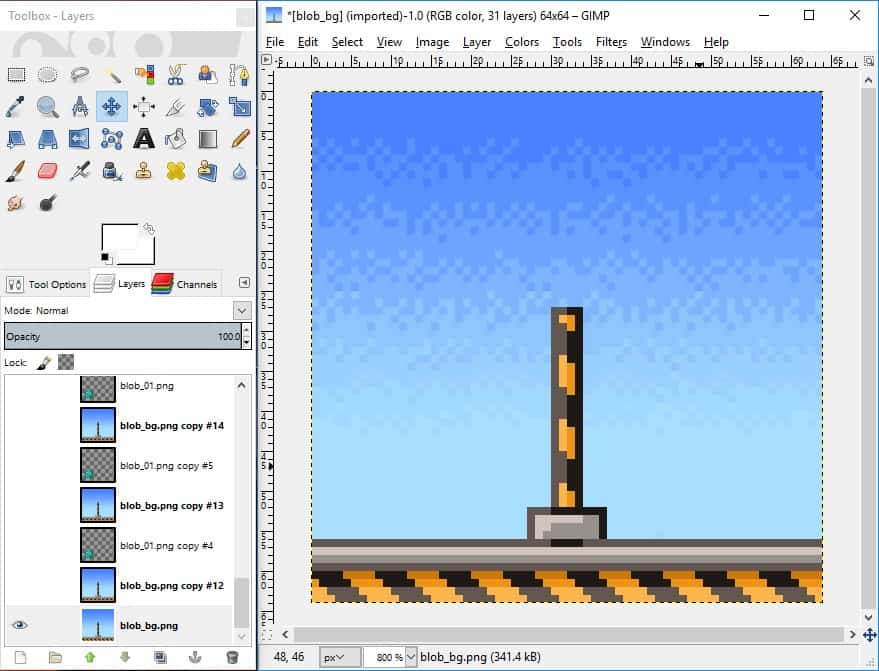
This activity is more involved, as we will be drawing on and showcasing all of the skills learned to date, combined with the animation fundamentals from in this lesson. Open GIMP and the file “blob_bg.png”. This is the default background for our image. In a game or application only one copy of this file would be needed, but for animation in GIMP this image needs to be duplicated for each frame. Go to File > Open as Layers and open the “blob_01.png” file. This will be the base frame for our animation. Press “4” to zoom in to 800%. You can work with the image as is, or redraw the blob in your own style or colours. Select the blob_01 layer and use the Move tool to drag the blob sprite to the ground on the left of the barrier.
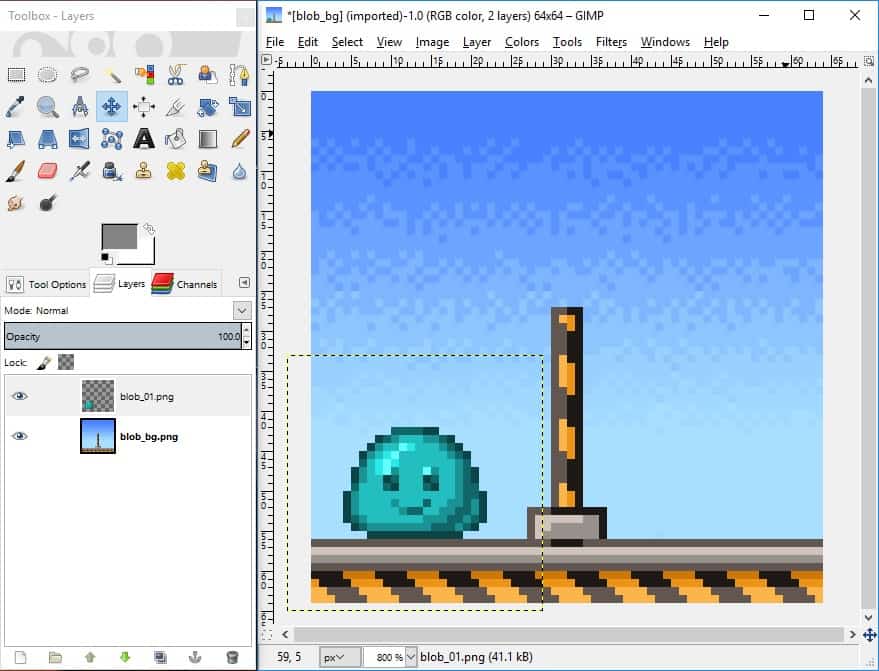
Before the blob jumps over the barrier we need to show the sprite building potential energy. Using deformation, we draw the blob squishing downward, as though crouching before a powerful jump. Duplicate the blob_01 layer, rename it blob_02, and using the pencil and eraser tools, give the blob a squished appearance. You could create a second squish frame where the blob compresses even further. The opacity of the layers can be adjusted to see the layer below while you draw.
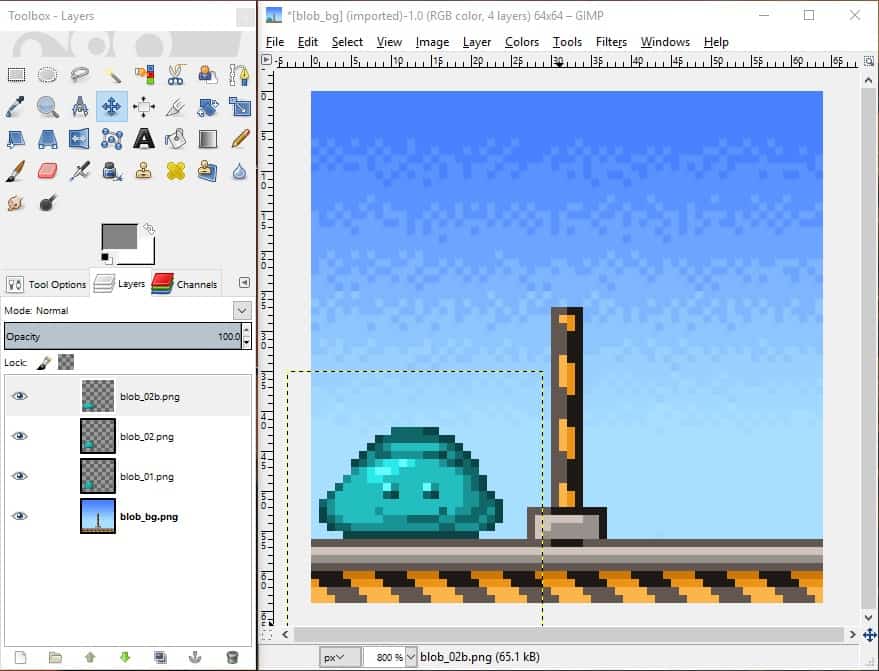
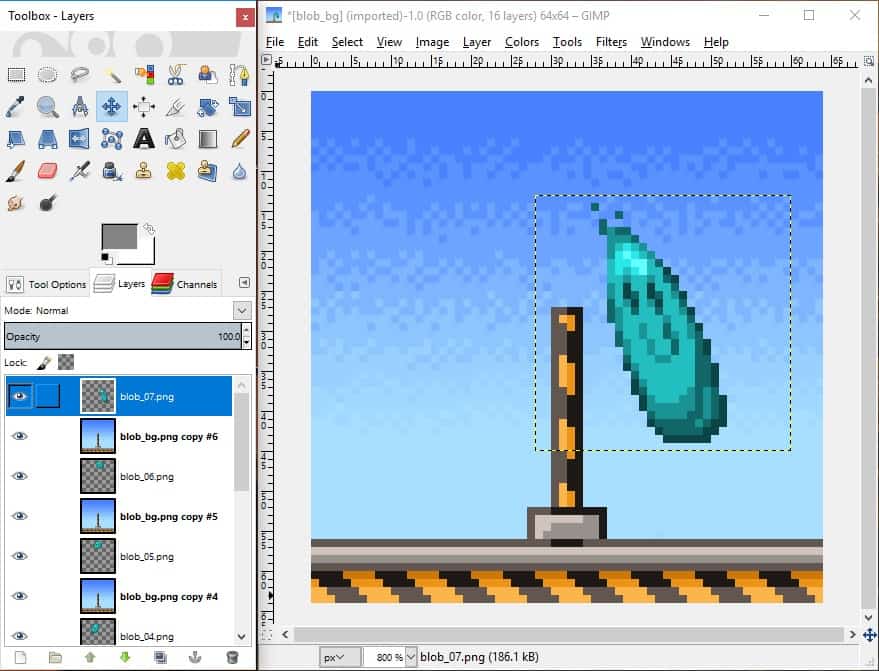
Duplicate the blob_bg layer and move a copy of the background behind each of the blob layers. Duplicate the blob_01 layer and move it to the top of the layers stack. With all of that potential energy stored, we need to show it as kinetic energy, as the blob shoots upward over the barrier. Using deformation and motion blur, redraw the blob stretching out towards the top of the barrier. Again, a second frame could be added where the blob is closer to the top of the screen, and starting to retract as it loses kinetic energy. Duplicate the blob_bg layer and move these new background layers behind any new frames you’ve made.
The blob has now reached the apex, or highest point of its jump. Duplicate the blob_01 layer again and move it to the top of the layers stack. Redraw the blob shifting over to the right, so the animation retains a sense of movement in that direction.
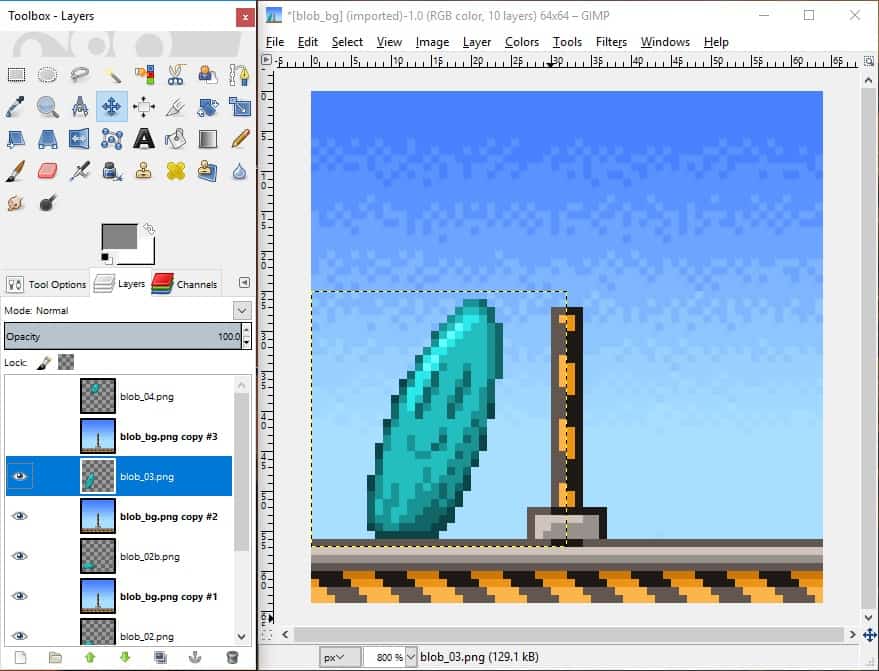
Ready for the fall back down, duplicate your last blob layer and use deformation and motion blur again to show kinetic energy as the blob rockets down to the other side. Duplicate the background and place it behind this frame.
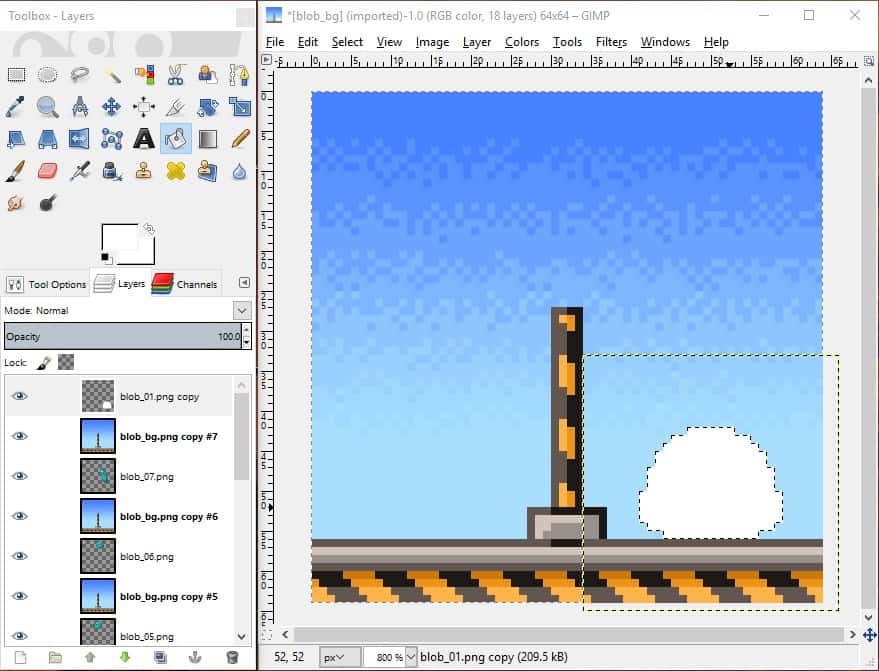
Add a flash when the blob reaches the ground to show a sense of impact. Duplicate the blob_01 layer, use the move tool to reposition it to the ground on the right side of the barrier, and move it to the top of the layer stack. Choose the Select by Color tool, click the background area outside the blob, and go to Select > Invert. This selects the area of the canvas that the blob sprite takes up. Choose the Bucket Fill tool, select white as your foreground colour, and click on the blob sprite to fill it completely with white.
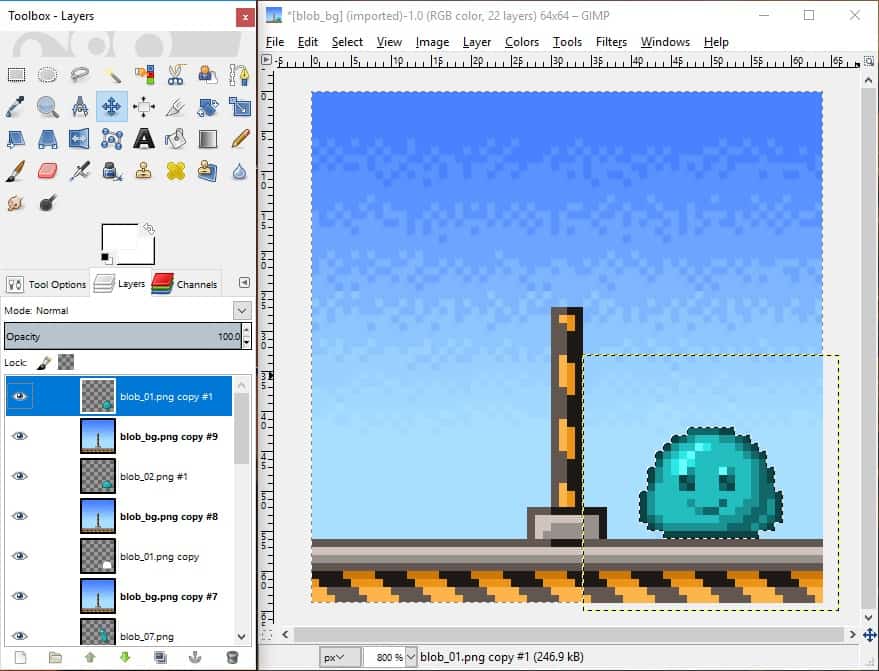
Duplicate your squished blob layer (or layers) that you used on the left side of the barrier and use the Move tool to shift them to the right, then move them to the top of the layers stack. Finally, duplicate the original blob_01 layer, move it to the right, and arrange it at the top of the stack. Make duplicates of the background layer to put behind each of the new blob layers. This completes the motion in the scene.
The last thing to do is fade the blob in and out. Duplicate the highest blob layer in the layers stack, as well as a background layer to place behind it. Select the highest blob layer and set the Opacity in the Layers tab to 66.0. Duplicate both this blob layer and the background layer, and set the opacity of the newest blob layer to 33.0. Click the eye icon in the Layers tab and hide all of the layers except the very first blob_01 and blob_bg layers at the bottom of the stack. Set the opacity of the duplicated blob layer to 66.0. Move these two new layers to the bottom of the layer stack, and hide the layers above. Duplicate the bottom blob and background layers, then set that blob layer opacity to 33.0. Move those two layers to the bottom of the layers stack. Lastly, duplicate the bottom-most blob_bg layer.
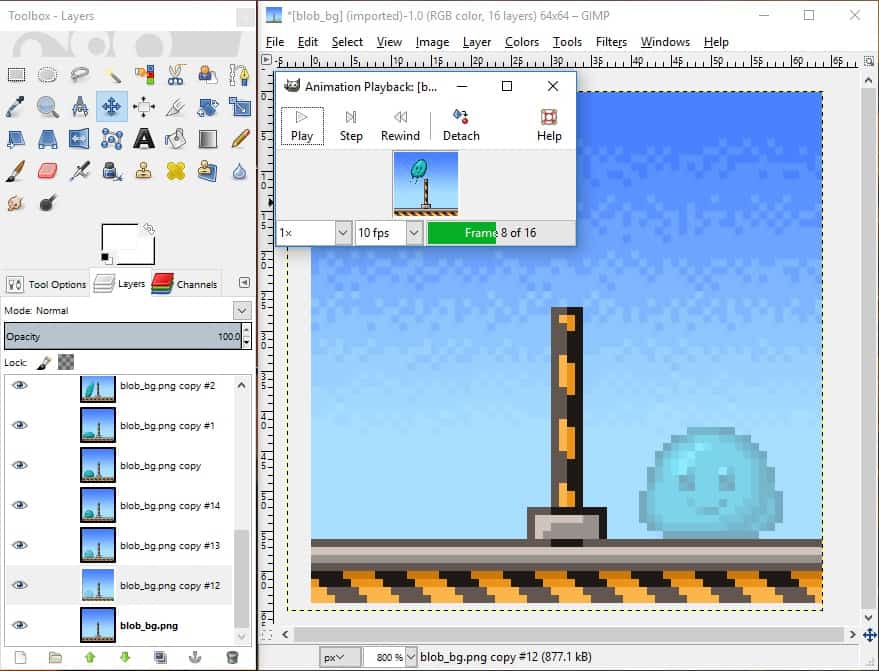
We need to merge each blob layer with its background layer before we output the final animation. Make all of the layers visible. Select the topmost blob layer and go to Layer > Merge Down. Select the next blob layer down in the stack and repeat, merging the layers down, for each blob layer in the stack. The very bottom layer should only be the background image, with no blob layer. Go to Filters > Animation > Playback and test your animation.
If you are happy with the default timing that is great! If you want to enhance any of the motion, rename the layers and add (XXms) where XX is the number of milliseconds the frame is displayed. Remember that longer delays create tension, while short delays create speed. The default timing for all frames is (100ms). Before we export, let’s enlarge the image. Go to Image > Scale Image, set the width and height to 256px, set Interpolation to “None,” and click Scale. Go to File > Export As, choose a file name, set the file type to GIF, and click Export. In the GIF export dialogue make sure “As Animation” is checked, as well as “Loop Forever.” Click Export and you’re finished!
Conclusion
Traditional animation can be time-consuming and difficult, but becomes easier with practice. This and previous modules cover all of the basics for creating animations using pixel art. You may not feel a natural aptitude or inclination for creating game artwork, but understanding how it is made can still be useful. What aspects of animating sprites did you enjoy? What elements did you find difficult or tedious? What kind of things would you like to animate next? Did you find it more enjoyable to work with character motion or effects? Some artists focus solely on creating effects, making things like explosions, fire, sparkling lights, running water, and so on. These animations can be coupled with tiles or sprites, or sometimes used as separate assets within a game.
Accommodating Diversity
Due to the nature of traditional animation, these lessons could be time-consuming. It may be worthwhile to break up the opening activity and main activity into separate lessons. If some students are less inclined towards creating their own artwork, basic frames for all of the blob motion for the main activity are included. By using the Open as Layers function, they can import these sprites into their scene and work with them instead of drawing their own sprites.
Students who excel at artwork or are keen to do so, they can recreate the opening activity animation using their own character. With the exception of the fading block, they should be able to draw over the template character in the frames of that animation to create something more personal.