
Introduction
Welcome to the Make your own game, Scratch Mix and Match Cards Challenge #3! There are three new cards for this challenge. Use the code from at least two of the three featured cards to make your own game or interactive story. Watch the video tutorials or follow along below to see a few examples for how to use these pieces of code. Remember, you can add in any other code that you want and you can adapt the code on the cards to best fit your game or story. The yellow Events block you see at the beginning of some of the code cards is there only as an example. You can swap that Events block out for any other way that you want your code commands to begin. As you begin collecting the cards, you will also want to notice the colour coding of the code blocks in Scratch. Use the colour coding of the code blocks to help you find the code that you need to make your game or story.
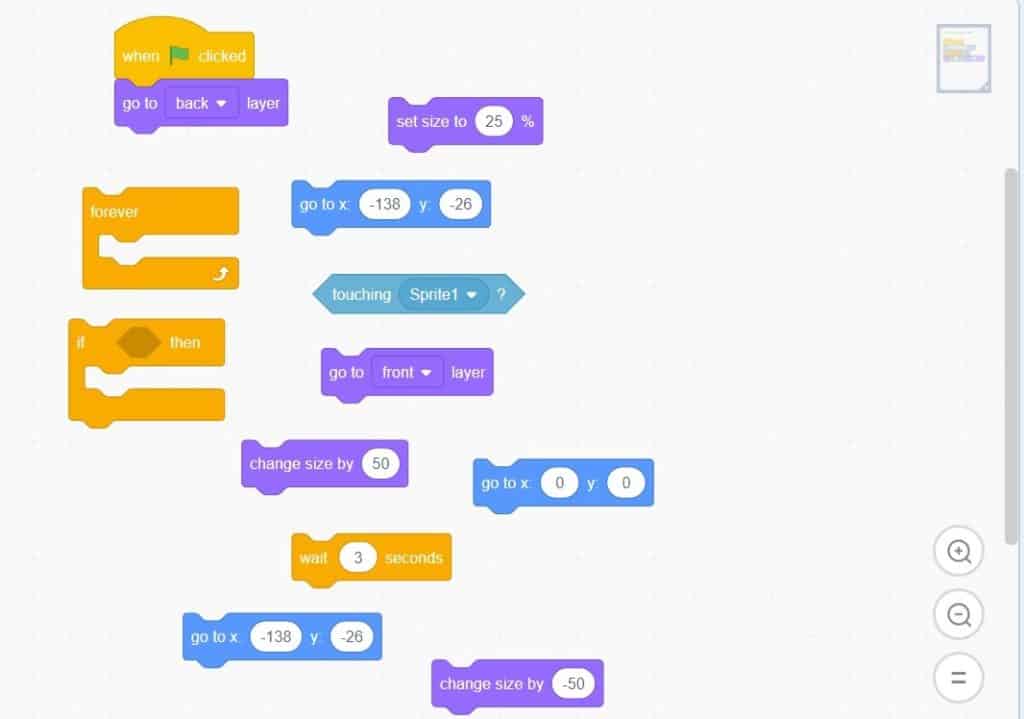
Notice the colour coding used in the code blocks to help you find the code you need.

Materials
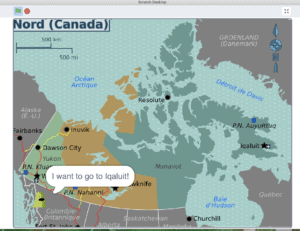
Visit Candyland with Critter and play the game to find out the three cards for this challenge, or watch the video below.
Use the arrow keys and the spacebar to move Critter around. Reveal the three cards for Challenge #3 that are hiding behind the candy hearts!
Music Attribution:
Thanks so much to The Green Orbs for their track, Splashing Around
Use the code from at least two of the Mix and Match cards for this challenge to make your own game.
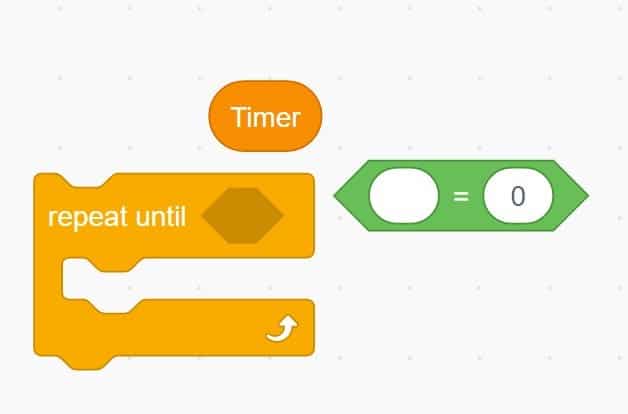
Timer
Thanks so much to Nat Keefe and BeatMower for sharing their track, I Feel Like Partying Right Now
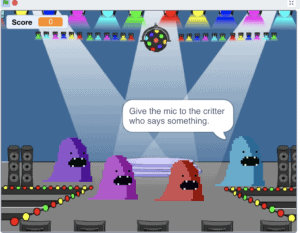
Give the mic to the Critter who has something to say and score a point. When you get to the next level, the timer starts. See how many more points you can score before the time runs out!
Add a Timer in Ten Steps
Adding a timer is another way to add an extra challenge to a game. It can be one way to make a level more difficult. In the Critter Chorus game, the game itself gets more challenging and I’m also adding a timer. The timer is a Variable. This Variable block is a code block that will keep track of information that can change during a game. This game has two Variables — the timer and a score. Let’s look at how to build the code to add a timer to the game.
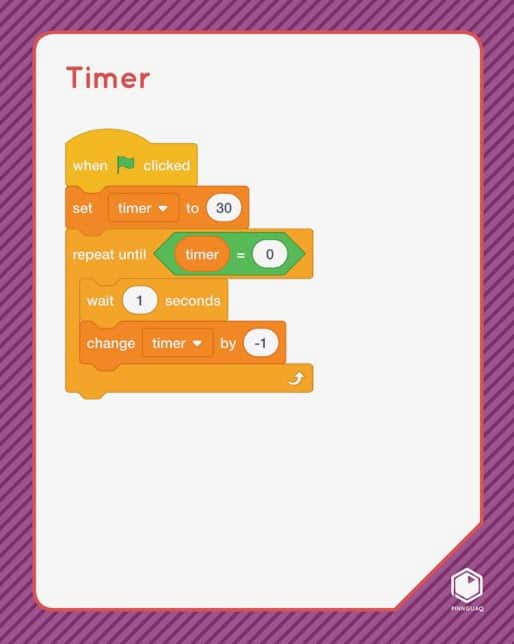
Let’s begin by pulling apart all the pieces of code that are showing on the Timer Mix and Match card.

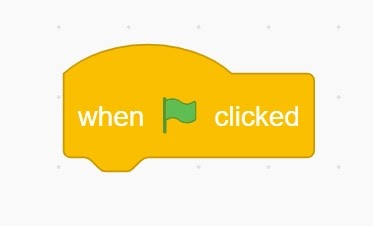
You can start the timer at the beginning of the game, as it shows in the Timer card. The code on the challenge card begins “when the green flag is clicked”.
You can choose a different way to begin the timer. In the Critter Chorus game, the timer only begins with the second level, when the backdrop switches to the Arctic backdrop, as you can see in the picture above, showing all the code pieces in the algorithm I created for the Levels with Timer Critter Chorus game pulled apart.
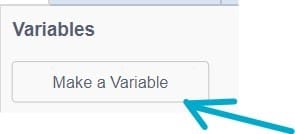
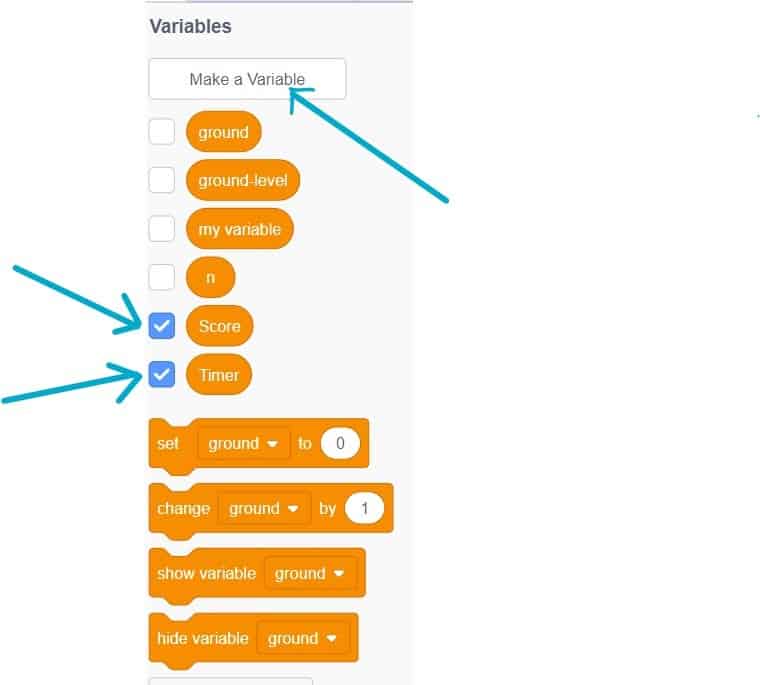
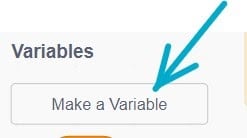
- First you will need to make the Variable for the timer. In the deep orange Variable blocks, click on “Make a Variable” and give it the name, “Timer”.

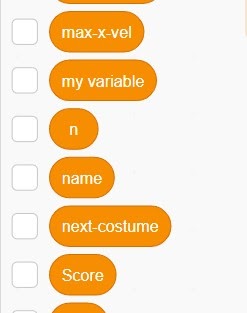
2. Now you will see your variable in the list of Variables in the library of Variable blocks. If you leave the box checked, that Variable will show on the stage during your game.
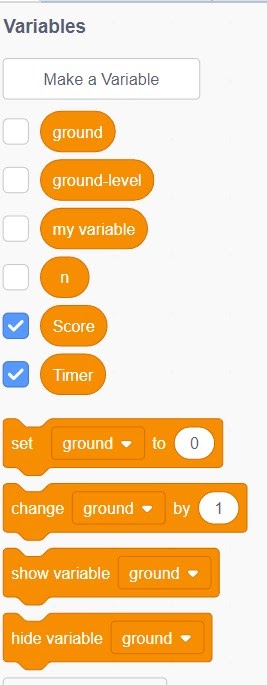
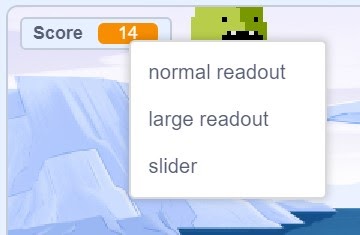
- You can choose how the readout of the Variable looks on the stage by right clicking on the Variable.

Play with the different setting choices to see which you like best.
- You can see the yellow Events block, “when backdrop switches to Arctic” at the top of the sequence of code blocks, as I want the timer to begin counting down once the second level has begun. You can choose a different Yellow Events block to begin your code algorithm. Choose the Events block to begin your code algorithm in the way that best fits your game or story.
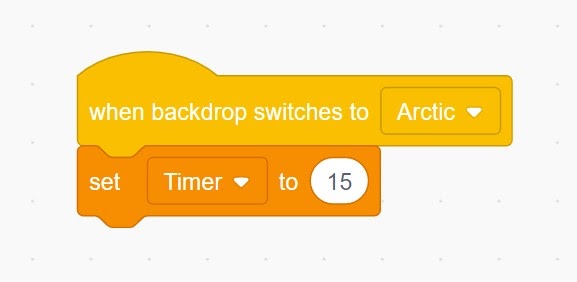
- Now you need to set up the timer with the value, the number of seconds you want it to begin with when it starts counting down, or counting up. I want the timer to start at 15 seconds and then countdown. Drag in the “set Timer to (15)” block from the deep orange Variables blocks. You can put any number in the value bubble. I’ve chosen 15 to have a 15 seconds timer.
- To tell the computer to keep the Timer running until it runs out of time, drag in a repeat until block. Notice the hexagonal shape of the hole in the middle of this block. We need the timer to keep counting down until it reaches 0. A green Operators block can be used to tell the computer to continue counting down until the Variable for the timer equals zero. Drag the Timer Variable from the deep orange Variable blocks and put it inside the first hole in the green Operators block.

- Drag in “change Timer by (1)” block from the deep orange Variables blocks. Click on the little arrow in the middle of the block to see all the Variables made for the game and choose “Timer”.
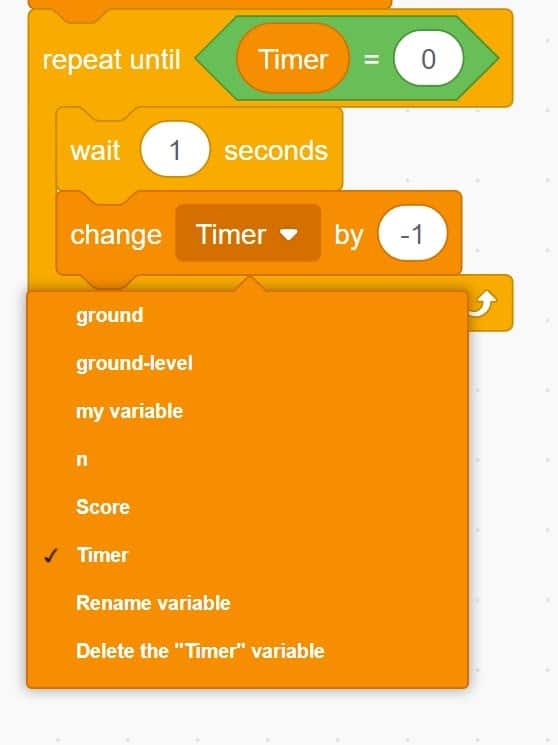
- For the timer to count down, you need to put in a negative number like -1. This negative number will tell the timer to change by taking away 1 (-1) each second.
- Adding in an orange Control “wait (1) seconds” block tells the timer to wait one second in between each count down, for one number to change every second, to prevent the timer from counting down too quickly.
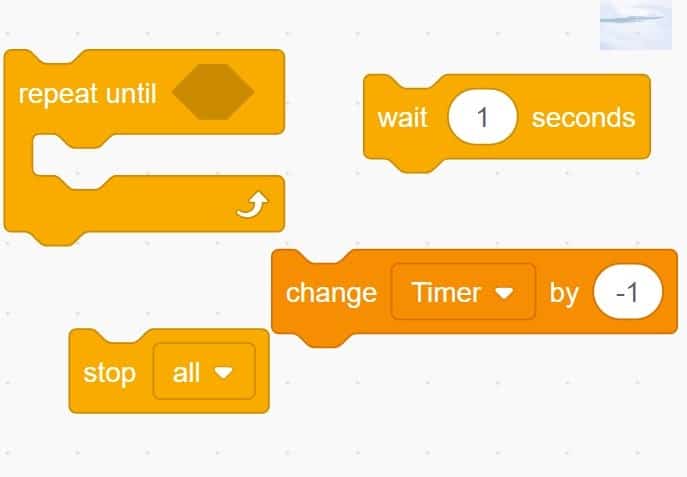
- Add an orange Control “stop all” block. With this Control block, you can choose to stop just the code for this one action for this sprite, for other code algorithms or scripts for this sprite, or to stop everything in the game by choosing, “stop all”. Without this code block, the timer would stop because we instructed the timer to repeat until the timer equals 0, but the game would continue. The “stop all” code block tells the computer to stop the game when the timer runs out and counts down to 0.

Ask Your Name
The code on this card shows how to ask the player a question and then to use the answer in the response back. What a cool way to make the game immersive and interactive! You can use this code to give the player all kinds of choices. In this tutorial, I’ll show you how to use it to ask the player’s name and to have the player’s name be brought into the game. You could also use this code in a Role Playing Game (RPG), where you have a character in the game giving directions or giving choices to the player that affect the action of the game. Watch the video and play the game to see how I’ve used the code on the Ask Your Name card to set the Critters up for a funny “Who’s on first?” kind of skit. If you don’t know about the classic Abbott and Costello, “Who’s on first” comedy skit, you can find the video here.
Thanks so much to Craig MacArthur for sharing his track, Bird Therapist.
Hey, what’s your name? Click the green flag, then answer with your name and find out the names of the blobs on the bench.
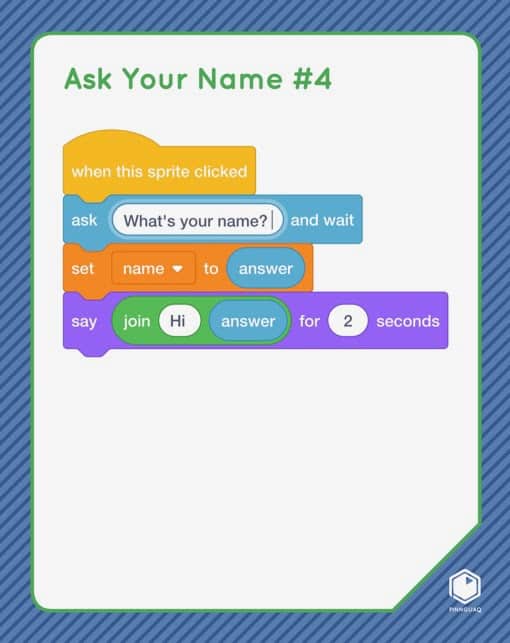
- Let’s pull apart the pieces to see what’s inside the algorithm showing on this Ask Your Name #4 card.
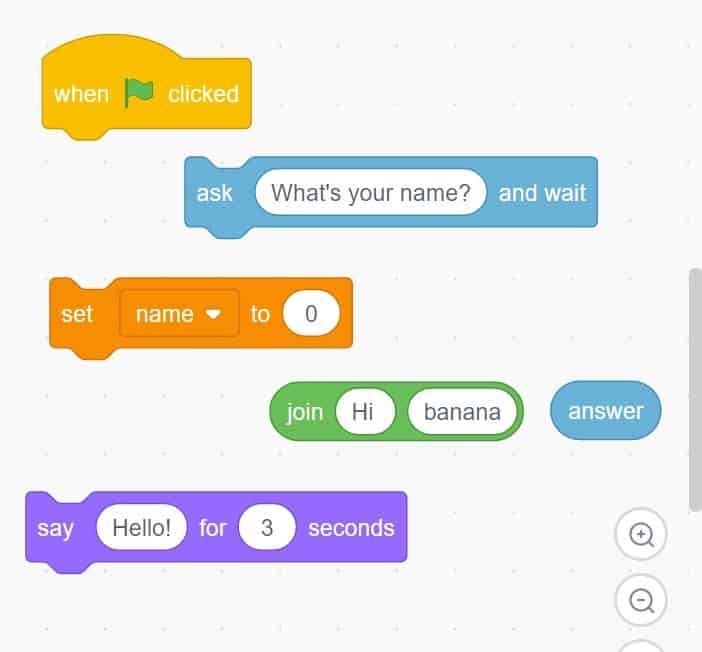
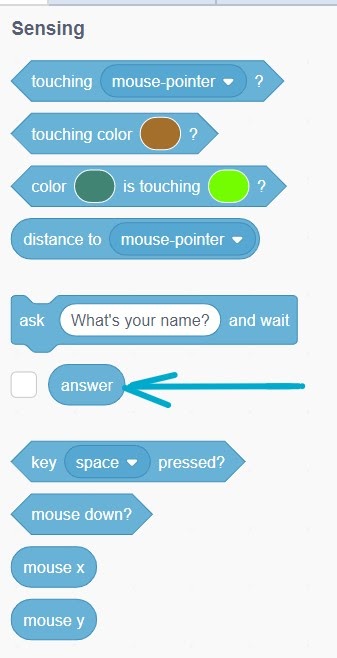
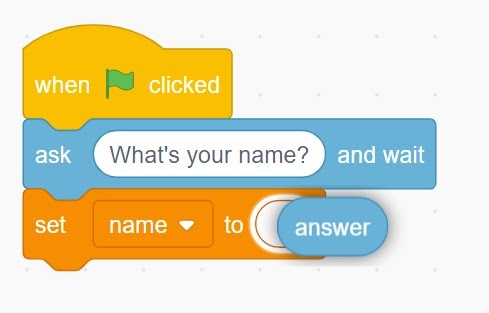
- After the green flag is clicked, Critter is going to “ask (What’s your name?) and wait”. This is a Sensing block. The light blue Sensing blocks take information, input from actions in the game or story and give that information to the computer. When you use this block, the words and text in the text bubble will show on the screen. You will also see a box pop up on the stage for you to type in your answer, your input.

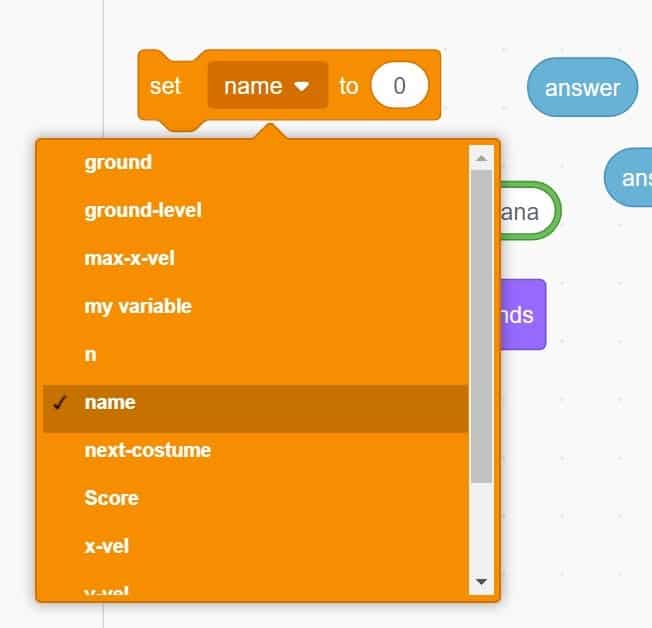
- Now we need to code what will happen after that answer, that input is given. You need to make a Variable for the answer you are asking for — a Variable for “name”. In the deep orange Variable blocks, click on “Make a Variable” and call it “name”.
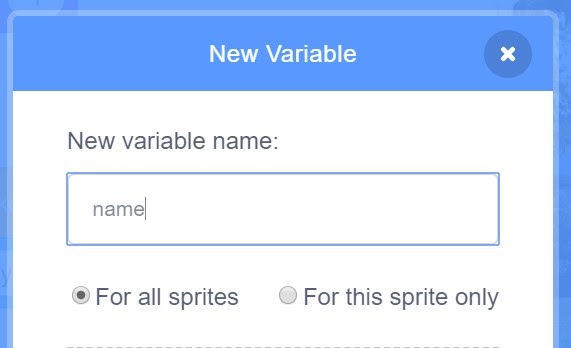
Now you will see “name” in your list of Variables and it is ready to be added to the code blocks. I have not checked the box beside this variable because I don’t want it to show on the screen. It is now one of the choices in the drop-down menu of the Variable blocks for “set variable to” and “change variable by”. We need to bring the “set variable to” block in next. Click on the little down arrow to open the drop down menu and choose “name” as the Variable.
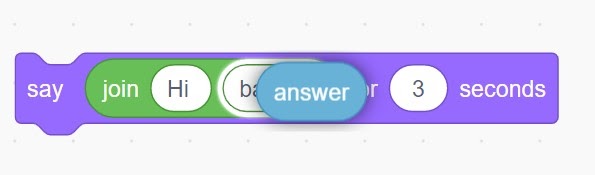
- In the light blue Sensing blocks, you will find an “answer” block which you can put inside the value bubble in the “set name to (0)” Variable block. This Sensing block tells the computer that this name Variable should be set to the answer that you type in, your input.
- Now we need to have your input used in the game or story. Let’s make Critter say Hello to you, using your input, your name, in what Critter says. The “say hello” block from the purple Looks blocks has only one text bubble. Using the green Operator “join apple banana” block will let us put your input answer into one of the text bubbles and “Hey” into the other text bubble. Make sure you get another blue Sensing “answer” block and put it in the next hole, otherwise, Critter is going to call you a banana.
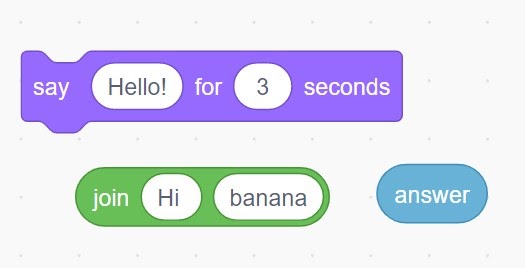
- Test! Do you see that the space is missing in “HeyMary”?
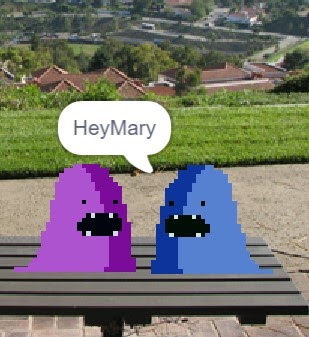
- You need to make sure you type in a space after “Hey “ in your text bubble. It won’t be there if you don’t tell the computer to put that space in, because remember, computers only do exactly as you tell them to do!
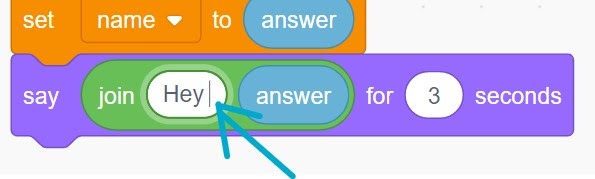
- Now test again! If you need the words to stay on the screen longer, change the number in the value bubble to a bigger number. I’ve changed the value to three in this block, for the words to stay on the screen for three seconds.
- Play the game to watch the rest of the critters join the “What’s your name?” game. You can download it to your computer from the download file above or play it online in the Pinnguaq Scratch Mix and Match — Make your own game studio here. Add in your own words to make your own immersive game!
Hide and Seek
Thanks so much to Chris Haugen for sharing his track, Campfire Song.
Games that involve seeking a hidden sprite can be fun but you can also use this code in other kinds of games. For example you could use this code sequence to hide and show special objects that help a sprite gain extra points or powers. As we go through this tutorial, think of different ways that you could use this algorithm, this sequence of code blocks which tell a sprite to hide and then to show when found. I’ve used the code from this hide and seek card to make the Challenge #3 Reveal game.
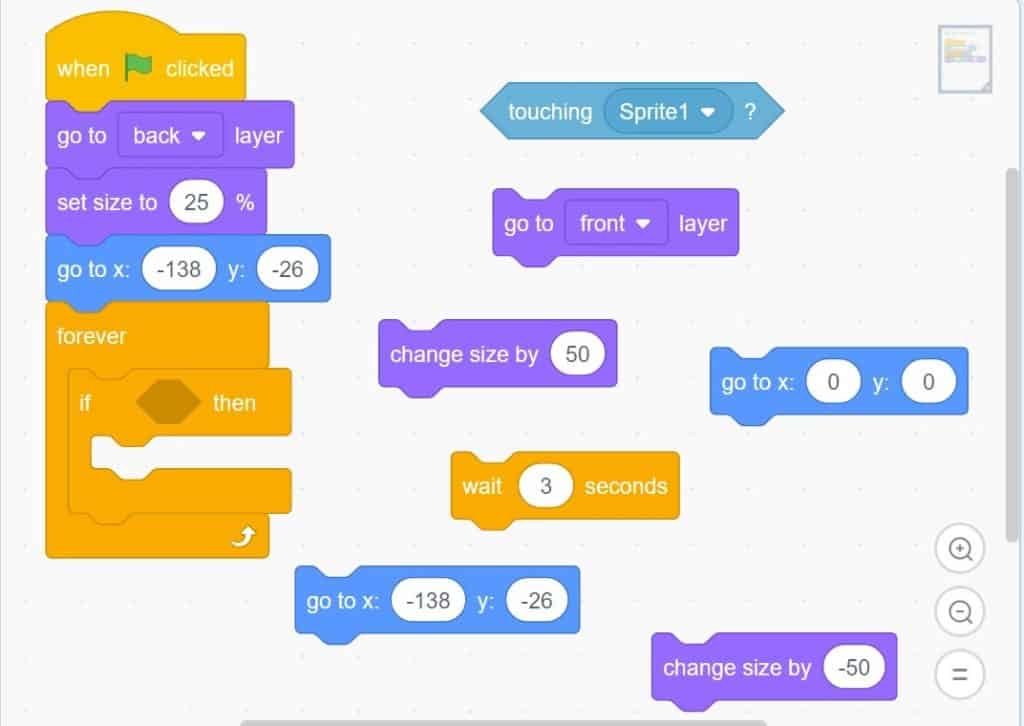
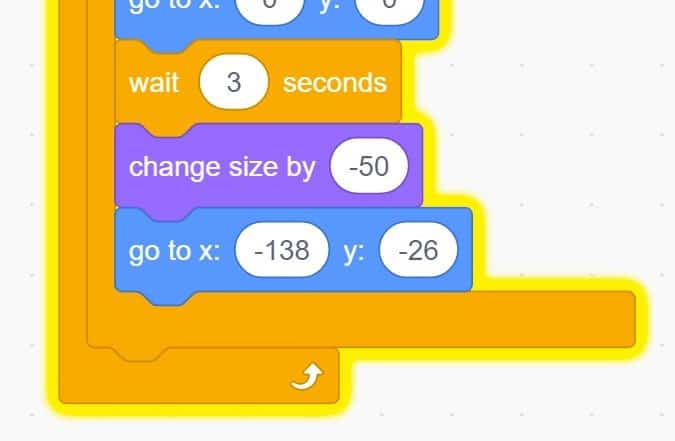
- Here is the code I used for the hidden challenge cards in the Candyland Challenge #3 game. It is the same code sequence as shown on the Mix and Match card except that I have added some extra blocks to make the challenge card sprite smaller when it is hidden and to move into the middle when it first shows, then move back to its hiding position.
- Let’s pull the blocks apart and see what each piece does.
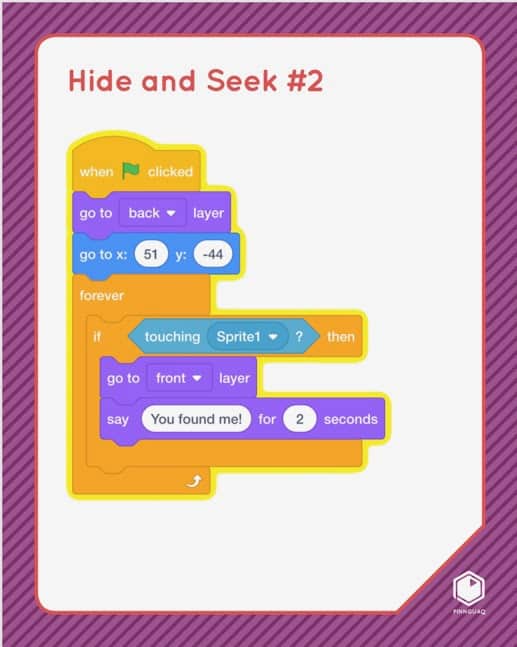
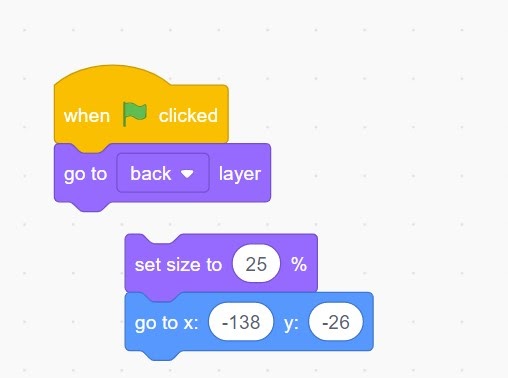
- At the beginning of the game, when the green flag is clicked, the purple Looks block tells the challenge card sprite to“go to back layer”, and hide behind the candy that is in front of it.
- The next purple Looks block, “set size to 25%” and the blue Motions block, “go to x (-138), y (-26) tell the card sprite to shrink smaller and go to its hiding position behind the candy.
- The forever loop will keep running the If…then code block inside it to keep checking if the conditions are met, if the conditional statement is true.
6. In the middle of the If…then block is the Sensing block that tells the computer if the sprite is touching Sprite 1 (Critter), then…
- Then all of the actions on the code blocks that go inside the If…then block should happen. The purple Looks block tells the card sprite to, go to front layer so that it will go in front of the candy and can be seen, to get bigger and to change its size by 50%, and the blue Motions block tells the sprite to go to the centre of the stage at x(0), y (0) so that you, the player, can see the card clearly. Now you can see the first card for the challenge.
- The last blocks tell the card sprite to wait in the middle for 3 seconds (this gives you three seconds to see and read the card), and then to go back to its original position and to get smaller. When Critter jumps and bumps into the next challenge card, it can get bigger and move to the centre and be seen clearly, the first card revealed will have moved back to its own place.
Think of all the different ways you could use this code to make a sprite hide and then show in a game or story. For inspiration, you could check out the Hungry Shark game here as another example of a game that uses a hidden sprite action. And to give you more ideas, you can think about if there are things that appear/disappear or are hidden and found in your favourite video games. I can’t wait to see what you create!
Conclusion
We want to see the awesome things you’re creating! Take a photo or video and share your work with us by emailing media@pinnguaq.com or tagging @pinnguaq on Facebook, Twitter, or Instagram. Don’t forget to include the hashtag #LearnWithPinnguaq! You can also upload your project to the Pinnguaq Studio.
For more fun activities, visit Pinnguaq’s Learn section!
You might also
Scratch Mix and Match Challenge #2
 Grade 7 – Grade 12
Scratch Mix and Match Cards Challenge #2 Learn how to make your own game with the Scratch Mix and Match Cards. Accept the challenge and make a game or story with the cards for this challenge!
Using the Backpack in Scratch
Grade 1 – Grade 12
In this short tutorial, you will learn how to use Scratch’s “Backpack” feature to move code and sprites between projects.
Scratch Mix and Match Challenge Bonus: Levels
Middle – Grade 12
Learn how to add Levels to your game or story in Scratch with Levels #1 and #2 from the Scratch Mix and Match cards deck.
