
Introduction
In this tutorial, I will be using Inkscape to create art assets for a game mechanic prototype that combines the fishing mini-game in Eric Barone’s Stardew Valley with aesthetics from Nintendo’s Animal Crossing: New Horizons. These assets will be imported into Scratch and staged as sprites so that they’ll be ready to have coding added. In this tutorial, you will also learn about the differences between vector graphics and raster graphics (also called “bitmap graphics” or “pixel graphics”) and how they are used in Scratch as well as how to use Inkscape to make vector-based art for use in Scratch.
Raster versus vector graphics
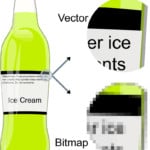
Raster graphics and vector graphics are different ways of storing data for images. For raster graphics (which are also referred to as bitmap or pixel graphics) images are stored as data for each pixel in the image. This means that images are a specific size, for example, a rectangle that is 32 pixels wide and 32 pixels tall, and data is stored for each of the pixels in the image. For a 32 x 32 pixel image, this would mean that data is stored for each of the 1024 pixels. If a raster image is made larger, it may look pixelated or fuzzy since the program doing the resizing has to create data for each new pixel based on the original image.
In contrast, vector graphics don’t store data for each pixel. Instead, for vector graphics, data is stored as the relationships between points on an XY-plane, points which are connected by lines and curves to make simple polygons and more complex shapes. Vector graphics also include some styling data such as colouring or line thickness. Because of the way that they store data, they can be resized both larger and smaller without becoming blurry. The picture below illustrates the difference between vector and raster graphics.
Vector and raster graphics are useful for different things. For simple images, such as logos or text boxes, that contain few colors and clearly defined shapes, vector graphics are best. For complex images, such as digital photographs or digital paintings, raster graphics are better able to capture the data about the color and position of each pixel. Raster and vector graphics can be used at the same time in Scratch, so choosing which to use and when and where each is used is mostly a matter of preference.
Vocabulary
- Prototype
- A prototype is the first version of something and is often used as a real-world test of previously theoretical designs. Prototypes build upon the changes or improvements to designs that are made as a result of the testing and use of the earlier prototypes.
- Raster graphics
- Also referred to as “bitmap graphics” or “pixel graphics”, raster graphics are images whose data is stored as a collection of data for each pixel in the image. They are images of fixed size, so if they’re made larger or smaller, they may distort or look pixelated (fuzzy).
- Scope (project management)
- A project’s scope is a measure of the size or complexity of a project. A large or wide scope means that a lot of features or functions are planned and a large amount of effort may be necessary to complete a project. Defining a scope and keeping a project’s scope narrow or focused helps to make sure the least amount of effort is wasted doing unimportant or unnecessary things.
- Vector graphics
- Vector graphics are images whose data is stored as relationships between points on an XY-plane, points which are connected by lines and curves to make simple polygons and more complex shapes.
Computer Activity
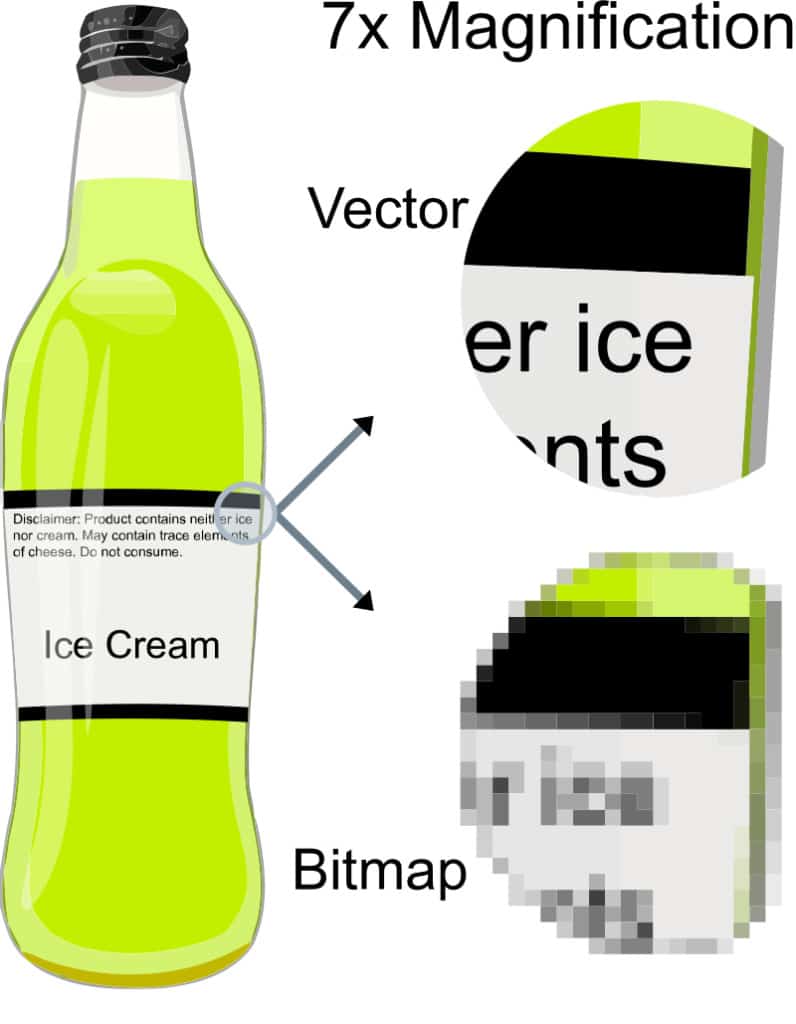
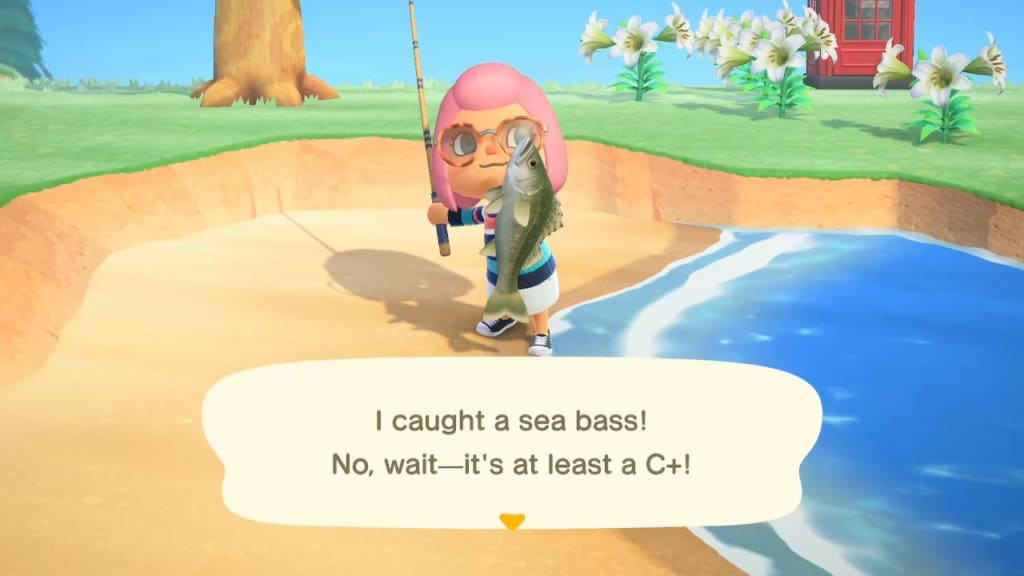
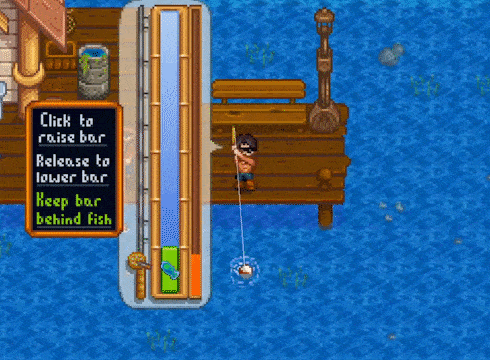
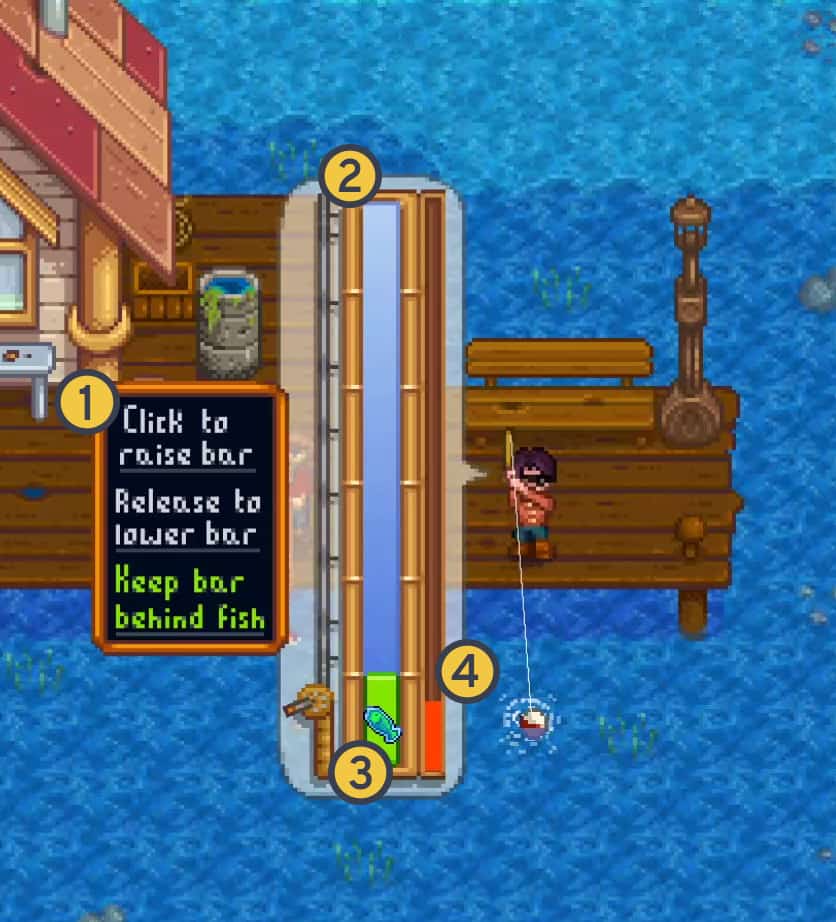
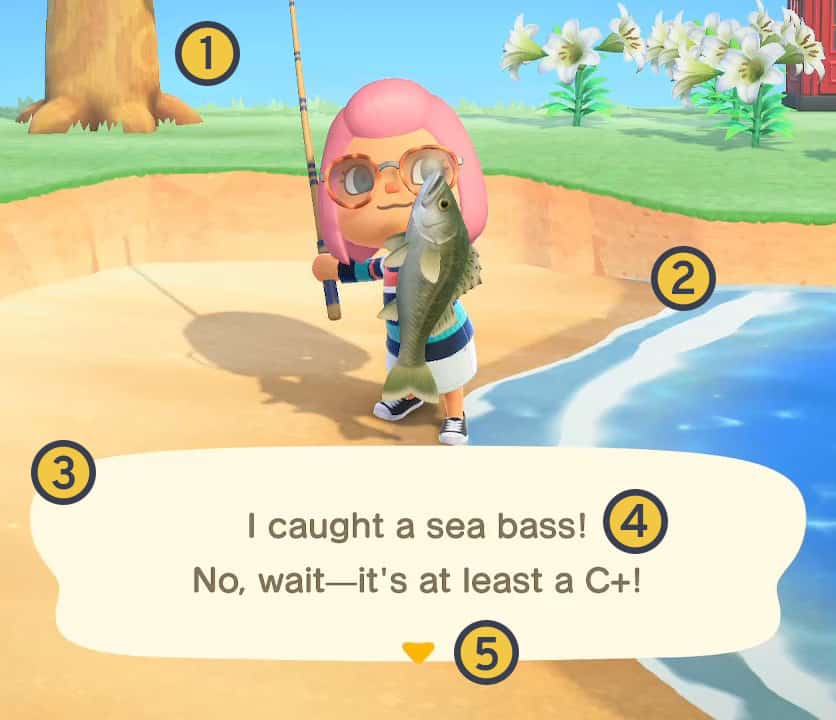
As mentioned in the introduction, the art assets being created in this tutorial are for a game mechanic prototype which combines the fishing mini-game from Stardew Valley with the styling of Animal Crossing: New Horizon. First, we will need to analyse what art needs to be created. Then, we can plan what tools we will use and how it might be accomplished. Below are screenshots from Animal Crossing: New Horizons and Stardew Valley that I will be using as references for the prototype’s art:
I’ve also included a short animated GIF to get a sense of the moving parts of the Stardew Valley mini-game:
With those screenshots as a reference, we can now approach the first task: analysing what needs to be done.
Analysing What Needs to Be Done
To make a plan, we first need to answer two questions:
- What graphical elements from Stardew Valley need to be adapted and what elements from Animal Crossing should be maintained?
- What will elements that are adapted from Stardew Valley look like?
These can both be addressed with the help of annotated screenshots, using a table to keep track of each of the potential elements or tasks:
| No. | Name | Description |
| S1 | Controls/instructions | Text describing the controls/instructions for the fishing mini-game. Only displayed the first time. |
| S2 | Main fishing area | A bar that shows the location of the fish as well as the player’s fishing rod bar. |
| S3 | Fishing rod bar and fish | Two elements that move independently of each other but stay aligned to the main fishing area. The player controls the fishing rod bar by clicking with the mouse. |
| S4 | Progress bar | A bar that fills when the fish is within the player’s fishing rod bar and empties when the fish is outside the player’s fishing rod bar. |
Each of those 4 elements from Stardew Valley are necessary for the prototype. Without one of these, the prototype would not make sense. As an exercise, I want you to ask yourself the question: Are there any other necessary elements that have been missed? What other elements might be included but are not necessary (optional, nice-to-have, etc.)?
| No. | Name | Description |
| A1 | Sky/ground ratio | The camera in Animal Crossing tends not to show much sky unless it is being specifically looked at. In this image, about ⅛ is sky, with the rest being ground. |
| A2 | Colour palette | Animal Crossing uses a bright, slightly desaturated (washed out) colour palette for many elements in the environment. |
| A3 | Text bubble | This off-white, blob-like shape gives a clean but not overly structured or formal feeling to the interface. |
| A4 | Typeface | Animal Crossing uses a rounded typeface, similar to “Arial Rounded”, called “Seurat”. Since Seurat might be hard to find, Arial Rounded can be used as a substitute. |
| A5 | Advance dialog icon | This downward facing triangle icon shows up when the text in the text bubble either can be advanced or the text bubble can be cleared. |
These 5 elements, taken together, should be able to evoke an Animal Crossing: New Horizons style for the prototype. You can see that the two games have drastically different art styles, so adapted elements from Stardew Valley will need to be remade with the above listed elements in mind to make the prototype’s concept, Stardew Valley fishing in Animal Crossing, work. Before moving on, as an exercise, I want you to ask yourself: What elements are most important to Animal Crossing’s style? What other elements might be included and what might not be shown or communicated by a screenshot?
Developing a Project’s Scope
Having completed a first pass on analysing elements from the two games that are being used for the prototype, we now need to think about the scope of the project. Since everyone has different skills and experience, this plan is something that may differ between people approaching the same set of tasks. You want to determine what art assets need to be made for the prototype and how they will be made. This will help you understand more clearly what tools you will need, and how much effort you will need to put into usingor learning those tools.
| Asset Name | Based on | Tools to use | Do I already know how to do this? | How difficult will this be to make? |
| Instructions/controls block | S1 | Inkscape (custom typeface means the built-in Scratch editor can’t be used) | Yes | Simple (text + round rectangle shapes) |
| Main fishing area | S2 | Inkscape (to get Animal crossing’s rounded/soft aesthetic) and then manipulated in Scratch | Yes | Simple (rounded rectangle shape) |
| Fishing rod bar | S3 | Inkscape and Scratch (as above) | Yes | Simple (rounded rectangle shape) |
| Fish icon | S3 | Inkscape or Scratch | Maybe | Moderate (complex shape, some experimentation required) |
| Progress bar | S4 | Unsure/Scratch (filling progress bars are difficult to make in Scratch and I’ve never made one) | No | Complex (or find an alternative to a filling progress bar) |
| Completion text bubble | A3 | Inkscape (for custom text) and Scratch or Inkscape (for custom blob shape) | Maybe (yes to text, and a little experience making custom shapes in Inkscape) | Simple (use a rounded rectangle) to Moderate (complex shape, some experimentation required) |
| Advance dialog icon | A5 | Inkscape or Scratch | Yes | Simple to moderate (potentially complex rounded triangle shape) |
| Background | A1 | Scratch (using Scratch’s built in editor for now, will revisit for later version of prototype) | Yes | Simple |
As in the table above, I’ve planned to make 8 different assets requiring the use of both Inkscape and the built-in editor in Scratch. In the next sections, I will present step-by-step instructions for you to follow on how to use Inkscape and the built in Scratch editor to make these.
Inkscape
Using the “Create and edit text objects” tool in Inkscape
The “Create and edit text objects” or text tool (hotkey: T) can be used to layout text in Inkscape. I want to use a custom font (Arial Rounded or Seurat) which means I can’t use the built-in text tool in Scratch since it doesn’t have either of those fonts. To use the text tool in Inkscape:
1. Click on the text tool in the toolbox, located on the left hand side of the Inkscape window. The tool is highlighted in red below:

2. At the top of the Inkscape workspace, change the values of Rx and Ry, short for “radius x” and “radius y”, to a small number. I will use “5” for each, as in the animated screenshot below:
3. Click and drag in your Inkscape document to create a rectangle, as shown above. The exact size and color don’t matter since you will be able to resize and recolor it using Scratch’s built-in editor.
4. If your rectangle doesn’t appear, double-check that the opacity setting, denoted by an “O” at the bottom of the Inkscape workspace, hasn’t been set to 0. It should be set to 100 as pictured below:
I will use this tool to create the text from the instructions as well as the text in the completion text bubble and lay them out in the document.

Adding “special” characters to text
If you look at the text in the Animal Crossing screenshot, you’ll notice that there’s a “special” character in the second line that looks like a long dash:
This character is called an “em dash” and you probably won’t be able to find it on your keyboard. To be able to add it, you have to enter a special mode called Unicode character input in Inkscape and type in the code for the character (which is 2014—for more information about Unicode, see the link “Unicode: Overview” in the Additional Resources section at the end of this tutorial). To do this:
Use the text tool to type in the text up to the special character.
When you get to the special character, press “Ctrl” and “U” at the same time to enter Unicode character input.
Type in the code for the character, “2014”, and press “Enter”. See the animated screenshot below. The pause is where I press Ctrl+U and type in the code for the em dash.

Finish typing the rest of the text.
Justification of text
You can make text be left-, right-, or centre-aligned by changing its justification. By default, text is left-aligned, that is, the left edge of each line of text is lined up. If you look closely at the Animal Crossing screenshot, however, you’ll notice that the middle of each line of text is lined up. This is called centre-aligned. To centre align your text:
Select your text by clicking on it using the text tool.
1. Click on the alignment drop down and select the icon for centred alignment. The alignment icon can be found near the top of the Inkscape workspace:

2. Press the escape (Esc) key on your keyboard to finish editing your text. The whole process is detailed in the animated screenshot below:

Alignment and distribution of objects
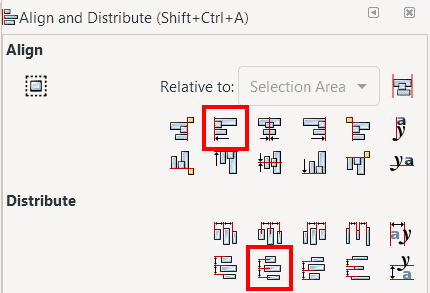
1. While text within each text box can be aligned using the text justification tool, to align multiple and evenly distribute multiple objects, such as the three pieces of instruction text, you will need to use the “Align and distribute” panel (hotkey: Shift+Control+A):
2. Click on the selection tool (hotkey: S) and use it to drag a selection box around the three pieces of instruction text. The selection tool can be found at the top of the toolbox, on the left side of your Inkscape workspace:

3. Click on the “Align and distribute objects” button in the top right of the Inkscape workspace to open the “Align and distribute” panel:

4. In the “Align and distribute” panel, look for and click the “Align left edges” button in the “Align” section and the “Distribute centers equidistantly vertically” button in the “Distribute” section. Both of these are highlighted in the screenshot below:
5. The overall effect should be as pictured in the animated screenshot below:

Making a rounded rectangle
Before exporting from Inkscape and moving over to the Scratch editor, I want to make a rounded rectangle that I can use as a template for anything that needs to have the soft corners of the Animal Crossing style. While you can make plain rectangles in Scratch, the built-in tools don’t make it easy to have rectangles with nicely rounded corners, so I will use Inkscape to provide the shape. To make a rounded rectangle:
1. Click on the “Create squares and rectangles” tool (hotkey: R) in the toolbox:

2. At the top of the Inkscape workspace, change the values of Rx and Ry, short for “radius x” and “radius y”, to a small number. I will use “5” for each, as in the animated screenshot below:
3. Click and drag in your Inkscape document to create a rectangle, as shown above. The exact size and color don’t matter since you will be able to resize and recolor it using Scratch’s built-in editor.
4. If your rectangle doesn’t appear, double-check that the opacity setting, denoted by an “O” at the bottom of the Inkscape workspace, hasn’t been set to 0. It should be set to 100 as pictured below:
Exporting from Inkscape
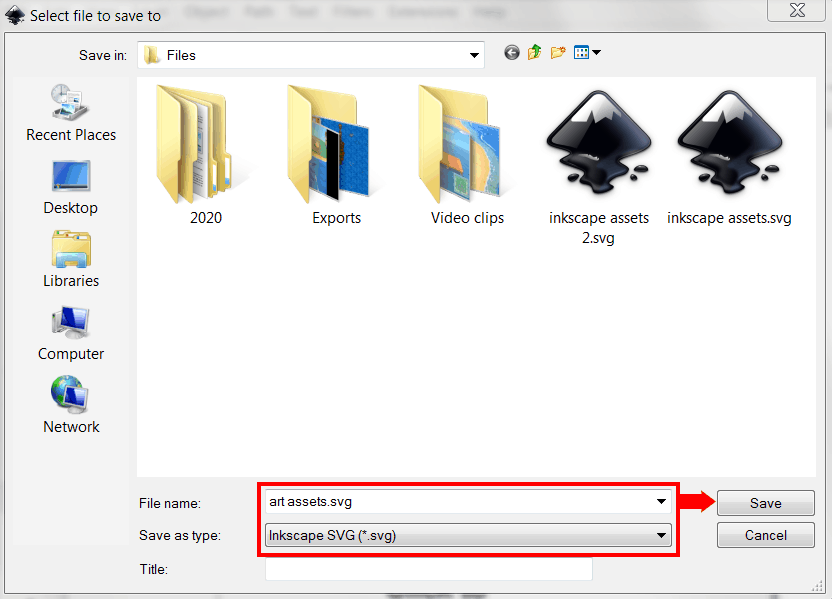
To be able to use the assets that I made here in Scratch, they need to be saved in Inkscape. By default, Inkscape saves in a vector format called “Scalable Vector Graphics” (SVG) and, thankfully, SVG files can be uploaded directly into Scratch. The approach I’m taking here is to export everything as one file and then use Scratch to create individual sprites from pieces of that file after it has been uploaded. Before saving, though, I need to convert the text to “paths”, which means that they become vector shapes behind the scenes instead of staying as text, because Scratch won’t be able to display this text using the typeface that I want. If you don’t have any text, you could skip the first two steps below:
Select all objects by going to “Edit > Select All” (hotkey: Control+A) in the menu at the top. You only need to select text objects, but it doesn’t matter if you also select the rectangle.
Click on “Path > Object to Path” in the menu at the top to convert your text objects to paths, as shown in the animated screenshot below. You can verify that this step worked by checking to see if you can still edit your text with the text tool (you shouldn’t be able to).

Click on “File > Save” in the menu at the top to open the “Select file to save to” dialog. Give your file a name, make sure the “Save as type” is set to “Inkscape SVG (*.svg), then click “Save”, as shown in the screenshot below:
Scratch
Bringing vector art assets into Scratch
Uploading vector art is done the same way as uploading any sprite in Scratch with an extra step at the end. To upload vector graphics into Scratch:
1. Hover over the “Choose a Sprite” and click on “Upload Sprite” in the popup menu, as pictured in the screenshot below:
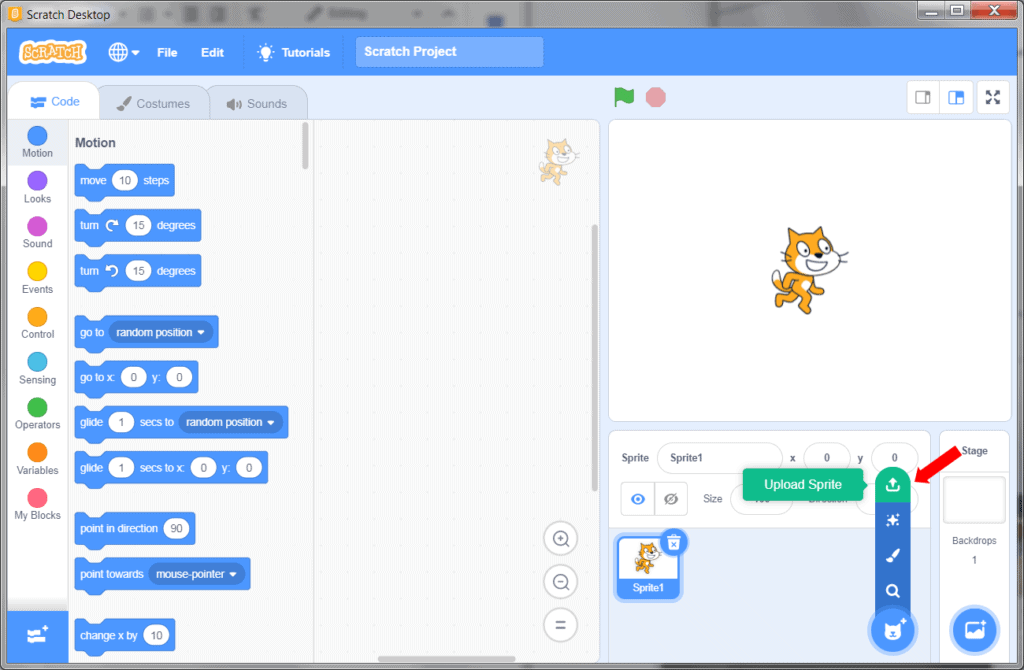
2. Select the SVG file that has your vector art assets. In my case, that will be “art assets.svg”. As usual, this should create and select the new sprite, but the new sprite won’t look right just yet. This is because imported vector art sometimes gets misinterpreted by Scratch.
A trick that I found to fix this is to use Scratch to convert it to a bitmap and then undo that change. I have described these steps and provided a corresponding animated screenshot:
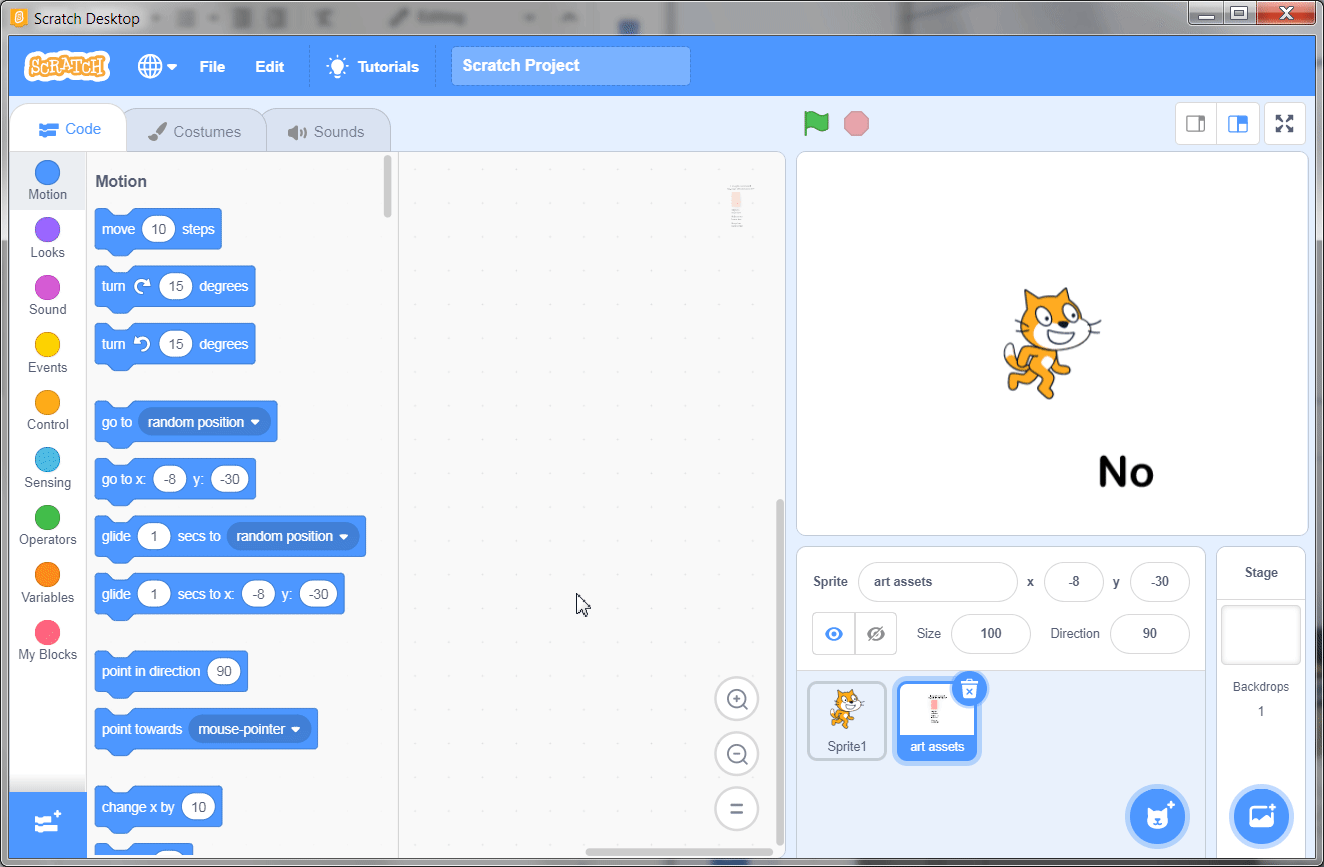
- Go to the “Costumes” tab.
- Click the “Convert to Bitmap” button.
- Click the “Undo” button.
This makes Scratch reinterpret the vector art that you uploaded and should fix how it is displayed.
Splitting vector art assets into multiple sprites
The process of splitting your uploaded vector art into multiple sprites is as simple as duplicating the uploaded sprite, then deleting elements that don’t belong using Scratch’s built-in editor. For example, if you wanted to only have the instruction text and a backing rounded rectangle, you would:
- Duplicate the art assets sprite by right-clicking on it and selecting “duplicate” from the popup menu.
- With the new (duplicated) sprite selected, go to the “Costumes” tab.
- Using the “Select” tool on the costumes tab, click on each unwanted element to select it and then click the delete button. In this case, the only unwanted element is the completion text, so I would click on the completion text and delete it, as shown in the animated screenshot below:
- Optional: It’s a good idea to rename your sprites so that you’re able to keep track of them. To do this, click on the bubble next to the word “Sprite” in the sprite pane and type in something better. In the example above, this bubble has “art assets2” in it.

Using the “Costumes” tools to change the size and color of uploaded assets
Now that you can split your sheet of assets apart, you can use Scratch’s built-in tools to adjust your sprite. Because you imported vector art, you can easily change the fill colour of any element by:
- Selecting it by clicking on it with the “Select” tool.
- Changing the “Fill” to a different colour. The “Fill” colour picker is just above the “Select” tool.
Using the Animal Crossing screenshot as reference, I will be aiming to make the rectangle a light brown colour and the instruction text a darker shade of brown. I will also reposition the rectangle so that it is behind the instruction text and resize it so that it covers the text. To resize any element:
- Select it by clicking on it with the “Select tool”.
- Grab any of the handles that show up and drag them.
Both the “Fill” tool and the resizing handles are highlighted in the screenshot below:
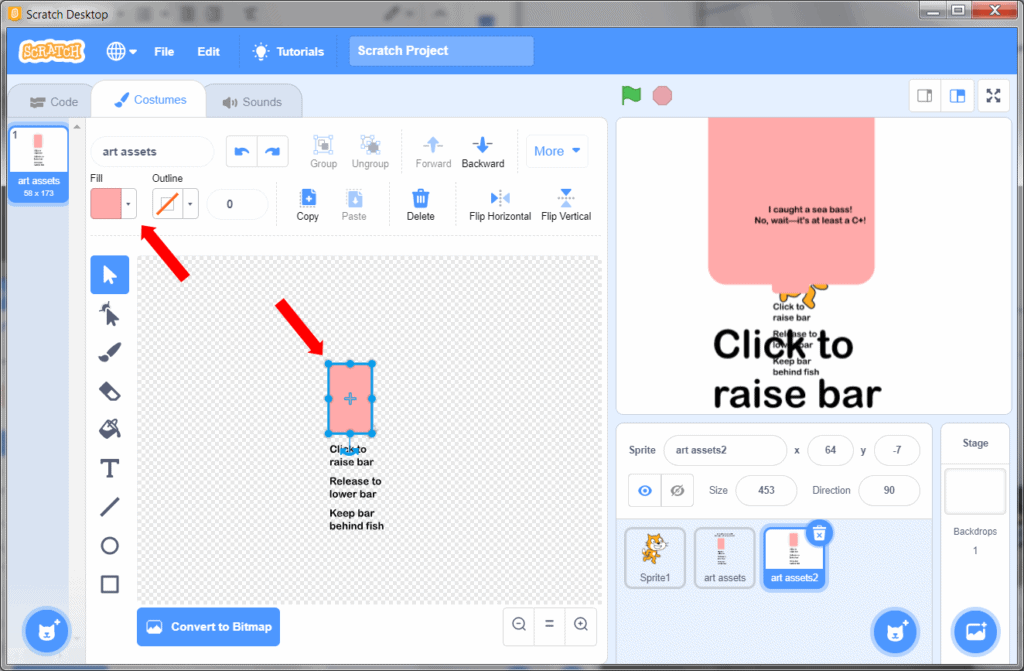
If your rectangle appears on top of the text, change its layer by clicking on the “Backward” button at the top of the “Costumes” tab.
Creating the Planned Assets
Use the steps above to create as many assets as possible. You should be able to create assets for everything that I marked as “simple” since they’re based off of the Inkscape and Scratch techniques, or solely use the Scratch editor. Don’t forget that some of these assets can be used multiple times, for example the rounded rectangle might be used as the background for text but also stretched out for the main fishing area. For the more complex assets, create a sprite to act as a placeholder for whatever they eventually will be and make a quick design using Scratch’s built-in tools for now. This is what I came up with:
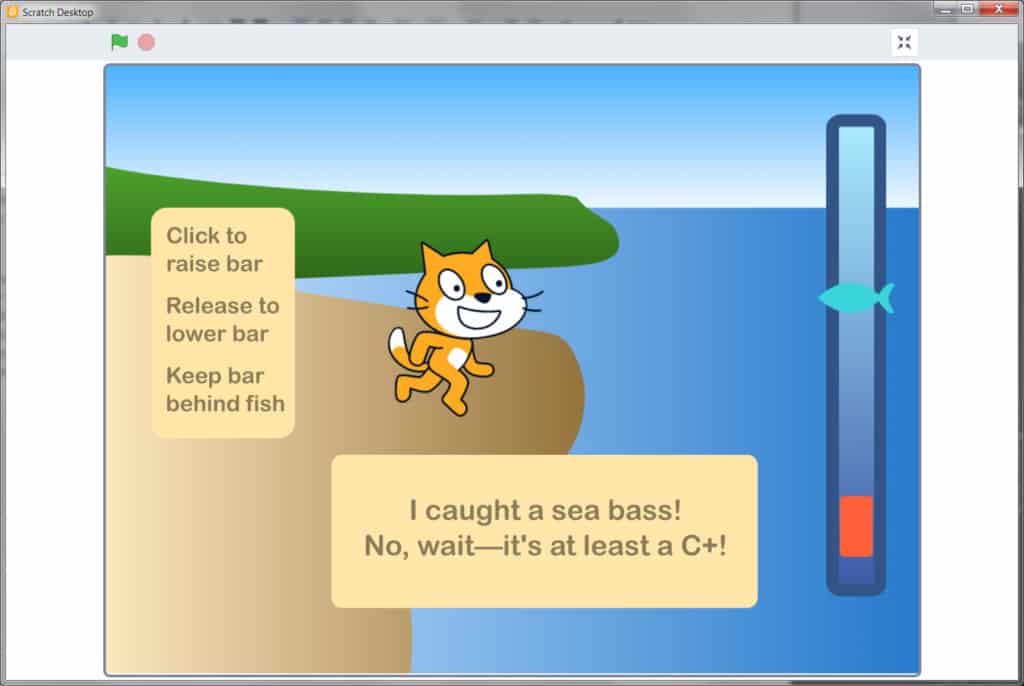
I even made a crude fish icon as a placeholder! Some of these art assets will be swapped out as better ones, with stronger Animal Crossing flavour, assets are made. The completion text, for example, should be more of a compound blob shape than a rounded rectangle. The background, also, is in dire need of detail, but that can be painted separately. The important thing is that the art assets necessary for the game prototype are now mostly in place.
Conclusion
In this tutorial, I presented a workflow for creating vector graphics in Inkscape and bringing them into Scratch. Vector graphics are excellent for creating clean and clear user interfaces and art that can be resized as necessary without losing any detail. They can also be easily recolored in Scratch to fit any design theme. Vector and raster graphics are used throughout computing. Understanding the purpose of vector graphics and the difference between raster and vector graphics will help you not just up your Scratch game, but in other computer, coding, and digital art projects as well.
We want to see the awesome things you’re creating! Take a photo or video and share your work with us by emailing media@pinnguaq.com or tagging @pinnguaq on Facebook, Twitter, or Instagram. Don’t forget to include the hashtag #LearnWithPinnguaq!
Resources
Additional Resources
You might also like
Scratch Basics Episode 1: Introduction to the Scratch Working Environment
 Grade 1 – Grade 12
In this series, the basics of Scratch will be introduced to provide learners with the foundational skills required to begin creating in Scratch.
Scratch Basics Episode 4: Adding Sound
Grade 1 – Grade 12
In this series, the basics of Scratch will be introduced to provide learners with the foundational skills required to begin creating in Scratch.
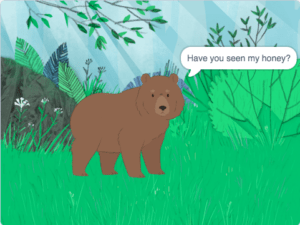
Scratch Basics Episode 3: Make Your Sprite Say Something
Primary – Adult
In this series, the basics of Scratch will be introduced to provide learners with the foundational skills required to begin creating in Scratch.
