
Introduction
In the primary division, students are in the early stages of developing their sense of self, while also learning to identify and manage their emotions and feelings. Learning is therefore focused on skills related to self-awareness, identifying and managing emotions, and learning to cope with challenges.¹ At the same time, primary-school students are beginning to develop skills around relationships and critical and creative thinking. This activity introduces students to a digital tool that will help them express and reflect on their identity.
¹ Ontario Ministry of Education Curriculum Doc 2015, 91
Learning Goals
- Students will be able to identify the factors that impact their physical and mental well-being (e.g. nutrition, exercise, play, family, friends, school)
- Students will participate in the creation of their own Scratch poster to express in a creative way the message they want to convey about being their best “ME”
Vocabulary
(Ontario Ministry of Education Curriculum Doc 2015)
- Self-Concept
- The perception a person has of their own identity. People form their self-concept by interpreting information they acquire about themselves through experiences and interactions with others and their environment. A person’s self-concept can be influenced by the opinions of others, reinforcement of behaviour, and explanations or understanding of one’s own behaviour or actions. Unlike self-esteem, self-concept is not positive or negative, but rather accurate or inaccurate, or extensive or narrow.
Guiding Questions
- What does being healthy and well mean to you? What does being healthy and well feel like in your body?
- What does your body feel like when you are not healthy or not well?
- What factors influence whether we feel at our best or not (e.g. nutrition, exercise, play, friends, family, school)?
Curriculum Links
This lesson provides the opportunity to make connections that relate to health and well-being, including how choices and behaviours affect both oneself and others, and how factors in the world affect the health and well-being of oneself and others. Cross-curricular links can be made to subjects including Coding (creating a digital story to promote a positive sense of self), Arts (creative and critical thinking) and Literacy (understanding how words impact how we and others feel about ourselves).
Materials
- Music (for Moving to Music exercise)
- Cards with statements on them (see example list below)
- Laptop and projector to show exemplars of Scratch-coded stories and games (optional)
Non-Computer Introduction Activity
1. Moving to Music
Give each student a card with five to eight statements on it. Students move about the room while the music is playing, and stop when the music stops. They turn to the person closest to them and are directed to complete one of the statements.
Sample statements:
- I feel good about myself when…
- My favourite food is…
- My favourite sport or physical activity is…
- I feel sad when…
- One thing I like about myself is…
- My favourite time to play is…
- One thing I am good at is…
- I feel happy when…
After a few rounds of the game, share some of the completed statements as a group.
2. Groups of Three
The teacher instructs students to move about the room, then calls out “Groups of…” and announces a random number. Students should then form groups of that number. The teacher continues doing this so that students form groups of various sizes, ending the game with groups of three. Each group of three has 30 seconds to come up with three things that make them feel good (e.g. a good snack, a sport or a hobby). After playing, have each group share their lists with the class.
Computer Activity
Following this lesson plan is a tutorial in which students create a simple digital poster using Scratch that portrays who they are and what they love about themselves. Students will be introduced to Scratch as a digital tool that can be used to create and share digital art.
Conclusion
Think Pair Share with a partner:
- What was the coolest thing about creating and coding?
- What was one task I had that was hard at first, but that I got better at?
- Have students share Scratch pieces of art
Additional Resources
- Pinnguaq Scratch Basics Episode 1
- Pinnguaq Scratch Basics Episode 2
- Teach Body Image, Dr. Lorayne Robertson, Ontario Tech University

Tutorial
Note to Teachers
The following is an introductory coding activity using Scratch, a basic computer language that uses a “building-block” style of coding to create animated stories, interactive games, simulations and beautiful artwork.
If this is your first time using Scratch, we recommend you explore our Scratch Basics video series, episodes 1 and 2—they will give you a good foundation in the basics of using the software.
In this exercise, students use Scratch to create a simple digital poster that portrays who they are and what they love about themselves. Students are introduced to Scratch as a tool that can be used to create and share digital art. Teachers should guide students in creating lists of positive aspects about themselves by using some of the answers from the Moving to the Music game in the non-computer activity OR have students discover which of Scratch’s sprites best reflect them as they explore the software.
Introduction
This tutorial outlines how to create a digital poster in Scratch.
In this activity students will learn to:
- Open a new project
- Add a backdrop
- Add and delete sprites
Vocabulary
The following vocabulary definitions are taken directly from the Scratch Wiki.
- Backdrop
- is the image that all sprites are shown in front of on the stage area.
- Block Palette
- the area that appears on the left of the screen under the Code tab. It contains nine sections of blocks that can be dragged into the code area to build the code that makes sprites move or make sounds or whatever you want them to do.
- Blocks
- puzzle-piece shapes that are used to create code. The blocks connect to each other vertically like a jigsaw puzzle, where each block provides the code needed to make your sprite do what you want it to do.
- Code Area
- the large empty space to the right of the block palette. It is an area for storing the blocks that run your project. Blocks can be dragged from the block palette into the code area and arranged to form scripts.
- Script
- A series of connected blocks that interlock with one another. The blocks and their order are very important, as they determine how sprites interact with each other and the backdrop. Sprite An object, character or picture that the user creates, uploads, or finds in the sprites library. Using coding blocks, users program sprites to perform actions and become a central part of the digital project.
- Sprite Pane
- the white area located beneath the stage area where all sprites in a project can be easily accessed for modification or inspection.
- Stage
- the area where sprites perform their actions. It is located at the top of the area to the right of the code area.
Step-by-Step Instructions
In this activity you are going to use Scratch to create a digital poster about yourself. When someone else looks at the poster, we want them to learn about who you are just by looking at it. In Scratch, any object, character or picture is called a sprite. In this activity you can choose different sprites that represent you for your poster. Portraying who you are goes deeper than just showing your outer appearance. Remember, it is less important to select sprites that look like you; rather choose sprites that best represent who you are as a person.
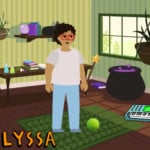
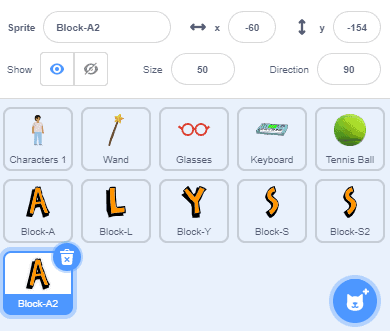
For example, this is my project:
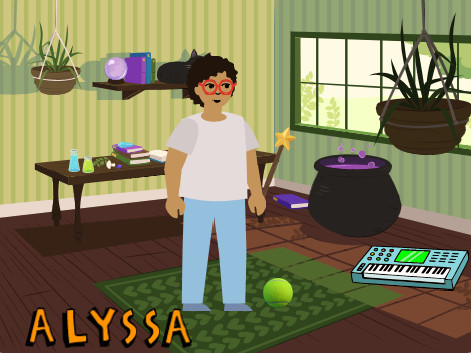
It displays many different sprites that represent me. For example, I added a piano because I play piano, and a tennis ball because I play tennis. I made sure I put glasses on my character so it looks more like me. I also put a magic wand in my character’s hand, because I love fantasy games and movies.
Step 1: Open Scratch and start a new project. Where it says Scratch Project, type in a title for your project. I called mine About Me.

Now, let’s save the project to the computer. Under File you will see Save to your computer—save your project there.
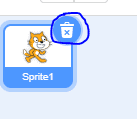
Step 2: The Scratch editor automatically starts with a Cat Sprite for all projects. The cat sprite appears on the Stage. Delete the cat to make some room for more sprites! To do this, click on the trash icon in the corner of the Scratch cat icon in your sprite pane. You can add and delete as many Sprites as you want—but first let’s add a backdrop.
Step 3: Add a backdrop by clicking on the Backdrops tab.
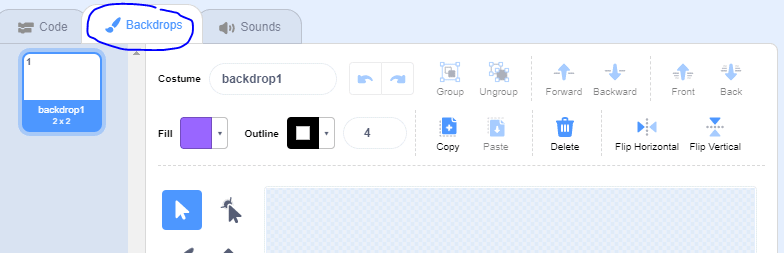
At the bottom-left corner of the Scratch editor, you will see an icon of a picture with a plus sign in the corner. Click on the icon and choose a backdrop that you like and that reflects something about your personality. There are many backdrops to choose from. I chose Witch House because I love video games, shows and movies that are based around fantasy! Remember, everything you choose should say something about you. Once you are done, go back to the Code tab, which is to the left of the Backdrops tab.
Step 4: Now that you have a background, you can choose a sprite that represents you. To add a sprite, select the sprite bubble that you see in the bottom-right corner of the sprite pane—it has a plus sign in the top-right corner. Here you will find a People button where you can choose from a variety of character sprites. Choose one that you think best represent you.

In Scratch, costume refers to the appearance of your sprite. This could include the sprite’s colour, shape or size, as well as what it is wearing. If you would like to change something about the appearance of the sprite you’ve selected, you can modify it by clicking on the Costumes tab (beside the Code tab).

Here you will find different options for your sprite’s costume. Click on your sprite in the stage area to select it, then use the formatting toolbar along the left side of your screen to change your sprite’s shape, colour or size until you’re happy with how it looks.
Step 5: Now that you have selected a sprite to represent you, add more sprites that represent things that reflect who you are—like sports, animals, friends, interests and hobbies. If you have trouble adding new sprites, go back to Step 4. If a sprite gets stuck behind another sprite, just click on them in the stage area and drag them to where you want them.
Add as many sprites as you’d like to describe yourself!
Make sure you save your project to your computer like we did in Step 1 so you don’t lose it!
