
Introduction
This activity is intended for an intermediate Scratch user who is familiar with the basic Scratch coding blocks. This activity is an extension of the Lost In Space Maze Game for Beginner’s Tutorial. This video tutorial will explore a different way to move a sprite and make costumes rotate in Scratch while building on knowledge that was learned in Lost In Space Maze Game for Beginner’s Tutorial. This activity has been broken down into three parts. Scratch uses code blocks that are grouped by category. The categories we will be exploring are Motion, Event, Control, Sensing and as an additional option Variables. These code blocks can be pieced together in the scripts area like a jigsaw puzzle.
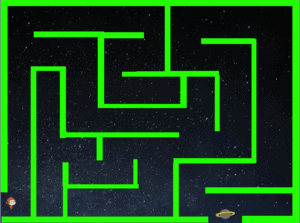
You will create a moving maze game where our alien friend is lost in space again but this time it must pass through Saturn’s moving rings that orbit the planet to return to its home planet. Mazes often only have one path that leads to the finish but include different pathways, branches and dead ends which encourage the person playing to problem solve and find their way out. Scratch helps to develop computational thinking skills while allowing you to explore your own ideas and bring them to life.
During this three part tutorial, you will be introduced to coding concepts and computational thinking by exploring different combinations of code to create a moving maze game. As mentioned by BBC, computational thinking can be broken down into four main categories: decomposition, pattern recognition, abstraction, and algorithms.
Decomposition is a thought process that allows you to break down a problem such as how to get through a maze.
Pattern recognition allows you to connect the given problem to problems you have previously encountered.
Abstraction allows you to focus on relevant information and problem solve by focusing on your core knowledge surrounding the problem.
Algorithmic thinking allows you to develop a solution to a given problem through sequential rules.
For more information on computational thinking, read the following article and lesson provided by BBC Bitesize.
Vocabulary
- Control (Scratch Block Category) – these blocks are used to control scripts and provide various loops.
- Event (Scratch Block Category) – these blocks are mainly hat shaped and sense events which trigger a script to run.
- Motion (Scratch Block Category) – these blocks are used to control a sprites movement.
- Sensing (Scratch Block Category) – these blocks are used to detect different factors in your project.
- Stage – the stage is the background of the project, which can have scripts, backdrops (costumes), and sounds. It is 480 pixels wide and 360 pixels tall. This is where you can play your code that you create.
- Variables (Scratch Block Category) – used to hold and refer to (i.e. use later) values and is often a temporary piece of information that can change in a code.
- X-Coordinate – A number on the x-axis that describes where something is in terms of left and right (or horizontally).
- Y-Coordinate – A number on the y-axis that describes where something is in terms of up or down (or vertically).
Materials
Scratch 3.0 (Online or Download the Desktop Version)
Computer Activity
These steps will take you through the process of developing a game in Scratch where an alien is lost in space and must pass through Saturn’s moving rings that orbit its planet in order to return to its home planet. This activity has been broken down into three parts. Part one will take you through the steps to set up your backdrop, select specific sprites and create a new sprite. Part two will take you through the steps to code your alien sprite. Part three will take you through the steps to code your moving maze and add a variable to your game. To begin this activity, open Scratch 3.0 (Online or Desktop Version) and select File or Create > New, to begin our new project.
PART 1: Setting The Backdrop, Selecting Sprites & Creating a New Sprite.
- Delete your cat sprite by clicking on the small ‘x’ in the right corner of the sprite box.
- Choose a backdrop by hovering over the picture icon in the bottom right corner of the screen and selecting the magnifying glass to search for our backdrop.

Then, add your space backdrop by selecting ‘Space’ in the top menu, then selecting ‘Stars’ as your backdrop.

- Add in your first sprite by hovering over the ‘Choose a Sprite’ icon in the bottom right corner of the screen and selecting the magnifying glass to search for our sprite.
Then, select ‘Fantasy’ and scroll down using your mouse or touchpad to find ‘Pico Walking’ and select it.
- Add in your second sprite by hovering over the ‘Choose a Sprite’ icon and selecting the magnifying glass. Then, using the search bar, type in ‘Planet’ and select ‘Planet2’ from the sprites.
- We are going to change the size of the ‘Pico Walking’ sprite and ‘Planet2’ sprite. First, click on the ‘Pico Walking’ sprite and in the ‘size’ box type in 15. This will make your sprite smaller so it can fit inside the maze.

Next, click on the ‘Planet2’ sprite and in the ‘size’ box type 45. This will make our planet look a little more proportional to the size of our alien sprite. Once this is complete, click and drag the sprite on the Stage and place it to the far right side of the screen.

- We are going to create our own sprite that will represent the rotating rings around Saturn. To do this we must first hover over the ‘Choose a Sprite’ icon and select the ‘paint’ icon.

This will bring us to our blank drawing board to create our first ring sprite!

- Start by selecting the ‘Fill’ tab and clicking on the ‘No fill’ icon, this will take away the option of filling in the entire shape that we create.

Next, select the ‘Outline’ tab and use the slider to select a bright green colour to represent the rings around Saturn. Once you have dragged the slider to find your perfect shade of green, change the width of the outline to 10.

- Next, select the ‘Circle’ icon from your tool box to the left of the drawing board. Use this tool to draw a large circle in the centre of your drawing board. Note: this circle should only take up about 75% of the drawing board.

- We want to erase a piece of the circle so that our alien sprite can enter the first ring of Saturn. Select the ‘Eraser’ tool from the toolbox and erase a small part of the circle on the left side. Make sure that you erase enough for the alien to fit through and keep in mind that the circle will be moving so we might want to give a little extra space!

- Next, we want to look over at the right side of our screen in our sprites menu and select ‘Sprite 1’ so that we can make our ring large enough to fill most of the playing screen. Change the size of the sprite so that it almost touches the top and bottom of the playing screen. Move the sprite into the center of the playing screen by selecting it with your mouse or touchpad and dragging it to the middle. I changed my size to 120 but yours might be different depending on your drawing!
PART 2: Coding Our Pico Walking Sprite
- LET US CODE! We will begin coding our ‘Pico Walking’ sprite. Select your ‘Pico Walking’ sprite and then in the top left corner select ‘Code’ to bring us back to the drag and drop code blocks.

Next, click and drag on your ‘Pico Walking’ sprite on the stage and place the alien close to the left edge of the screen. This is where we will code our sprite to start each time we play our game. Let’s start by clicking on our yellow Events tab and dragging a ‘When Green Flag Clicked’ onto our scripting page.


We want to tell our ‘Pico Walking’ sprite where to start the game each time and which direction to face. What blocks could we use and attach to our ‘When Green Flag Clicked’ so that we always begin the game on the left side of our screen in the exact same spot and always facing the direction of our home planet?
I used the following blocks:
- ‘When Green Flag Clicked’
- ‘Go to x:-224 y:-4’ this block may have different numbers for you as this is the location to which I dragged my ‘Pico Walking’ sprite a few steps back.
- ‘Point in direction 90 degrees’ Note: you can click on the number in this block and drag the arrow to point in the direction of home planet.

- Next, we need to code our four arrow keys so that we can move our ‘Pico Walking’ sprite and guide him through the maze. To do this we are going to use a conditional statement ‘if, then’. Conditional statements tell the code that if something specific occurs then do this. In this case we will tell the code that if a specific arrow key is pressed then it will move in a specific direction. For this part of the code we will be selecting blocks from the Motion, Control and Sensing tabs in the toolbox.
The Scratch stage is an xy-plane, which means that it uses two numbers, the x-coordinate and the y-coordinate (x, y), to describe the position of sprites. Everything you add to the stage has set x,y coordinates. See the grid below for example.

The x-coordinate determines where something is in terms of left and right (or horizontally). The y-coordinate determines where something is in terms of up or down (or vertically). Any change in the x,y coordinates for a sprite will result in its movement along those lines. This is the following code I used which controls the sprites movements using small changes to the x and y coordinates.
We will code our up and down arrows to move our ‘Pico Walking’ sprite along the y-coordinate. We will code our left and right arrows on the keyboard to move our ‘Pico Walking’ sprite along the x-coordinate. There are many ways you can code a sprite to move but this way allows the sprite to take smaller steps for better control. For more on basic movement techniques, check out this resource from Jonathan Weber at Pinnguaq, Player Control in Scratch: Basic Movement Techniques.

- Test out this code! Can you guide your alien sprite around the screen?
PART 3: Coding Our Moving Maze & Adding a Variable
- Did you happen to notice that our alien gained powers that allow him to travel through the first wall of our maze? Next, we will add another conditional ‘if, then’ statement block so that if our alien touches a specific colour it will bounce back to the starting spot. We want this to ‘forever’ occur when we play the game therefore, we are going to add the ’if, then’ conditional statement block to our ‘Pico Walking’ sprite code inside the forever loop, alongside our arrow movement code.
First, under our light blue Sensing tab select the hexagon shaped block ‘touching colour red’ and drag it to the scripting field. Click on the colour and this will bring you to the option of picking a colour from the slider bar. At the very bottom there is an option to select a colour from your screen using your colour dropper. Click on the colour dropper option.

Guide your mouse to the green ring or ‘Sprite1’ on your Stage and carefully select the green colour on the sprite.

Next, we can add this to our code for our ‘Pico Walking’ sprite. We will use another ‘if, then’ condition block from our Control tab alongside the hexagon shaped block we just created. This code will state that if our ‘Pico Walking’ sprite touches the colour green in our ring sprite that it will then be sent back to the start of the maze. For this we will need to add another ‘go to x: y:’ block and insert the exact coordinates to our start position. As you can see below, I have added in the three blocks mentioned above and the ‘go to x: y:’ block matches the one at the top of this code.

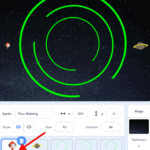
- Now we must code our ‘Sprite1’ so that it will rotate and create our moving maze. Once we finish this code we can create more layers in our maze. Start by clicking on your ‘Sprite 1’ in the sprite menu to the right of the screen.
In order to make our sprite rotate we will need to start with our Event block ‘When green flag clicked’. Drag this block onto our scripting field. We will need a ‘Forever’ loop block from our Control tab so that our green ring will forever rotate in the direction we tell it. Lastly, from our Motion tab we need the ‘turn left (arrow) 15 degrees’ block. Change the number in this block to 1, this will allow the sprite to make small movements in the rotation so that it stays in the same spot while it rotates. This is the entire code we need to make our ‘Sprite1’ rotate! See below for the code.

- We need more than one ring in our maze. Since we have already coded our first ring in our maze, we will simply duplicate the sprite and code! Right click on our ‘Sprite1’ using your mouse or touchpad and select ‘duplicate’.
Repeat this process one more time so that you will have three ring sprites.
- Now we are going to resize our ‘Sprite2’ by clicking on the sprite and entering the number 90 into our Size field.
We will also resize our ‘Sprite3’ by clicking on the sprite and entering the number 60 into our Size field.
- This will give us three different sized rings! Click and drag on the rings on the stage to place them inside each other like below.

- We are going to slightly change the code in our ‘Sprite2’ so that it spins the opposite way in order to make our maze a little harder! Click on ‘Sprite2’ and remove the ‘turn left (arrow) 1 degrees. Replace this block with the ‘turn right (arrow) 15 degrees’ block from the Control tab. Change the number from 15 to the number 1 again and then place it back inside the forever loop. Now we have three rings that will turn in two different directions to make our moving maze more challenging!

Test out your codes! Can you move the alien from the left side through the moving rings to its home planet?
*OPTIONAL STEP*
- Add in a variable to make your maze into a game where the player only has 3 ‘lives’ or chances at getting to the home planet! First, select your ‘Pico Walking’ sprite so that we can add a Variable and code to this sprite.

Next, go to the Variables tab closer to the bottom of the toolbox on the left side of the scripting field. When you click on ‘Make a variable’ it will pop open a window that will allow you to name your Variable, which I name mine ‘Lives’. Make sure that before you hit ok that the New Variable is set ‘For all sprites’.

Once you hit ‘OK’ you will see the Variable appear in the top left corner of your Stage.

Next, we need to code our ‘Pico Walking’ sprite so that each time it touches the green ring it bounces back to the start of the maze and loses a life. We will need two blocks from our Variables tab to do this. The first is the ‘set lives to 0’ block and the second is the ‘change lives by 0’ block. Place the ‘set lives to 0’ block directly under the ‘When green flag clicked’ block so that each time the game is started, the lives will reset as well. Change the 0 to a 3 in the ‘set lives to 0’ block. This will give the player 3 chances at getting through the maze. Then we will place the ‘change lives by 0’ block under the ‘if touching colour green, then’ block. Change the 0 to a -1 in the ‘change lives by 0’ block so that each time we touch the colour green our lives decrease by 1.

Your game is complete! Let’s PLAY! Test out your code and see if your lives decrease each time you touch a green ring. Can you complete the maze or challenge friends & family to complete the maze?

Follow Up
After you have completed the steps to create a game where an alien must navigate through a moving maze to return to its home planet, try adding to your game. Think about how you could add different levels to your maze or code your sprite to celebrate once they have reached home planet!
We want to see the awesome things you’re creating! Share your work with us online by tagging @pinnguaq on Facebook, Twitter or Instagram. Don’t forget to include the hashtag #LearnWithPinnguaq! You can also send us your work by email at media@pinnguaq.com.
For more fun activities, visit www.pinnguaq.com/learn.
You might also like
Player control in Scratch: Adding acceleration, speed, and friction
 Grade 7 – Grade 12
In this lesson students will be introduced to the techniques of adding acceleration, speed, and friction in Scratch!
Player Control in Scratch: Basic Movement Techniques
Grade 7 – Grade 12
In this lesson students will be introduced to three techniques for moving a player around the stage in Scratch!
Lost in Space Maze Game for Beginner Game Designers
Grade 3 – Grade 6
Design a simple maze game in Scratch where an alien is lost in space and must move through the maze to return to its home planet.
