Section Navigation

Introduction
In this module students will learn about the location of the provinces, territories and the various cultural areas of Canada. They will also become comfortable using cardinal directions (north, east, south, west) and transferring these skills to x and y coordinates in Scratch. They will gather research about each location prior to starting the Scratch project. What information they gather will be decided by the teacher based on age group and curriculum expectations.
Learning Goals
By the end of this module students will be able to use cardinal directions in an xy-plane. They will understand Canadian geography, Indigenous cultural maps and basic programming skills.
Vocabulary
Cardinal Directions - The four main points on a compass. The cardinal points are north (N), south (S), east (E) and west (W).
Arctic - The region around the North Pole, the Arctic Circle.
Subarctic - The area immediately south of the Arctic Circle.
Plateau - A land area having a relatively level surface that is also raised above adjoining land on at least one side. It is often cut by deep canyons.
Plains - Flat land with few trees.
Eastern Woodland - The region stretching from the northeastern coast of present-day United States and the Canadian Maritimes, to west of the Great Lakes.
Pacific Northwest - A region in western North America bounded by the Pacific Ocean to the west.
Guiding Questions
- Is there more than one type of Indigenous culture in each province/territory?
- What Indigenous groups do you know of in our province/territory?
- What about other provinces and territories?
- Do you know what cardinal directions are? Why are they important?
Curriculum Links
This module links into Canadian Social Studies, specifically geography and history. Students will be learning about the locations of the provinces and territories and the geographic areas of Indigenous people prior to contact with European settlers. The students will research about each of the Indigenous areas and the people who lived in them. Teachers can add specific details that they want the students to include on their interactive map.
Materials
- Scratch – Download Scratch
- Adobe AIR (required for Scratch to run) – Download Adobe AIR
- Navigating Canada art assets – Download Assets Folder
- Research handout – Download Assets Folder
- Tape
Non-Computer Activity
Below are two sample games that allow for exploration of the provinces, territories and the various cultural areas of Canada.
Can’t Cross Canada Game
Very similar game to “Octopus”. Two students are in the center trying to tag other students. They give a condition that gives some people a free pass, which can be geography related. For example “if you have been to Manitoba, then you can cross Canada”. All the students who have been to Manitoba cross to the other side. Then the students that remain, they say “you can’t cross Canada”, and the then try to tag them as they try to run safely to the other side. This continues until you have a winner. You can play multiple rounds of this game.
OR
Cardinal Directions Game
This game works best in a gym or large room where there are walls the students can run to. Start by telling the students which direction is north (be accurate!). The teacher shouts a direction, and the students run and touch the corresponding wall as fast as they can. The last person to touch is eliminated. Continue until you have one student remaining.
Computer Activity
For this module students will be given a digital copy of a map of the six different Indigenous geographic areas. They will create an interactive map which will allow people to explore the different Indigenous areas and find information about the people who live there. The information included can be determined by the teacher but could include who lived there, what provinces and territories the area covers, something unique about the people who live there, food sources, etc.
Give an example:
Activity
Start off with a land acknowledgement for where you are. The Whose Land website divides Canada into the different territories of Indigenous people. Use the following website to find your location and corresponding land acknowledgement. This website includes a detailed guide of how to make a proper land acknowledgement.
Example Of A Land Acknowledgement
City of Kawartha Lakes, ON
“We [I] would like to begin by acknowledging that the land on which we gather is the traditional territory of the Anishinaabe Mississauga adjacent to Haudenosaunee Territory and in the territory covered by the Williams Treaty. Each day we greet and honour the original inhabitants of the land.”
After the land acknowledgement, tell or watch a video of a Creation story about how North America was created. Here are are few links, but there are many to choose from on YouTube. Try and find a creation video for the Indigenous group that lives in the same region as the students. Be sure to screen the videos before showing them to students.
Next, divide the students into small groups and have them do research on each geographic area. This module includes a handout that students can use to organize their information. When they have finished their research they can begin programming by themselves, or you can work together as a class to research and program. Of the topics the students research, it is recommended they pick no more than four to cover in their program.
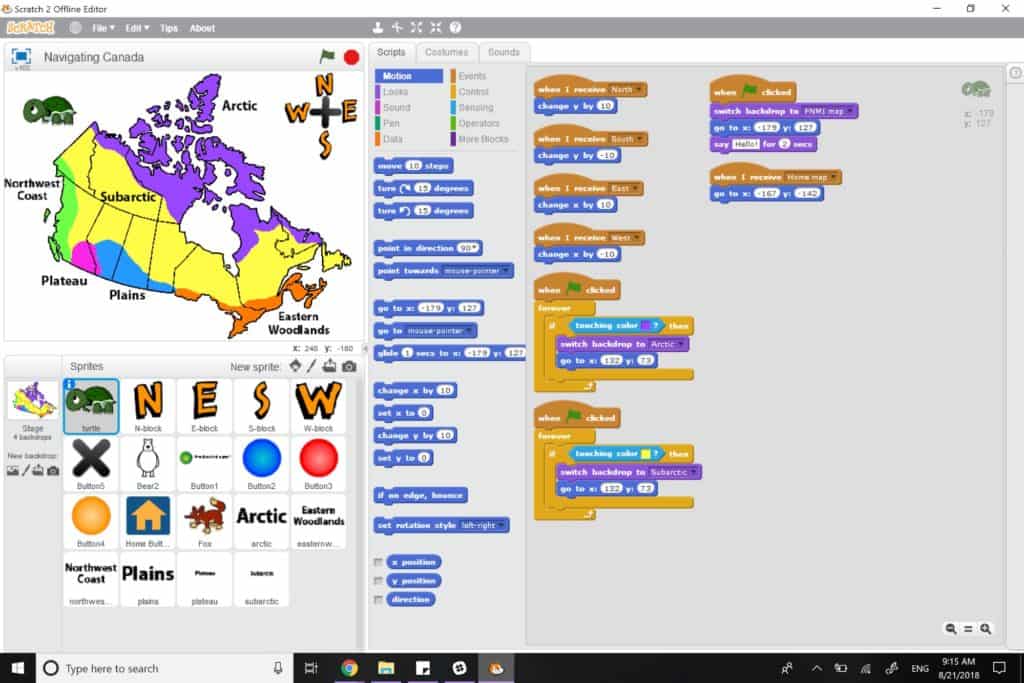
- Start a new project and delete the cat so your workspace is blank.
- Begin by importing the background of the cultural areas of Canada.
- Add the turtle sprite and start with a “when flag clicked” block and set the starting location for it.
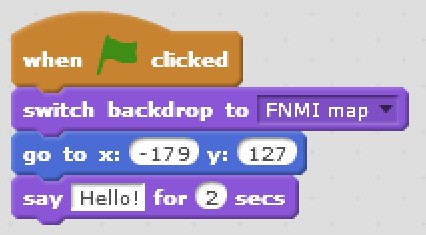
- This sets our starting backdrop when the flag is clicked, and makes sure our turtle starts in the same location and says “Hello!” (which can be changed into an introduction or starting instructions).
- Make sure to leave the speech bubble on the screen long enough for your message to be read.
- To add sprites click the character beside the words new sprite. Add the letter sprites N, E, S, W and the X Button to form your compass.
- Rotate the X button to make the cross for the compass. We will program these sprites to move the turtle in the correct cardinal direction when clicked.
- Set up your compass like this

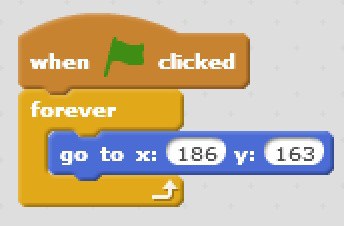
- As we want these letters to be buttons, and not objects that could inadvertently be dragged or moved, we will use a forever loop to set each of their positions
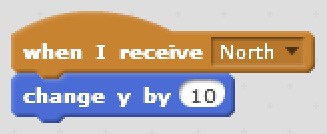
- To program the compass letters to move your turtle sprite, we will use “broadcast” blocks. When N is clicked we want to broadcast message north.
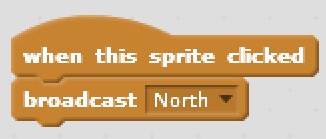
- When the turtle receives message north we want the y value to change by 10. (Remember y is movements up and down and x is movements left and right.)
- Continue programming the rest of the cardinal directions this way. Test your program to see how the movements affect your turtle.
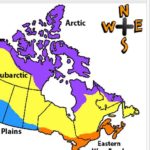
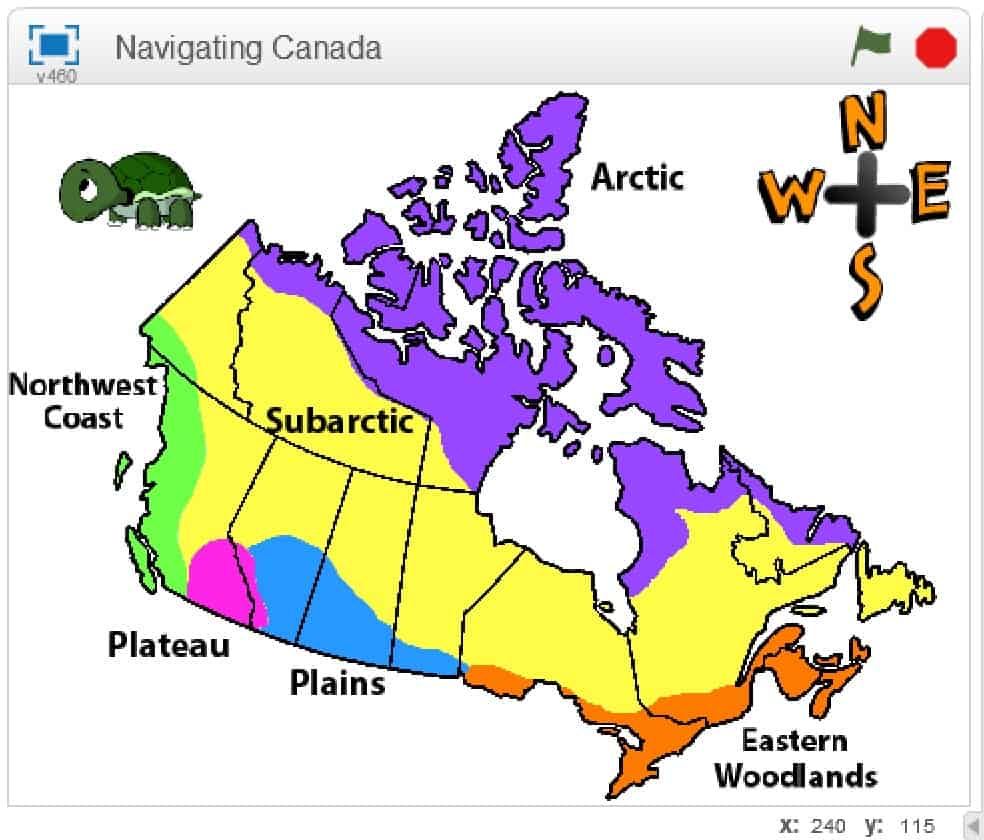
- This module includes word sprites for each cultural area. Upload them and place them in the correct areas. Use this image for reference:
- We want different backdrops for each area. This example uses a plain white background, but students can get creative here. But remind them to keep legibility in mind as they create their background so that the text can still be read easily.
- The text is also part of the background but can be made to be a sprite instead (explained in step 21). The circle sprites are not part of the background.
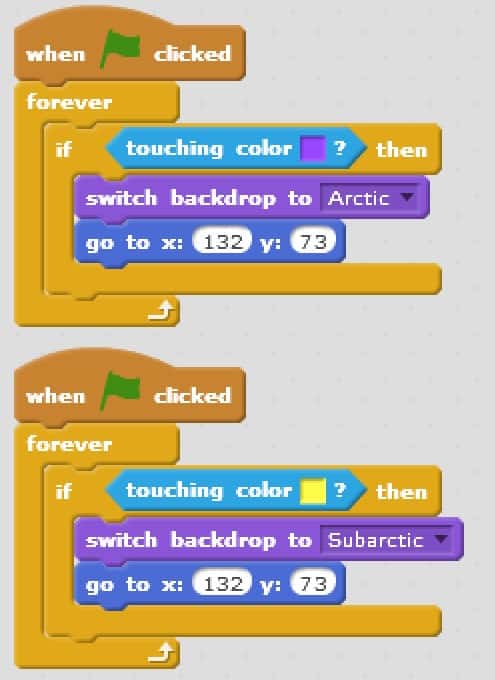
- To program the backdrop to switch, use the if-then block with a colour sensing block for the colour of each geographic area. This will make the backdrop change to whatever area the turtle is touching.
- At this stage add a block that changes the location of your turtle so it is out of the way of the information being displayed.
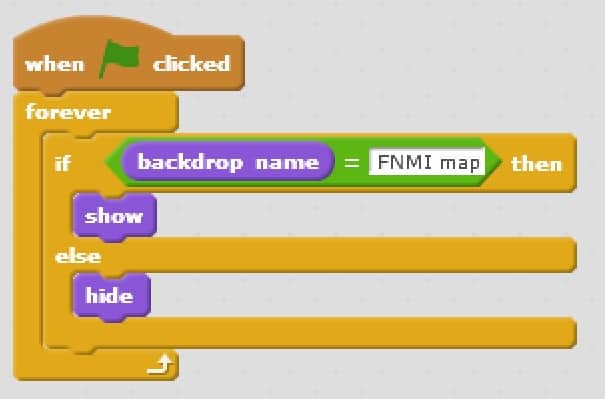
- We want the compass sprites and word sprites to be hidden when they are not on the opening background. Add the following program to each sprite you want to hide.
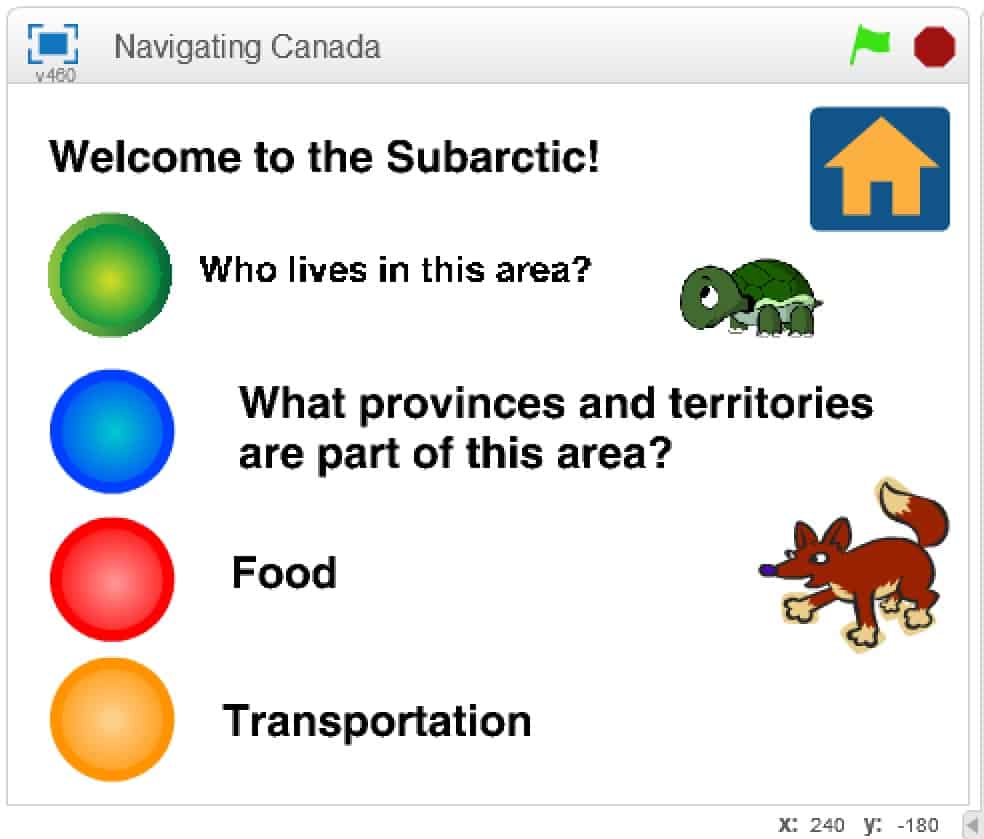
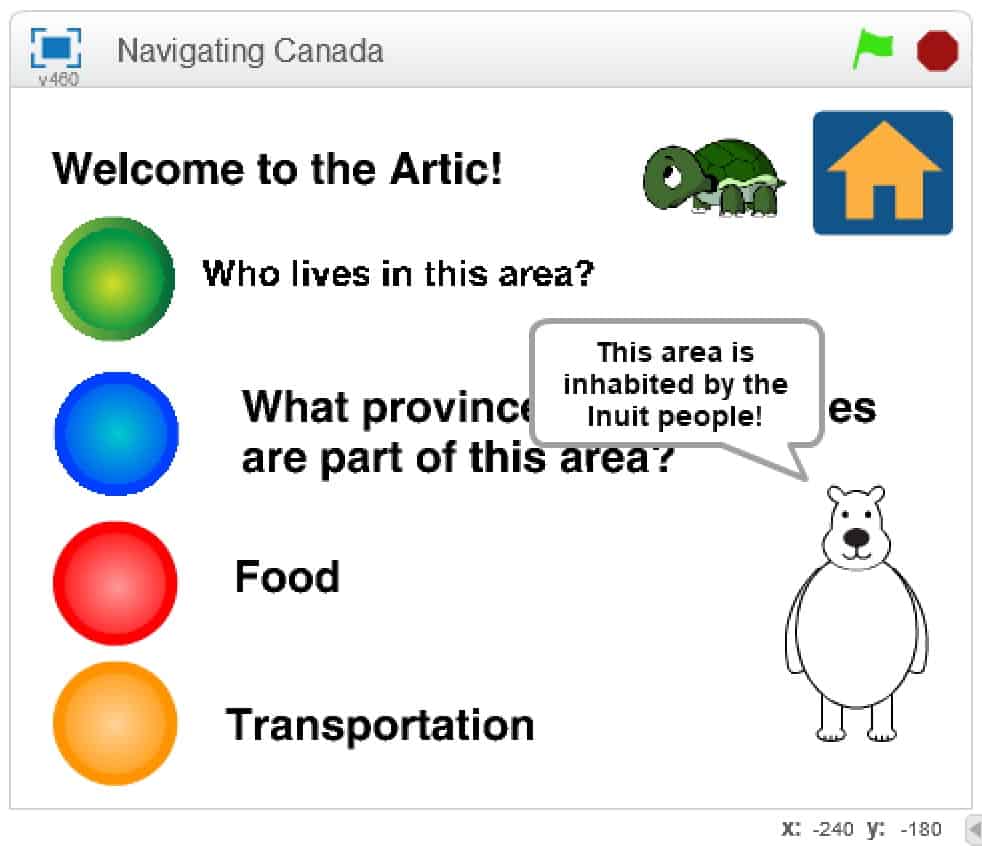
- Add circular button sprites for the topics covered in each area. Start by adding four buttons and adjusting their colours using costumes so they are different from each other.
- We will program the circle buttons so that when they are clicked the animal character on the screen provides the information for that geographic area.
- If you would like the words to be part of the button sprite, click “costumes” to edit the current costume and add text to go with your topic.

- To simplify the programming we will program the buttons to broadcast a message when they are clicked. In this example we name the messages to match the colours of the buttons.\
- Next add a character for each location. Try to pick ones that make sense for each area, such as a polar bear for the Arctic, and a fox for the Subarctic. Alternatively students could choose one animal sprite for all locations.
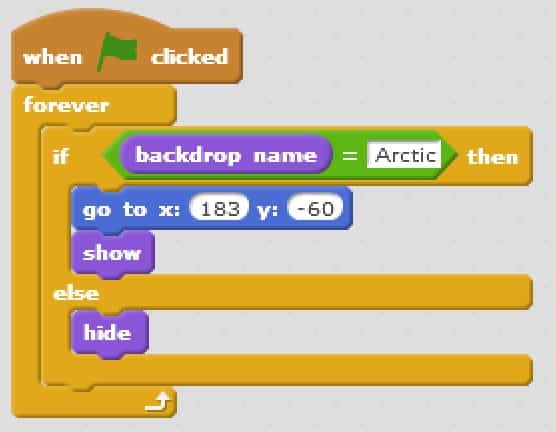
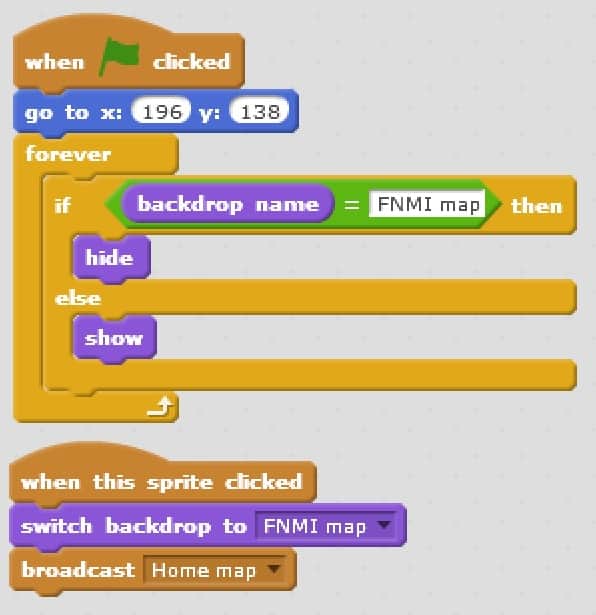
- We want the circle buttons and animal sprites to be hidden on the home screen. To do this we need an if-then-else loop that will check what backdrop is active, and hide or show the sprite based on the backdrop name.
- Add this code to each sprite we want hidden. Ensure that the “backdrop name” matches where you want it to be, and that “show” and “go to” location corresponds with where you want the sprite to go.
- To program the character to share the informational text, follow the scripts below.
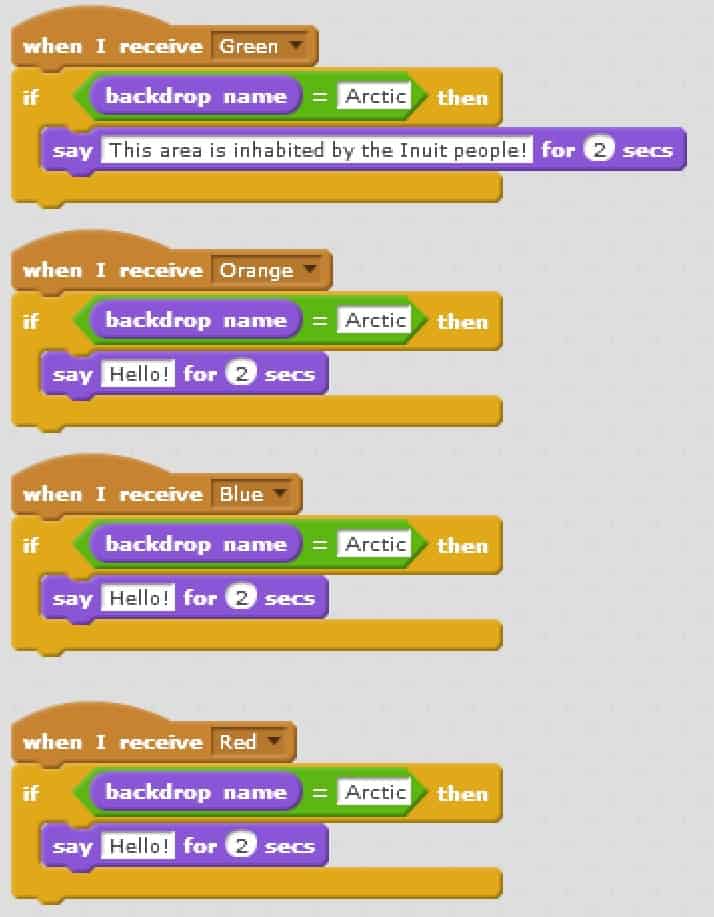
- This example has the polar bear receiving the messages for the different buttons, then saying the corresponding information. Use the same program for the different characters, changing the information and backdrop name for each.
- The final step is to pick a location for the turtle to go to on the map screen when it receives the message.
Conclusion
Play the XY Grid game.
- On the floor tape out a grid of any size (8×8 or larger is best).
- Plan a route to get from one side of the grid to the other.Note: Be sure to have only one safe square along the x-axis or the start line.
- Students can move left, right or forward. You can add backwards for an additional challenge later on. Explain that moving left is moving West, right is East, forward is North, and backwards is South.
- The goal is for the students to find their way through the grid, remembering the correct path and working as a team.
- Have children say their movements using the proper terms, such as “I am moving north one square”, or “I am moving east one square”.
- If you have space constraints, the “Robot Turtles Board” works well as a grid, and one of the tiles from the game can be used to move across the board. Alternatively a grid could also be drawn on chart paper or a whiteboard.
- Telling the children that the grid is “lava” and there is only one safe way across grabs their attention. This can easily be changed to any other kind of situation where there is one safe path.
- If they pick a square that is not “safe”, they must go back to the start and try to follow the correct path again.
Example:
| X | ||||||||
| X | ||||||||
| X | X | X | X | X | ||||
| X | X | X | ||||||
| X | X | |||||||
| X | ||||||||
| X | ||||||||
| X | X | X | ||||||
| X |
In the above example, the yellow X is the starting point. The next safe spot is stepping forward (“north”), then to the left (“west”), and so on. The students would state their movements as “I am moving north one square, and west two squares. Now I’m moving north three squares,” and so on. Continue this way until they make it safely across the grid to the green X.
Resources
- The Whose Land website shows the different territories in Canada and explains how to do a proper land acknowledgement for where you are.
- The CAUT(The Canadian Association of University Teachers) website has a guide to acknowledging First Peoples and Traditional Territories. It should be used alongside the Whose Land site to ensure you are doing a proper land acknowledgement.
- Canadian Geographic has a map of the different Indigenous languages in Canada.
- Aboriginal Perspectives: A Guide to the Teacher’s Toolkit (available as a PDF to download) includes different lessons that incorporate Indigenous perspectives.
- This Scratch project is similar to the one we are creating in this module. It can be explored to show students what they will be creating or used for a reference point.
- The end product of this module will be similar to this project from the Scratch website.
Websites for Information on Each Geographic Area
These are good starting points; feel free to research further.
- Arctic
- Subarctic
- Woodlands I
- Eastern Woodlands II
- Plains
- Plateau I
- Plateau II
- Pacific Northwest I
- Pacific Northwest II
You might also like

Explore Nunavut’s Best
 June 20, 2014
Pinnguaq shows some of the best attractions in our home, Nunavut. You can find some ground breaking stuff here.
Using Twine To Explore Environmental Preservation
 Grade 9 – Grade 12
In this lesson students will learn about the impact of climate change on the environment, and create an interactive story using Twine.

Using Digital Tech To Explore The World Around You
January 30, 2020
Pinnguaq proudly creates and uses digital technology is to teach, preserve and shape public opinion about environmental exploration using digital tech.
