Section Navigation

Introduction
At the beginning of home personal computing, some of the earliest games were text-based. These text adventures allowed players to “walk-through” a game by reading what their environment looked like and what it contained, and then making choices by typing in commands to perform actions. The most common of these games were dungeon-style mazes, where players had to find key components in order to get past specific obstacles. The goal was usually to navigate treacherous environments to seek out fame and fortune. Because these games had no graphics, navigation of these games meant that players had to create their own maps based on the description provided. For example:
“You are standing in a long corridor; there is door to your right, a stone wall to your left, and the corridor proceeds into darkness in front of you. The stairs up to castle are behind you.”
In this example a player would sketch or draw a square on a piece of paper with a door on the left a stair behind them and would choose a direction to move which would add another square to their drawn map, continuing in this fashion until they knew all the possible routes between playable spaces in the game.
Computer/video games are inherently based on decision making. As a player, I might ask: Where do I go? How do I get there? What do I do? etc… everything in the game is based on exploration and decision-making in order to progress the story. This module provides an easy to learn foundation to creating an environment for players with minimal game rules required and can be used as a tool for mapping out a proposed maze-based and/or adventuring computer game.
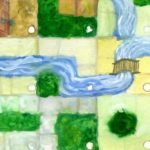
In this module students construct an adventuring world (or labyrinth) using paper tiles that they create. Students will create and decorate their own creative tiles. These tiles will contain the required visual information that players need to navigate the “world” and complete the challenge(s) designed by the game-maker. Because all the tiles are shuffled before each game, the maze or world layout is never the same twice.
Learning Goals
This module exposes students to breaking up game components into individual visual components. It helps students visualize and construct a story, and develop game mechanics with limited rules required. And finally, it prepares students to understanding how computer games can be constructed by building small modules that can be added to one another.
Guiding Questions
- How do you make a maze?
- If you can’t see the map, how would you describe to someone where they can go?
Curriculum Links
The tiles template are vector line drawings that can be colored and decorated by students (Art). Once the tiles are constructed, the student then needs to lay each one out and write a brief description of each tile that will help a player, and provide context to the map area being navigated (Language Arts). These are stepping stones to Module 2, which introduce the coding parameters of this paper maze game.
Materials
- Sheets of white cardstock printed with the two attached template pages – Download Templates (ZIP)
- Coloring materials (crayons, pencil crayons)
- Scissors (and adult guidance)
- A couple of paper clips
- Scotch tape
Non-Computer Activity
This module results in a playable game for solo play or with a partner(s). Additionally, students can combine their tiles to organize even larger games.
Activity
- Print/Copy the included template sheets (Empty Play Tiles) on to the cardstock – each student should receive 2 sheets – one with ground tiles, and one with 2 avatars including 2 “special tiles”. Note: each sheet contains 2 inch tiles that are separated into 9 squares. These 9 internal squared can be used to help define borders or contain special items, see the included examples on Playsheet 1) For advanced (and more ambitious game makers), these individual smaller squares can be decorated individually (see ‘Example Playsheet 2’).
- Students are asked to create a story where a player’s avatar must locate an item or place in the game, examples:
- Help [your avatar’s name] hunt the moose
- Help [your avatar’s name] find home
- Bring [grandma] some hot tea
- Explore the forest and find the hidden treasure
- The story development phase is necessary to think of first because they will need to decorate their tiles with appropriate imagery like trees, or stones, or water, snow, etc…
- Students should now decorate and colour their tiles. While coloring they should add at least one (and no more than three) distinctive wall(s) or barrier(s) to the edge of each ground tile. So if they are making forest tiles, then thick bushes will work. If they are in a stone building then stone walls will work. A simple black/dark colored thick line is acceptable as well. The aim is to indicate to players that they cannot go in those directions in the game.
- At least one “special” tile should be used (for example the Buffalo tile), or students can make their own to fit their own story. This “special” tile should be the goal – the last thing the player needs to acquire to complete the game.
- In the corner of each ground tile is a small circle for numbering. Students can make many tiles, but each should be number individually.
- Once all the tiles are colored, carefully cut them out along the “heavy” border lines to make 2” square tiles that can be stacked into a neat pile.
- On a separate sheet of lined paper, the student should write one to two sentences of what each tile is, what it contains, or if there is anything special about it, using the number(s) they have assigned to them. Examples:
- (1) You see a bunch of small trees, and two exits.
- (2) You see a pond, and in the pond you find a very colorful and special rock.
- (3) This is the center of camp where a fire is cooking today’s meal.
- To assemble the avatars bend a paperclip to a 90 degree angle (right at where the pointy ends are) and using the scotch tape affix the “skinny” half of the paper clip to the back of the avatar.
- Add your name to the back of each tile, in case you decide to play a combined game.
- With the tiles complete, avatars made, and the “story” events written. You are ready to playtest your game.
- Blank
Advanced Game Features
To make a player’s game even more interesting (especially for older players), tiles can be made to contain “special” helpers, tools, or abilities that players can acquire as they move through the game. These special actions should only be allowed to activate once, and can be marked with a special symbol or drawing on one of the nine squares inside the tile. Examples of these special instructions can be things like:
- Player gets to move 3 spaces this turn.
- Player selects another player to get stuck in the mud and miss their next move turn.
- You may take a tile without an avatar on it and move it to another location (except the last tile).
- Select a target player and swap your avatars.
- Make special matching tiles like singer/drum; raven/seeds; bear/fish; etc… These are shuffled in to the deck (not put on the bottom). And each player must pick up each “item” and deliver it to the respective “character” as directed by the story. So, “find the fish and deliver it to bear.” These tasks can be hidden on a tile (i.e. only written in the tile descriptions script) or can be illustrated on the tile so players know where exactly to go.
- When playing with more than 2 players, a new deck of 20 tiles should be incorporated. In this way a really large adventure with many people can be created.
Imagine an entire class combining their tiles to play?
To add these special instructions make sure the script contains the appropriate instructions for each “special” square being used.
Basic Game Play
- Keep the “special” tile separate, and shuffle all the ground tiles face down, and place neatly in a stack to one side.
- Place the special tile on the bottom.
- Flip a coin to see who goes first.
- The first player will draw a tile and place it face up on the table.
- Each player should now place their avatar on any of the allowable 9 squares within that first tile.
- The narrator, game creator, or player should read any text that belongs to that tile from the script (depending on how the creator has constructed the text).
- Player 2 now draws a tile, places it on a valid edge of the previous tile. Note tiles can be turned and offset, they do not need to be lined up into exact squares (See the examples).
- Player 2, now moves their avatar one square in any direction, and their turn ends.
- Player 1 now continues, draws a tile, places it at a valid spot, and moves their avatar.
- Repeat this draw, place, move action till all the tiles are placed. The last tile usually contains the goal, so players should aim to go to that tile. Each taking turns to move their avatar one square at a time.
- The game completes when all players reach the end, or complete all the tasks.
Conclusion
Gather in a circle and discuss what students thought about the game? What did they like? What would they do differently?
Resources
The origin of video games that use these concepts:
- Rogue (1980) – History • Game Play (1984 DOS version)
- Sword of Fargoal (1982) – History • Game Play (original) • iPhone Remake (2011)
Modern examples:
Mazes and labyrinths are not unique to any one culture, but in mythologies of Native American cultures the labyrinth is often viewed as a spiritual symbol that carries with it specific cultural teachings and understandings that go beyond a maze’s interaction as an entertainment activity. In particular, cultures from the southern part of the US into South America – the maze/labyrinth is an important component of the cosmologies of a number of native peoples. For more information see the cosmology of O’odham peoples (primarily in Arizona) or the Tapuat, the Hopi people’s Symbol for life.
Though these examples are specific representations of the labyrinth in Native American cultures, the understandings of the interconnectedness of everything in life as represented by the medicine wheel, is another way of viewing the significance of the labyrinth. A labyrinth in Indigenous culture is about experiencing the path or journey and what connects one action to another, it is not necessarily meant to be just a puzzle, but a journey.
Social Media Resources
- See Jason Lewis and the Skins 5.0 Workshop on Aboriginal Storytelling and Video Game Design

