Section Navigation

Introduction
Small Basic is a simple programming language that is easy to learn. It is designed to make programming uncomplicated and fun, especially for beginners. Before we start programming our Pathfinder game, we need to understand the programming environment and the components of Small Basic.
This module is about understanding how to “talk” to the computer, to make the computer perform tasks and functions. The basics covered here form the basis of understanding any computer programming language, and the simplicity of Microsoft Small Basic is an ideal platform for teaching these concepts.
This module provides examples that will be used to create a full, text-based, computer adventure game based on the Pathfinder (Part 1) module. At the end of this module students will understand the computer concepts of:
- Variables
- Conditional statements (also known as IF-THEN-ELSE)
- Loops (sometimes known as FOR-NEXT statements)
- Subroutines
In addition to these four basic concepts, the examples in this module also illustrate:
- how to write information to the screen,
- how to slow down the processing of a program, and
- how to generate random numbers.
Learning Goals
This module exposes students to basic computer programming in a simplified and easy-to-navigate environment. It helps students construct program routines, and allows freedom to explore within the examples to see what happens. And finally, it helps students understand how computers understand sequential instructions and logic.
Vocabulary
Programming Language - a set of commands, instructions, and other syntax use to create a software program.
Guiding Questions
- How do we communicate with computers?
- How do computers “do” the things we ask them to?
- Do you want to write a computer program?
- Do you think that computer programming is hard?
Curriculum Links
This module directly links to the Computer Studies curriculum as students will be learning about coding and how humans and computers interact. Students will learn variables, conditional statements (also known as IF-THEN-ELSE), loops (sometimes known as FOR-NEXT statements) and subroutines.
Materials
Non-Computer Activity
- A plain coloured, medium-sized ball (like a small rubber dodgeball or volleyball)
- Paper
- Pens
- A receptacle (hat / bag / bucket)
- A large die (or a regular die, but big foamy ones are more fun)
Computer Activity
- A computer with the Microsoft Small Basic application installed OR Internet access to the online interface
- A pen and paper for taking notes
Non-Computer Activity
The Human If-Loop
This activity is similar to “Musical Chairs”. It is a human simulation of the concepts of For Next Loop and If Statement found in the computer tutorial. Instructions:
- On a slip of paper, each student writes one colour they are wearing (must be clearly visible).
- The papers are put in a hat.
- The students then sit evenly spaced in a circle with about 6 inches between them.
- The teacher selects a slip from the hat and reads it out by saying “This ball (hold up the ball) is now ____”, and fills the blank with the colour noted on the paper.
- The teacher then hands the ball to any student wearing that colour, and puts the slip back in the hat.
- That student rolls the dice.
- The ball is passed one at a time clockwise by the number rolled on the die.
- The student with the ball now picks a colour from the hat and asks “Is the colour of this ball ____?”
- If the current “colour of the ball” matches the colour selected from the hat then that person says “True” and rolls the die and the sequence continues.
- But if the current “colour of the ball” in NOT the colour chosen, then that person says “False, this ball is now ____.” Filling in the blank with the colour selected, and they must roll the ball to a person wearing that colour.
- Once received, that person states “this ball is ____” using its current “colour” and then rolls the die and the game continues.
- You can add rules such as: if a one is rolled, you have to change the direction the ball is passed.
- If you want to introduce a counting activity: for each change in colour add 2 to a scoreboard and for each time 1 is rolled on the die subtract 1 from the scoreboard.
Computer Activity
The Small Basic Environment
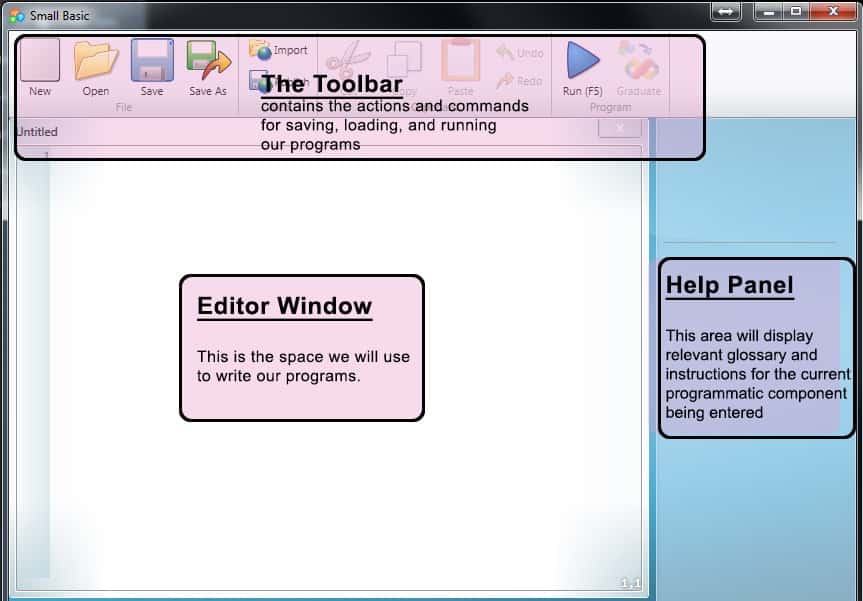
The Small Basic screen has three main components: The Editor, the Toolbar, and the Help Panel. When you first launch Small Basic, you will see a window that looks like the following image (Figure 1).
The Intellisense Helper
When you start typing in the Editor, a window pops up with suggestions that may help you. Figure 2 shows that after typing “gra”, the intellisense window series of suggestions with “GraphicsWindow” highlighted. We can click on this or simply hit “Enter” to accept it. Or you can scroll through the alternate suggestions using the arrow keys, the mouse wheel, or the scroll bar on the right. As you get familiar with the editor, this feature will make it easier and faster to write your programs.
Note: The online version of Intellisense is not as fancy as this one, but it functions the same way
As we will be adding graphics to our game, we will be using the GraphicsWindow component for our output. One of the advantages of this is the ability to use Unicode characters and our heritage language for programming AND display. This is exciting, because even though the programming keywords are in English, we can use any desired language for programming and interacting with the player. Though the code samples in this guide are in English, you will find alternative examples to highlight how code can be written using a First Nation language. The alternative examples in this module are presented in Plains Cree SRO as well as Cree syllabics.
Getting Started: “Welcome to Turtle Island” Program
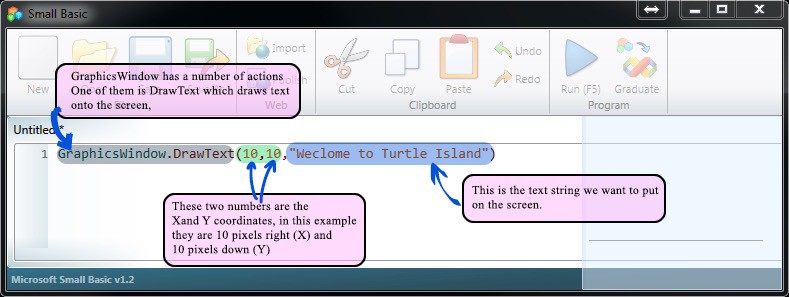
Our first program is a basic “Welcome to Turtle Island” program that runs in a graphics window. In the editor type the following line of code:
GraphicsWindow.DrawText(10,10,"Welcome to Turtle Island")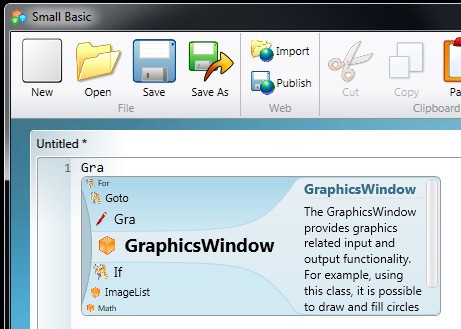
That’s it! It is that simple! Press the Run button or hit the shortcut key (F5) and you should see a window similar to Figure 3.
It is a good practice to save your programs frequently just in case the power goes out, or the computer locks up, you don’t want to lose all your hard work.
To keep this program, close the running program window or hit the “End Program” button in your Editor window. Then click the Save or Save As button. Choose a file name and save it.
Toolbox
Now that we have written our first program, let’s have a look at all the individual tools we will need to make our Pathfinder text game. Regardless of the programming language you choose, there are some common terms and concepts that nearly all programming languages have. The ones we will be exploring in this module are:
- variables,
- conditional statements (also known as IF-THEN-ELSE),
- loops (sometimes known as FOR-NEXT statements), and
- subroutines.
1. Variables
A variable is a “token” we can use to store data that we want to use later, and can be changed as the needs of our program changes. Here are a couple examples:
basket = "Raspberries"
NumberOfRaspberries = 5
In this example you will see that our variable name is all one word and has both upper and lower case characters. Variables must be a single word unit, cannot be a number, and though it is not necessary to use upper and lower cases it is good practice to do this to make it easier for others to read.
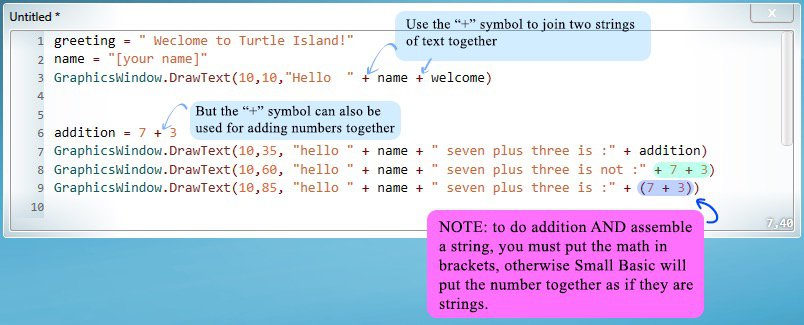
greeting = "Welcome to Turtle Island "
name = "[your name]"
GraphicsWindow.DrawText(10,10, "Hello  " + name + welcome)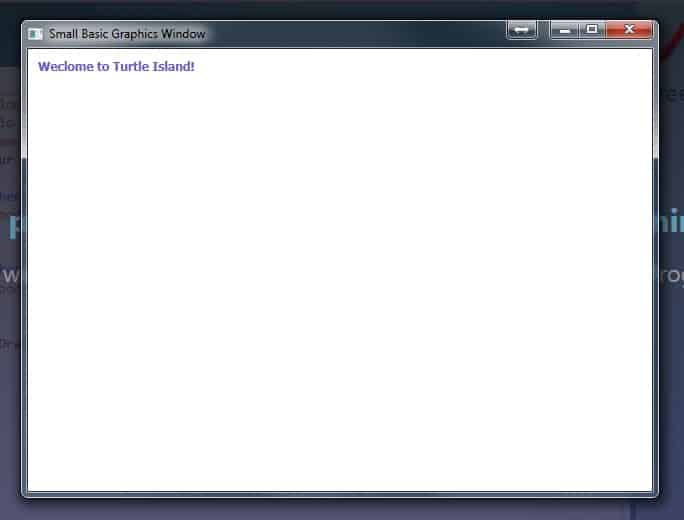
If all goes well, you should get the same result as the first program, so let’s jazz it up a bit. If you added the number addition section (lines 6 – 9 in the example), you will see how the “+” character behaves when used to add numbers or put words together. You can take this time to play around with the position of your DrawText lines by changing the numbers too!
Tip: Variables are a great opportunity for us to use our heritage languages:
in Cree SRO, mawiswâkan = “ayoskanak”
in Cree Syllabics, ᒪᐃᐧᓵᐧᑲᐣ = “ᐊᔪᐢᑲᓇᐠ”
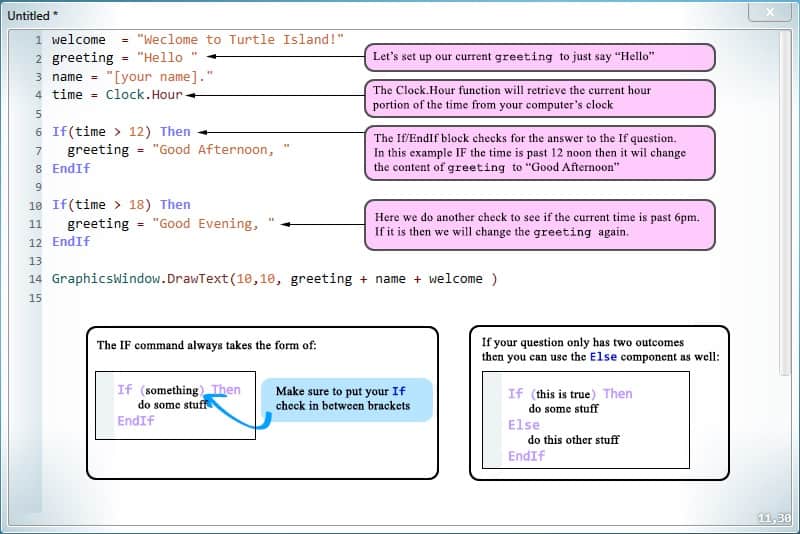
2. Conditional Statements
The If-Then-Else statement is easily understood by its literal English meaning which asks a question: if a certain condition is met, then something occurs. We can add an additional component to this called Else. So in basic English if the answer to our If question is true then do something otherwise (else) do something else. Try these:
Notice the order of the IF statements. If we checked if time > 18 first, our greeting variable would say “Good Afternoon” at 6pm instead of “Good Evening” because the second If would check if it is after 12 and would change the greeting again. And there you go. That is how to use the IF THEN ELSE statement. Now let’s try some loops.
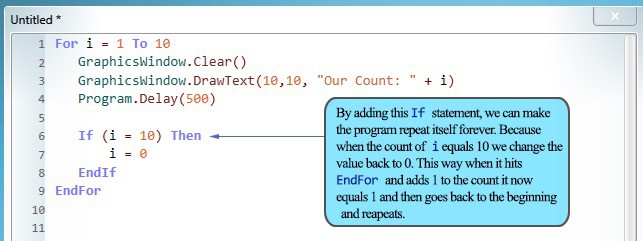
3. Loops/Looping
A loop is exactly what it sounds like – it loops, or repeats a set of instructions forever, or until a certain condition is met. We will often use a loop with an If statement. Let’s try this first:
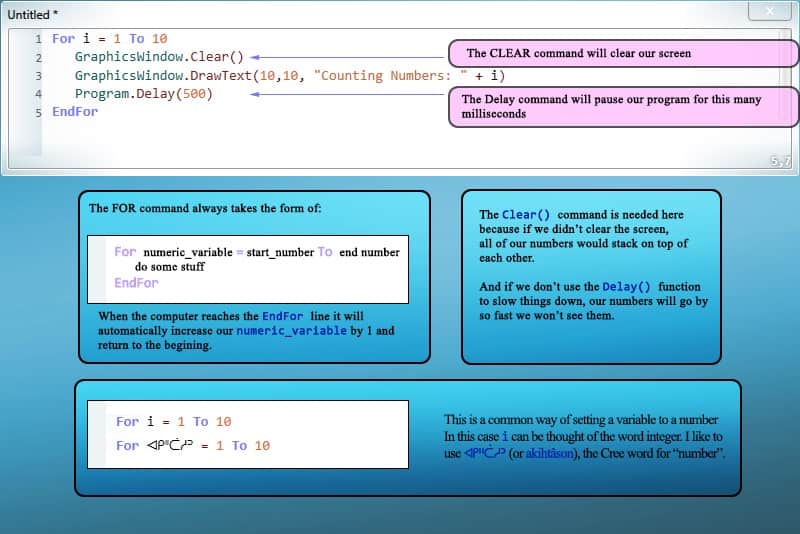
Here we have a couple new commands we can use: Clear() and Delay(). These will be very useful when we get to programming our game. We can make it loop forever (or until we stop) by adding the If statement in the second piece of code. And that’s how easy it is to make a loop!
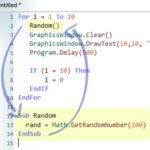
4. Subroutines (Sub)
Quite often you will find that as you write a program you will encounter an instance where you are rewriting or reusing the same code over and over again. This is a perfect case for introducing a Subroutine.
A subroutine is a small section of code that does a series of common or routine steps that we can call from somewhere else in the program. Subroutines are instructions that fit between lines that start with Sub and end with EndSub.
In the following example, add a Random() as the first line after your For loop start line, and then add lines 12 to 14 and see what happens.
What is happening is when you use Random() in your code, the computer jumps to the Subroutine called Random. It then processes all the instructions in Sub Random and returns itself back to where you called it from and continues. You can think of subroutines as mini-programs.
The other new command here is Math.GetRandomNumber, which is very handy command. We will encounter more basic programming concepts as we put together our Pathfinder video game, but we can tackle those as they arise. For now, make sure you’re comfortable with the four ideas covered in this module:
- Variables
- Conditional statements (also known as IF-THEN-ELSE)
- Loops (sometimes known as FOR-NEXT statements)
- Subroutines
Almost all programming languages utilize these concepts, and knowing them will allow you to learn other languages more quickly.
Conclusion
As a fun follow-up game similar to the Human If-Loop game, split the class into two groups of equal size, and each group does their own passing game same as defined in the regular game. There must be two hats, two balls, and each hat must have a copy of everyone’s colors (each student writes their colour twice, one for each hat).
The games run simultaneously, but this time whenever a colour change happens, the person has to give the ball (and die) to a member of the other circle that is wearing that new color. If no one in the other group is wearing that color then they can continue in their own circle. The two balls will likely change circles relatively frequently, and sometimes one group will have both balls, and sometimes none. It may be helpful to have a volunteer or two to assist in transporting the balls between the groups.
This modified version represents two subroutines – sometimes one is running and sometimes both are running. Each circle is running its own routine, but they are able to interact with one another when needed, and share information back and forth in the form of a “coloured” ball.
Resources
- Small Basic Getting Started Guide
- Introducing Small Basic Full Guide
- Online Tutorials
- Program Gallery – includes Small Basic examples for things specific to games, math and science applications, and graphics