Section Navigation

Introduction
This module uses the foundational coding components in the Paper Pathfinder and Introduction to Programming with Microsoft Small Basic modules and combines them together to build a story-driven adventure game. Students will need to know the basics introduced in Introduction to Programming with Microsoft Small Basic to understand this module.
This module provides examples that will be required to put together a full text based computer adventure game based on the Paper Pathfinder (Part 1) module. At the end of this module students will be able to:
- Plan and map the stages of a computer game
- Understand how to display text to a user
- Know how to process a user’s commands
- Use subroutines to group commonly used text descriptions together
- Troubleshoot and work with errors in their programs
Learning Goals
This module exposes students to basic computer programming within a simplified and easy-to-navigate environment. It helps students construct program routines, and provides freedom to play within the examples, utilizing their own designed Paper Pathfinder game as a foundation. And finally, it packages the skills they have learned to create a working text-based video game.
Vocabulary
CRLF - stands for “Carriage Return + Line Feed”, and is the equivalent of hitting the Enter/Return key.
Troubleshooting - is also known as debugging. It is the process used to determine where an error is in the code and correcting it to allow the program to run as intended.
Function - (sometimes referred to as Statement) refers to a component of the programming environment that is already built and understood by the system. For Example: Goto is a function, If … End If is another.
Guiding Questions
- Do you want to write a simple computer game?
- Do you enjoy assembling puzzles?
Curriculum Links
In this module, students will learn about computer coding and the interactions between humans and computers, and therefore it can be linked with a Science and Technology curriculum, as well as Technology Communications, and English. Students will examine and think critically about how we communicate and have computers perform tasks for us. Through the translation of a physical board game into a language-based text adventure, students will engage in creative tasks that can be linked with a Language Arts, Arts, and English curriculum. This module teaches how to look at a story from additional perspectives and guide players to a desirable outcome.
Materials
Non-Computer Activity
- The non-computer exercise is built into this module. Students will draw out and plan their game and actions before actually writing the program for it.
Computer Activity
- A computer with the Microsoft Small Basic application installed OR Internet access to the online interface.
- Coloured pens or markers and (graph) paper for creating a drawn map of their play space.
- Their Paper Pathfinder game tiles from the first module.
- Tile descriptions sheet from their Paper Pathfinder game.
Non-Computer Activity
Getting Started
The first step, before we start programming, is to “map out” our game. Though this step can be time consuming, it is necessary, and will help you understand some of the complexities your particular game may have.
Set Up Your Game
- First, shuffle your paper game tiles (created in Paper Pathfinder) and lay them out on a flat surface one by one to create a play board.
- You may move tiles around, rotate them, and offset their position to match your pathways.
- Try to keep your “special” or “goal” tile as far from the start position as possible.
- Place an avatar play character on a starting square.
- Establish which direction is north and use some kind of indicator to show which way North points.
Mapping It Out
To make coding the game easier, always create a map of your tile layout with paper and pen. This step is especially helpful if your layout gets bumped or interfered with, or if you need to put it away and return to it later. Mapping it out on paper means you won’t need to remember how it was laid out. Taking a quick picture with a smartphone is a good idea too. Get a piece of graph paper, a pencil, and two or three color crayons or markers.
- First use your pencil to layout the borders of your tiles.
- Then write the number of each tile in each of the tile boxes on your graph paper.
- Use a colored crayon or marker to mark the borders that are not passable.
- Use another color crayon/marker to mark arrows pointing to which directions you can move from on each tile.
- You can use a third color if you choose to indicate special areas or events.
- Get your Paper Pathfinder tile description sheet ready as well.
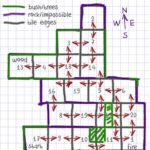
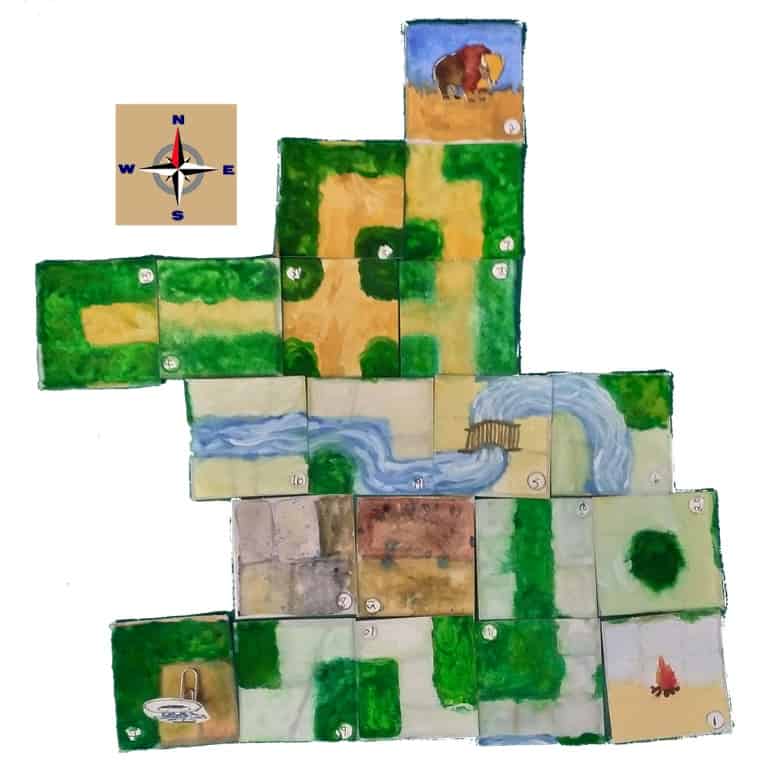
The goal of your paper game should also be the goal of your computer game. This module shows examples where the goal is to find wood for the fire at home. Below, Figure 1 shows the tile layout and Figure 2 shows the drawn graph paper map of the adventure board.

Computer Activity
This module assumes you are new to programming or are at least new to the Microsoft Small Basic programming language, and have completed the previous modules (Paper Pathfinder and Introduction to Programming with Microsoft Small Basic).
This module combines the four programming concepts from the previous modules and the Pathfinder tabletop paper game to generate a full story text-based computer game.
Supplementary material to this module is provided at the end for more in-depth details, and full source code for the game examples in this module is also included for comparison and assistance. As well, it may take some time to complete this module, but efforts were made to keep the content condensed for students to get started as quickly as possible. The module provides enough direction that it could be worked through in a longer single session, or spread over several smaller sessions.
Note that line numbers in the examples may be different than their actual locations in the source code file due to changes in text descriptions and comments that were added or removed to keep the image examples small and to highlight the specific text in each example.
First Lines of Code – Let’s Get Started!
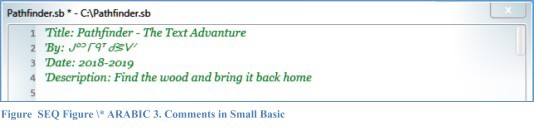
Click the New button in Small Basic to create a new programming window (if you already don’t have a blank program ready to go). Our first lines of code will actually be “comments”, not actual code. A comment can be entered using a single quotation mark ‘ at the start of the line. We want to add comments to identify: the name of our game, who we are, when we wrote it, and perhaps a brief description of what the program does. Figure 3 shows comments that indicate these details for the example game included with this module.
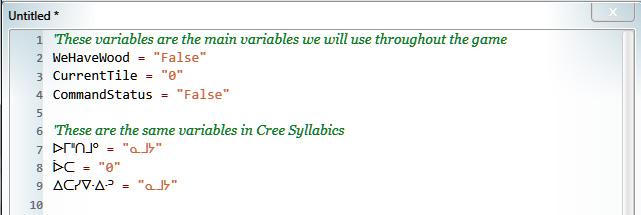
The next step is to establish some of our variables. Remember that variables are “containers” or “tokens” that can be updated and changed as the program runs. In this game we need a container to indicate whether we found the wood, and one to identify what tile we are currently on. Figure 4 shows these two lines – with two lines using Cree SRO that perform the same thing – you are encouraged to use your own heritage language in all your coding, however, the remainder of this module will use English only examples to save space.
Note: The CRLF variable. CRLF stands for “Carriage Return + Line Feed”. It is a special command that is the same as hitting the Return key on your keyboard, and we need to use this when we need a new line in our text strings. This way we can use CRLF instead of typing:
Text.GetCharacter(13) +
Text.GetCharacter(10)
Any time we want text to continue on a separate line.
Game Setup
Several pre-made subroutines have been included for students to use – regardless of their own content. A more detailed explanation of these pre-designed subroutines is located in the Advanced Programming Techniques section of this module rather than taking time showing programming concepts that are not as important for this module. More advanced students, and students wanting to learn more, may find this additional information useful as they learn about Small Basic programming. Otherwise, the key thing students need to know here is what text they should be replacing, which is indicated in the code.
To move on with the actual gameplay, we need to: Copy and paste in the following subroutines from the example game into your own blank program: UpdateScreen, ShowGameStart, OnKeyUp, and IsAValidCommand (lines 634 to 743)
The ShowGameStart creates a GraphicsWindow; setting its size determines where we will position our cursor for the user to enter text, as well as where our story space will be displayed. Additionally, it starts with some introductory text and basic game instructions to get players started.
OnKeyUp is a simple “helper” routine that records each time the player presses a keyboard key. It looks for the enter key and then processes the text that occurred just before the enter key was pressed.
IsAValidCommand checks to see if the command the player entered is allowable.
* Make sure to edit the details of ShowGameStart to match the details of your own game.
Figure 5 shows our successfully run game screen with the content of ShowGameStart.
Now The Fun Stuff – Setting Up The Game
Setting up our game variables: After our comments section, the first few lines are fairly straightforward. Here is a list of variables we will use and a description of what they are needed for:
WeHaveWood = "False"
CurrentTile = "0"
CommandStatus = "False"
CRLF = Text.GetCharacter(13) + Text.GetCharacter(10)
gameCommand = ""
startGame = ""
endGame = ""
WeHaveWood = False means we are creating a variable named “WeHaveWood” and are assigning it the value of “False”, which means we currently do not have any wood. CurrentTile is set to 0 since we haven’t started the game yet, and don’t have a tile to set. CRLF, this is a convenient way to make a “line break” in our strings. We will use this often. CommandStatus = “False”, we will use this variable to check if a player’s action is valid or not. We set its start value to false because no commands have been entered yet. gameCommand will hold they text our player types in the game. startGame and endGame are variables we use to break out of a loop. They start with no values, but we will assign them a value when a certain condition is met. startGame gets a value set when the player starts the game and “hits any key to start” and the endGame will be populated when a user types the command END.
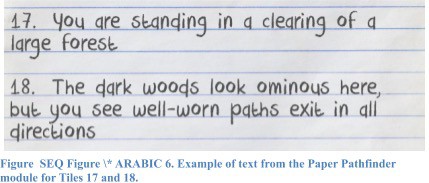
Once our variables are set, we should look at programming each play tile. The tile description sheet created in the Paper Pathfinder module will be invaluable here. Figure 6 shows a sample of the tile details sheet used for the examples in this module. As well, because our players might pass through each tile several times, we don’t want to write our code over and over again, so we will use a subroutine for each game tile’s text, and we will make a subroutine to process each action our player can try for each tile.
The starting tile for this game is 17 – let’s add that in. Note that the very first line under Sub Tile_17 says CurrentTile = “17”; we do this to make sure our program knows that we are currently on that tile. Other parts of our game might need to know what tile we are on so we want to keep that variable up-to-date.
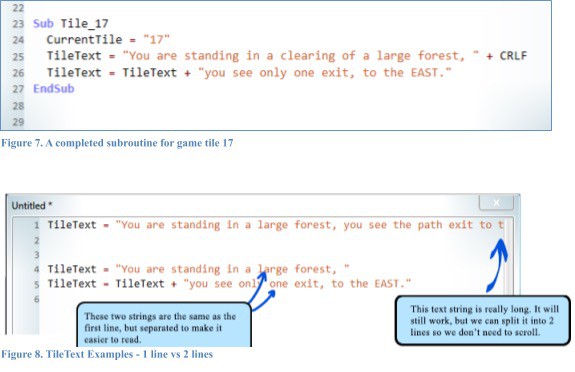
You may also notice the code for TileText in Figure 7 is on two lines. This is because sometimes our strings might get really long and go off the page where we can’t see them. Instead of scrolling left and right to see all our code we can break up the string text into multiple lines and still retain the same content. This is where the CRLF variable comes in handy.
Figure 8 shows two ways of coding our TileText for Sub Tile_17:
TileText = "You are standing in a large forest, you see the path exit to the EAST"OR
TileText = "You are standing in a large forest, "
TileText = TileText + "you see only one exit, to the EAST."
Both are acceptable and valid, but in the first example the text is all on one line. In Small Basic this may extend past the frame of our coding window. To make things easier to read, the second method puts the text in two lines of code. You will notice the second line in this example says “TileText = TileText +”. This means we want the contents of TileText to be equal to the text we already have in the variable TileText PLUS the additional text “you see only one exit, to the EAST” is then added to the end of that text. We could also add in a line break by using our CRLF:
TileText = "You are standing in a large forest." + CRLF
TileText = TileText + "You see only one exit, to the EAST."
We want to create a subroutine for each of our tile descriptions. As it will be time-consuming to enter all of our game information for 20 or more tiles, for now we will just add four subroutines. In this demo, the tiles entered are our start tile 17, and the next possible movements from this tile which are 9, 10, and 11. When you have the opportunity, add your remaining tiles into their own subroutines. Each of your tile subroutines should follow the same basic setup “Sub … CurrentTile … TileText …EndSub”. Here is what the first four subroutines look like in code:
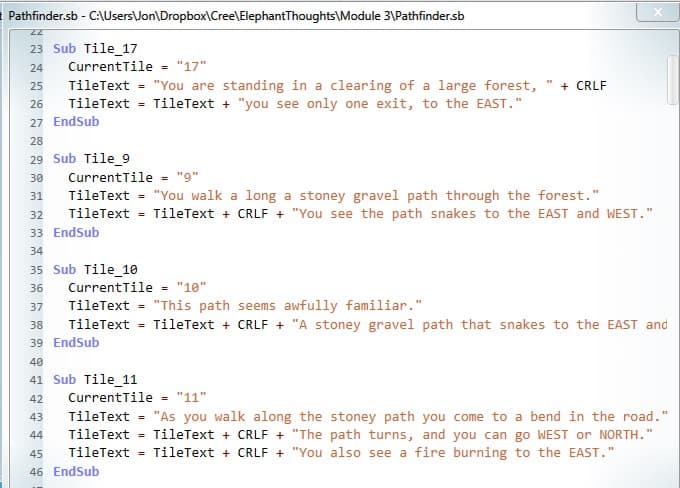
In Figure 9 notice that each description indicates the available movement options a player can take. Be careful typing your subroutines. If you unintentionally create two subroutines with the same name—for example entering Sub Tile_2 twice instead of Sub Tile_2 and a Sub Tile_12—it will create an error in your program. (See the section at the end of this guide for more on handling Errors and Troubleshooting). Also be careful to enter the correct directions; we don’t want to confuse our players by saying they can go North when they can’t.
All subroutines will follow the same structure for each tile. The only tile subroutines that will be different are our special tiles, so let’s have a look at those.
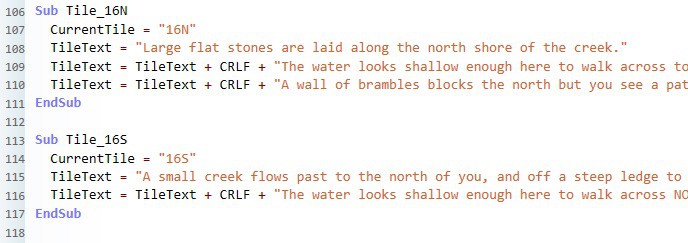
The first special tiles are tiles 16 and 12. Tile 12 has a hedge vertically through the middle, and tile 16 is split horizontally by a creek. To make it fun, we made the creek crossable on tile 16, which means we need two different subroutines for this tile: one for the NORTH side of the river, and one for the SOUTH (Figure 10). To differentiate these options in the code, we use N and S: Tile_16N and Tile_16S.
Tile 12 has the same situation— with two separate options: one for EAST and one for WEST—so we did two subroutines for this tile, too.
Challenge
Because our game tiles all have 9 squares we could allow players to move one square at a time through a tile. Just write a subroutine for each moveable space using an easy to remember name. Like, referencing each square by one of nine numbers or use letters, for example: Sub Tile13_1 or Sub Tile13A. This will make our game larger, so give this a try on your own when you have more time.
Ending The Game
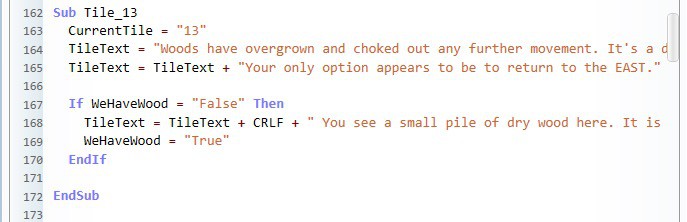
The objective of this game is to collect a bundle of wood for the fire. So our next special tile is the wood tile. On our graph map the wood is located on Tile 13. When our player finds Tile 13 the wood is picked up automatically and saved in our WeHaveWood variable, changing it from “False” to “True”. The code for Tile_13 checks if the player already has wood. We don’t want the wood message to display if the player has already visited this tile, so the message only displays if the WeHaveWood variable is False. See the code example in Figure 11.
The next special tile is our ending. Tile 1 has the fire, so this is where we will end our game.
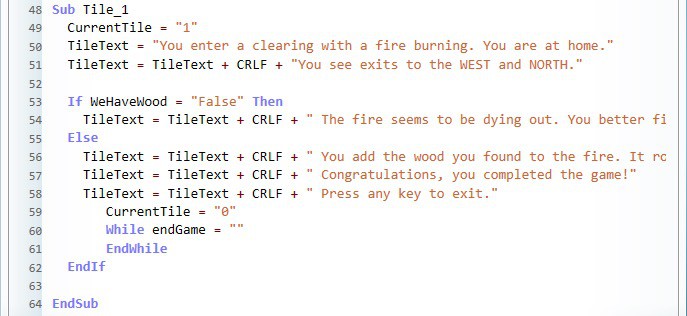
Since the game only ends if wood has been collected (Figure 12), we need to check if the player has the wood. When the player arrives at Tile 1, the basic description will show, and then one of two possibilities:
- if WeHaveWood is false (wood has not been collected) the message that the fire is low and they need to find wood is displayed; or
- if WeHaveWood is true then the congratulatory message displays, and the game ends.
You might have noticed the follow lines in the code above:
While endGame = “”
EndWhile
This code is a loop that goes on forever because endGame is equal to “”, and is there so our game doesn’t close prematurely. This is explained in more detail in the Advanced Programming Concepts at the end of this document. Fantastic! Now that the tile description subroutines have been written we can perform the real magic: actually moving around our game and interacting with our players!
Making magic – tying it all together
Every time the player types in a command, we need to first check if it is a valid command. If it is not, we show a message that the command was not understood. If it is, we need to process the requested action with the appropriate feedback. To do this we need to write a conditional IF statement for each tile, and inside that IF statement we add a series of IF statements to handle each of the possible actions. So first let’s set up the subroutine that we need to run ALL these actions. Enter the following two lines to start:
Sub DoGameCommand

EndSub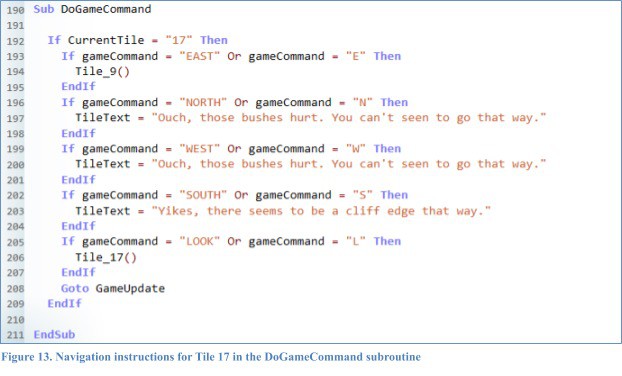
Inside this subroutine we add the first action check for tile 17 (our starting tile): Tile 17 only has one exit which is EAST. But we need to provide feedback to our player when they try to exit in other directions… Let’s look at how this block works, because each of our tiles will get a similar block, and once we know how to write one, we can easily write the other ones.
So first we check if our CurrentTile is 17. If it is not, it skips to the EndIf at the end (line 209 in Figure 13) and continues to the next If…Then block. If it is 17, it continues to the next line where there is another If…Then. This second If…Then checks if the command entered was EAST or E, and if yes, tells our program to play the Sub Tile_9 subroutine. The player can’t go North, West, or South, so a message is displayed that says they can’t go those directions. The last check is for LOOK or L. We include this because if our player needs to know where to go or has forgotten what tile they are on they can type LOOK or L and it will “reload” Tile 17 by playing the Sub Tile_17 subroutine again, which resets the text that is visible on the screen, and lets the player know where they can go.
The last line of our CurrentTile’s If…Then is a new Small Basic function called “Goto” which is pointing at something called GameUpdate. Let’s have a quick look at what Goto means and why we use it here.

The Goto function passes over code that we don’t want to run, as a way of saving time. Because our DoGameCommand will get very long from the numerous commands for each tile, we don’t want the computer to go through each line if it doesn’t have to. So just before the end of the EndSub in the DoGameCommand subroutine we added a GameUpdate. This gives a place to point our Goto at. The GameUpdate doesn’t actually do anything except act as a bookmark that we can jump to inside the subroutine. So now if we check Tile 17 and do the events inside the If…Then block, when we get to Goto GameUpdate, our code skips over all the other If…Then blocks and runs the next line of code that occurs after GameUpdate: Notice the colon “:” at the end of the GameUpdate bookmark – this is important; without it our code won’t work.
After GameUpdate we reset the gameCommand to an empty string. This was the text our player entered and since we have processed the action we reset it, and run the last subroutine called UpdateScreen. Let’s have a quick look at the UpdateScreen subroutine, which refreshes our game screen for the user to display any information that may have changed (this code will get copied and pasted from the source, but is discussed here to explain how it works).
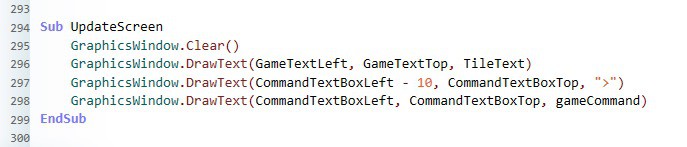
Note: The GameTextLeft and Top as well as CommandTextBox Left and Top can be found in the ShowGameStart subroutine. There should be no need to adjust these at this time but if you ever need more room for your game you can adjust these settings. Each variable holds the pixel-distance from the Top or Left of the window
The UpdateScreen subroutine is straightforward:
- First, we clear the screen to remove all existing text and graphics.
- Then, using the variables GameTextLeft and GameTextTop—which hold our game-text X and Y coordinates respectively—it outputs the text content from the TileText variable.
- The third line adds a “>” symbol to show our user where their cursor is located for typing.
- And finally, the fourth line shows the player the content of the gameCommand variable.
A breakdown of how the gameCommand subroutine works can be found in the Advanced Programming Concepts.
And that is it! BUT! Before we run it to see what happens, let’s try the next command together so you can get a bit more practice. This command is for Tile 9, the tile to the east of Tile 17. Immediately underneath the code entered for Tile 17—in the DoGameCommand subroutine—type the following code for Tile 9:
If CurrentTile = "9" Then

EndIf
Next, put your cursor inside this block and type the next If…Then block for the EAST action:
If CurrentTile = "9" Then
If gameCommand = "EAST" Or gameCommand = "E" Then
Tile_10()
EndIf
EndIf
This If…Then sends our player east to Tile 10. We just came from Tile 17 which is now to the west of Tile 9, so we can add that one in next:
If CurrentTile = "9" Then
If gameCommand = "EAST" Or gameCommand = "E" Then
Tile_10()
EndIf
If gameCommand = "WEST" Or gameCommand = "W" Then
Tile_17()
EndIf
EndIf
Notice in our first two If…Then blocks, whenever we want to move to another tile we simply send our code to the appropriate Sub Tile_# subroutine by using Tile_#(). If you recall, the () brackets at the end of Tile_# indicate to Small Basic that we want to call a subroutine, and that we are not referencing a variable.
On Tile 9 we can’t do any action or movement to the north or south, so we display a message for those options:
If CurrentTile = "9" Then
If gameCommand = "EAST" Or gameCommand = "E" Then
Tile_10()
EndIf
If gameCommand = "WEST" Or gameCommand = "W" Then
Tile_17()
EndIf
If gameCommand = "NORTH" Or gameCommand = "N" Then
TileText = "Wow. That cliff face looks really high. You won't be able to climb that."
EndIf
If gameCommand = "SOUTH" Or gameCommand = "S" Then
TileText = "Yikes, there seems to be a cliff edge that way."
EndIf
EndIf
Finally, we need to add an If…Then block for what happens when our player uses the LOOK command. At the end include the Goto GameUpdate to finish it off:
If CurrentTile = "9" Then
If gameCommand = "EAST" Or gameCommand = "E" Then
Tile_10()
EndIf
If gameCommand = "WEST" Or gameCommand = "W" Then
Tile_17()
EndIf
If gameCommand = "NORTH" Or gameCommand = "N" Then
TileText = "Wow. That cliff face looks really high. You won't be able to climb that."
EndIf
If gameCommand = "SOUTH" Or gameCommand = "S" Then
TileText = "Yikes, there seems to be a cliff edge that way."
EndIf
If gameCommand = "LOOK" Or gameCommand = "L" Then
Tile_9()
EndIf
Goto GameUpdate
EndIf
The next step is to enter an If…Then block for each and every tile, paying close attention to which directions your player is allowed to go. And with that we should now have enough of the pieces to our puzzle to construct a full game. You may always load and refer to the full working source code file (“Pathfinder.sb”) for the game described in this module. If you ever run into issues or wonder why your game isn’t running correctly, make sure you have followed these programming steps and look at the source code provided as an example.
Programming takes time, patience, and running and re-running to debug. But at this point, Run it! If all goes well, you won’t have any errors. But if you do have errors, look at the message and see if you can fix it. The Error and Troubleshooting section of this guide may also help you determine the issue.
Advanced Programming Concepts
There are a few programming elements in this module that may require additional explanation if learners are interested as to why they are used. In this section we will briefly discuss the behavior of the While startGame and While endGame loops followed by the three subroutines from the included source code: OnKeyUp, IsAValidCommand, and ShowGameStart.
While start/end Game
These two functions are used to “pause” the screen and await our user to “press any key”. The While loop is similar to the For…Next loop presented in the Pathfinder 1 Module, but instead of performing a certain action a specific number of times, the While loop performs the action indefinitely until the condition being evaluated is satisfied. For example:
While startGame = ""
‘do some stuff
EndWhile
What this loop is doing is nothing! And it will do it forever. We could put some code where the comment is between the While and EndWhile, but all we are waiting for in this case is for startGame to equal “True” to let us know the game has started. Likewise, the same holds true for While endGame … EndWhile found in the Sub Tile_1 subroutine. But how does startGame and endGame go from being equal to “” to “True”? That is where our OnKeyUp subroutine comes in.
OnKeyUp
The OnKeyUp is initialized at the start of the program when we enter:
GraphicsWindow.KeyUp = OnKeyUpThe GraphicsWindow object in Small Basic allows us to do things when users press keys on the keyboard. The KeyUp function here is associated with the OnKeyUp subroutine we write. This means that anytime a player hits a keyboard key when the game is running, the code in OnKeyUp is going to execute. What we are really looking for is whether or not the Enter key was pressed, because that is the key we use to execute the player’s command. In the following explanation the code is highlighted in blue, and we will discuss each line or section with comments to describe what the code is doing:
Sub OnKeyUp
lastKeyUp = Text.ConvertToUpperCase(GraphicsWindow.LastText) // This captures the last key pressed and converts it to an uppercase character
If (CurrentTile = "0" And startGame = "") Then
startGame = "started"
CurrentTile = "17"
gameCommand = "LOOK"
DoGameCommand()
Goto ExitSub
EndIf
This is our startGame event. If we haven’t set the CurrentTile yet, and the startGame variable is empty, then we can start the game by setting the CurrentTile, changing the startGame to “started” or “True”, setting our gameCommand to LOOK (this simulates as if our player typed in LOOK), and then executing the DoGameCommand subroutine and then Goto our ExitSub bookmark.
If (CurrentTile = "0" And startGame = "started" And endGame = "") Then
Program.End()
EndIf
This is our endGame event. Now that our game has captured a key being pressed, we can end the program. Notice our CurrentTile = “0”: if you look at the code we wrote for Sub Tile_1, our If … Then code sets the value of CurrentTile to 0 when we arrive at the end. This is important, because we essentially have no tiles we can move to, we can only “hit any key to exit”.
If (GraphicsWindow.LastKey = "Return") Then
' CheckOurCommand - user hit the Enter/Return Key
IsAValidCommand() // We have made it this far which means we are not starting the game or ending the game. So we need to check if the key pressed was the Enter/Return key. If yes we run IsAValidCommand.

If CommandStatus = "True" Then
DoGameCommand()
Else
'Invlaid command
TileText = "I'm sorry, I don't understand your command. What would you like to do?"
EndIf
gameCommand = ""
Goto ExitSub
If the command is not found, we give the user a message that the command was not understood and to try again, then we reset the gameCommand variable and skip to the end of the subroutine where we have our ExitSub bookmark.
Else
If(GraphicsWindow.LastKey = "Back") Then
gameCommand = Text.GetSubText(gameCommand, 1, Text.GetLength(gameCommand) - 1)
Else
'The key was not the Enter/Return key so add the key text to our command text string
gameCommand = gameCommand + lastKeyUp
EndIf
Here we check if the back button was pressed. If yes, then we need to remove a character from our gameCommand variable.

EndIf

We are finished processing our key press event and can continue to the UpdateScreen subroutine.
UpdateScreen()

ExitSub:
EndSub
We put an ExitSub bookmark here so that we can skip to the end of the subroutine if we are finished early (such as when we encounter a command that is not understood).
IsAValidCommand
The IsAValidCommand does exactly what the name describes. It checks to see if the text entered in the gameCommand variable can be equated to any functions we entered as valid commands. Because our valid commands are East, West, North, South, and Look; or E, W, N, S, L, and END, the IsAValidCommand checks to see if gameCommand equals one of these values. If yes, it sets the CommandStatus variable to True, otherwise it sets it to False.
This way our OnKeyPress can use this subroutine to check if the command entered is allowed. You can add more commands here if you wish, for example, adding additional directions such as “NE” or “SW”, or adding other actions like CLIMB or SWIM. Your game can get very large with more options, but it also makes it more fun to play!
Sub IsAValidCommand
CommandStatus = "False"
If gameCommand = "EAST" Or gameCommand = "E" Then
CommandStatus = "True"
EndIf
If gameCommand = "WEST" Or gameCommand = "W"  Then
CommandStatus = "True"
EndIf
If gameCommand = "NORTH" Or gameCommand = "N"  Then
CommandStatus = "True"
EndIf
If gameCommand = "SOUTH" Or gameCommand = "S"  Then
CommandStatus = "True"
EndIf
If gameCommand = "LOOK" Or gameCommand = "L"  Then
CommandStatus = "True"
EndIf
If gameCommand = "END" Then
Program.End()
EndIf
EndSub
Errors and Troubleshooting
What happens if you get an error? Figure 16 shows an example error where two subroutines have the same name. Let’s look at this example and see what information is available so that we may be able to determine and correct the error.
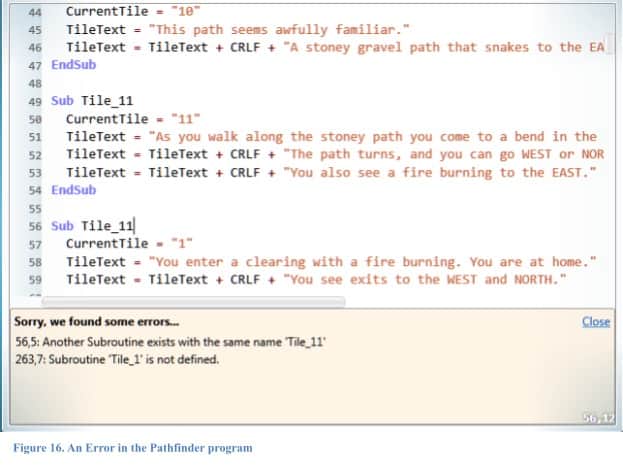
When we hit play with this code, we get an error box at the bottom of our code window. In this example we have two errors:
56, 5: Another subroutine exists with the same name ‘Tile_11’
The numbers at the beginning of this line indicate the row/line and character where the error occurred. So, line 56 at the start of character 5: the start of Tile_11. As you can see in Figure 16, there are two subroutines with the same name… we probably missed something when we entered it. Should be an easy fix, but let’s look at the other error first before we make any changes.
263, 7: Subroutine ‘Tile_1’ is not defined.
This error says that we are trying to call a subroutine at line 263, character 7. But the message “is not defined” means that Small Basic can’t find anything called ‘Sub Tile_1’. This probably means that one of the two Sub Tile_11’s is supposed to be a Sub Tile_1. So which one is the correct Sub Tile_11 and which one is Sub Tile_1? Well, looking at the TileText of one of these subroutines, we see “you enter a clearing with a fire burning…”, and looking at the drawn map of the game, we see that Tile 1 has the fire on it, so this must be the problem. Changing the second Sub Tile_11 to Sub Tile_1 does indeed correct both errors.
One final thing that may be handy are the other numbers in the lower right corner of the error message. In the Figure 16 example they are 56, 12. This is the current location of our cursor in the code. So if we want to go to certain code position we know where our cursor is in relation to the error location.
Additionally, if you hover your mouse over these error messages they highlight and can be double clicked. When you click these messages in this way, Small Basic takes you to the exact position where the error is.
When [something] is not defined
Something is not defined is one of the most common errors you will encounter. Whenever you see this error, Small Basic is telling you it cannot find what you are looking for. Here is another example:
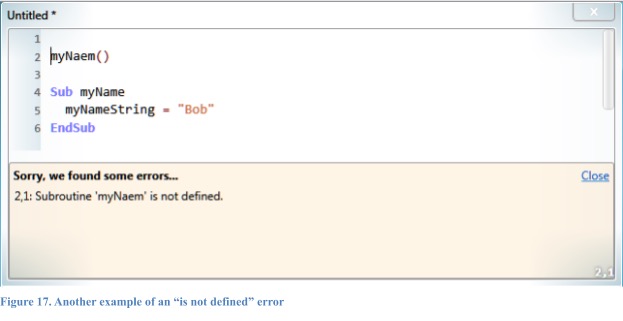
In this example (Figure 17), we see the “not defined” error again. But this time it is because we misspelled the subroutine call. We typed in myNaem() instead of myName(). Spelling errors are common, so be sure to choose easy-to-spell and easy-to-remember names for your subroutines and variables.
Let’s look at another situation that can happen: forgetting to End a function. If you have a lot of lines—like all the If … Then’s in the DoGameCommand subroutine in this module—it can be hard to find exactly where the problem is. Here is an example (Figure 18). Can you spot the problems based on the error messages provided?
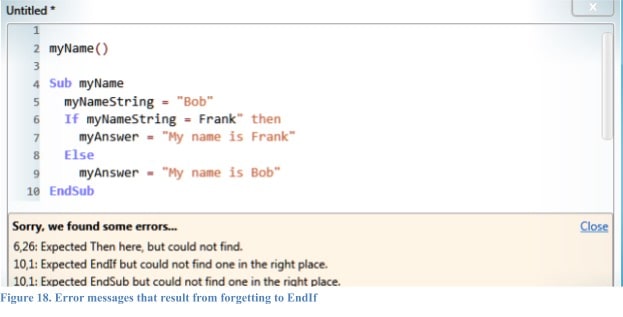
In this case there are a couple of problems. First, looking at our error messages we can see that there is a problem on line 6 that says it is expecting a Then as part of the If statement, but it can’t be found. Even though there is a “then” on this line, notice it is not blue nor is it capitalized. This means there is a problem with the line itself. Double clicking the error puts our cursor right before the quotation mark, and looking at the string “Frank” you will see that we forgot to type a quotation mark before we typed in the name Frank. We can also tell this because Small Basic colours different parts of the text on our lines. “Bob” on the line before is in red, so “Frank” should also be red and it is not – it is black.
The next two errors say we are missing or don’t have the EndIf and EndSub in the right place. The easiest way to correct this is to start reading the If … Then then look for an Else and/or EndIf where we think it should go. Here, we would add an EndIf at line 10 and this corrects both these error messages.
There are many different error messages that can occur. Most errors are easy to correct, but some can be hard to find, especially when your programs have hundreds and thousands of lines of code. Read the error messages carefully, use the double click to go to specific error locations, and the answer should be fairly evident. If you encounter an error that you can’t figure out, try asking a fellow student or doing a Google search for the specific message.
Conclusion
This module combines basic programming concepts with art and non-linear storytelling to create a fictional, interactive game that requires students to draw on and build their problem-solving skills and creative language.
Resources
Additional Resources
- Small Basic Getting Started Guide
- Introducing Small Basic Full Guide
- Online Tutorials
- Program Gallery – includes Small Basic examples for things specific to games, math and science applications, and graphics
Social Media Resources
There is a great 2D graphic video game based on the Tłı̨chǫ folktale “How Fox Saved the People” by graduate students at the University of Toronto. The project is aimed at language revitalization, but has a number of other points of educational value that are very similar to this collection of modules. This CBC article offers a wonderful description. Access to the video game can be obtained through one of the developers, Luke West, at 4luke4@gmail.com.

