Section Navigation

Introduction
This module teaches, at its core, the basis of all computer programming: how to create the commands for a computer to perform a task. Understanding these basics is essential for a full understanding of programming, and here we apply the concepts to image creation; specifically, how to create artwork using code within the Microsoft Small Basic environment. The simplicity of Small Basic is a perfect platform for teaching the basics, but is robust enough to allow for advanced learning as well.
Students can use the documented examples and source code samples provided to assemble detailed but simple creative graphics using Microsoft Small Basic. At the end of this module students will be able to:
- break images down into small squares (pixelation),
- use a grid and simple mathematics to plot image components, and
- understand how to assign colour to objects.
Vocabulary
Hex or Hexadecimal - A 6-digit number format that starts with a pound sign (#) and uses a combination of numbers and the letters A through F to make a unique code that references a specific colour. This module refers to colour assignments using both text names and hexadecimal values.
Pixel - The smallest individual coloured element in a digital image.
Pixelate or Pixelation - A method of breaking an image down into small individual geometric shapes, usually formatted as squares or circles.
Guiding Questions
- Do you want to know how to draw pictures using only computer code?
Curriculum Links
This module can be linked to an Arts curriculum, as students learn to create art in a digital environment. They will develop their critical and logical thinking skills as they learn to understand and master creating algorithms for computers to follow.
Materials
- Graph paper (students can also use blank paper and create their own grid)
- Transparency film (optional) – used to draw a grid which can be placed over a photo to avoid having to draw one directly on the photo
- Colouring utensils (pencil crayons, markers)
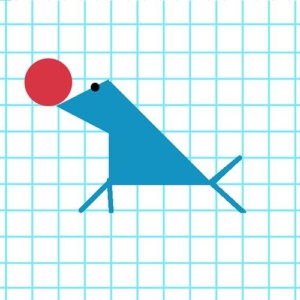
- Reference imagery – simple designs or close-ups and detailed images (such as the Blue Jay example in the computer activity) work well for this project, but images should be large enough so the smallest details can be represented by a single block of colour
- A computer with the Microsoft Small Basic application installed OR Internet access to the online interface
Computer Activity
Drawing Pictures: Pixel Art
This module explains how to draw pictures using the Microsoft Small Basic programming language, and assumes students are familiar with Small Basic, and are comfortable with the basics of drawing covered in the previous module.
In this module, we will draw pictures using only rectangles, and work on image planning and efficient programming techniques. If you enjoy making 8-bit or block/pixel images, or want to learn how to create detailed digital images, this is a great introduction to image construction.
There are limitless examples and patterns available online to fuel your creativity.
Planning
Before we start drawing pixel images in code, first, we must understand what pixel art is. Pixel art is a way of organizing blocks of colour into interesting designs. Anything from simple characters and abstract designs to realistic images can be created with pixel art.
The examples in this module use a grid of 32 by 32 blocks; each block made up of 10 by 10 pixels. As individual pixels are very small, we will make pictures using squares that are 10×10 pixels, so that we can see them better. With that said, let’s prepare a picture!
Planning Tools
Paper and coloured pencils
Use whatever tools you have available; any paper, any colouring implement (pencils, markers, crayons, etc.). A printable grid sheet with light blue rulings and numbering is included at the end of this module. Preparing a design on paper allows us to:
- work away from the computer,
- determine which colours we want to use, and
- map the coordinates of our colour blocks (pixels).
Transparency Film
A piece of transparency film with a grid drawn on it can be placed directly over a picture. Then you simply look at each square and select the most dominant colour of that square, and colour on the graph paper accordingly.
Magnetic/Cardboard Pixels
There are products available that allows you to construct pixel images using coloured magnetic squares (Asobu Pixel Craft is one such example, see Figure 1). Alternatively, you could use paint chips cut into squares – or punched using a square hole puncher (available at most craft stores).
Beads
Coloured beads can also be used to represent pixels and plan simple graphics.
Computer Software
There are many software applications available to make pixel art. Check with a parent or teacher before downloading any software from the Internet.
Others
There are other products that can be adapted or repurposed to create pixelated art. Anything that used simple coloured shapes or objects, such as Lite-Brite, PixelHobby, MudPuppy Magnetic Pixels, or even Rubik’s Cubes! Search “Rubik’s cube art” or “Rubikubism” and you will see incredible examples of art by artists using only Rubiks’ cubes!
Planning Process
For this example we are using a transparent overlay to place a grid overtop of our photograph. Find an image to work with. One with a single, simple object, made of a limited colour palette, and a solid coloured or blank background is ideal.
Figure 2 shows our reference image, the reference image with a transparent grid overlay, and our interpretation hand-drawn on graph paper.
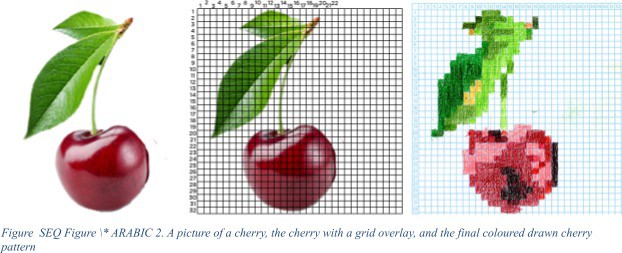
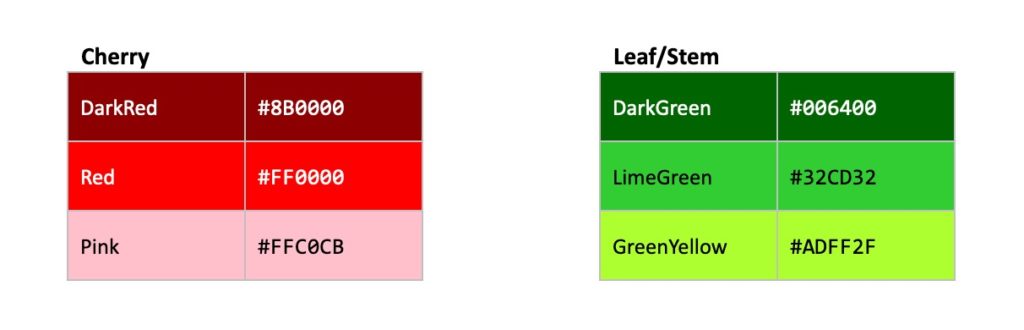
For our graph paper plan, we simplified the palette to three greens and three reds: a light, medium, and dark of each. Using the colour charts at the end of this module, find the best hex-colour matches, and write them down. For this example, we will use the following six colours:
When translating this graph paper plan into code, we want to be efficient. Rather than working through our drawing row by row, pixel at a time—which would be time-consuming and inefficient, as we would be continually changing our brush colour—we want to work by colour. We will look for all of the squares and rectangles (where two or more cells of the same colour are side by side) of one colour and program them in batches. This is where our plan really comes in handy.
We will use the row and column numbers as the coordinates for where to place each rectangle. Starting with the first row of the cherry image, we see three blocks of LimeGreen in columns 11, 12, and 13. We can combine these three cells into a single rectangle 10px high and 30px wide, and place it at 110, 10. Remember that each cell or square of our graph paper plan represents 10 pixels, so we have to multiply the column (in this case 1) and row (11) numbers by 10, or simply add a zero to the end of each reference point number.
The final step before programming is to determine if there are any large areas that could be filled in first. For example, since the majority of our cherry is red, we can layer the shadow (dark red) and highlight (pink) areas over top. To make the entire cherry shape, Figure 3 shows one possible configuration of breaking the cherry into rectangular blocks. Make notes of the sizes of these shapes, for example:

- Body: 11 blocks wide by 10 blocks tall (or 110 pixels wide by 100 pixels tall*)
- Left edge: 1 block wide by 8 blocks tall
- Right edge: 1 block wide by 9 blocks tall
- Bottom 3 rows:
- 1 block tall and 10 blocks wide
- 1 block tall and 8 blocks wide
- 1 block tall and 3 blocks wide
* Since we know that each block is 10 pixels by 10 pixels, you simply multiply the number of blocks by 10 to get the pixel dimensions.
After you have your various block dimensions, you can use the coordinates to note their position, and then you’re ready to program!
Programming The Image
Using these plans, we can construct the cherry in code. Let’s begin by setting a background colour to give our picture more visual interest. We will use a light blue in this example. By applying our background as a solid colour, we can change it to a different colour easily, at any time. And we know that because of how Small Basic uses layering, we will build our cherry overtop of this background colour.
As always, the very first task is to set the GraphicsWindow to the correct size, in our case, 320px wide and 320px tall. Let’s add 20px all around for a border, making our final window size 340px square:
GraphicsWindow.Width = 340
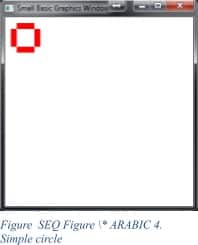
GraphicsWindow.Height = 340Fantastic! Before we create our planned picture, let’s draw a simple “circle”, just to see how things work, then we will move on to coding our cherry.
Simple Circle
Copy the following code and you get the result shown in Figure 3.
GraphicsWindow.Width = 320
GraphicsWindow.Height = 320
GraphicsWindow.BrushColor = "Red"
GraphicsWindow.FillRectangle(20,10,10,10)
GraphicsWindow.FillRectangle(30,10,10,10)
GraphicsWindow.FillRectangle(40,10,10,10)
GraphicsWindow.FillRectangle(10,20,10,10)
GraphicsWindow.FillRectangle(10,30,10,10)
GraphicsWindow.FillRectangle(10,40,10,10)
GraphicsWindow.FillRectangle(50,20,10,10)
GraphicsWindow.FillRectangle(50,30,10,10)
GraphicsWindow.FillRectangle(50,40,10,10)
GraphicsWindow.FillRectangle(20,50,10,10)
GraphicsWindow.FillRectangle(30,50,10,10)
GraphicsWindow.FillRectangle(40,50,10,10)
Great start! The code above draws a series of squares that are 10px square, placed at 10px increment coordinates. To change the colour of any of the squares, add a BrushColor command prior to the rectangle you want to change. Look at the code in the following example, and the resulting circle:
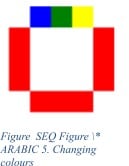
GraphicsWindow.Width = 320
GraphicsWindow.Height = 320
GraphicsWindow.BrushColor = "Blue"
GraphicsWindow.FillRectangle(20,10,10,10)
GraphicsWindow.BrushColor = "Green"
GraphicsWindow.FillRectangle(30,10,10,10)
GraphicsWindow.BrushColor = "Yellow"
GraphicsWindow.FillRectangle(40,10,10,10)
GraphicsWindow.BrushColor = "Red"
GraphicsWindow.FillRectangle(10,20,10,10)
GraphicsWindow.FillRectangle(10,30,10,10)
GraphicsWindow.FillRectangle(10,40,10,10)
GraphicsWindow.FillRectangle(50,20,10,10)
GraphicsWindow.FillRectangle(50,30,10,10)
GraphicsWindow.FillRectangle(50,40,10,10)
GraphicsWindow.FillRectangle(20,50,10,10)
GraphicsWindow.FillRectangle(30,50,10,10)
GraphicsWindow.FillRectangle(40,50,10,10)
Remember that our squares here are each 10 by 10 pixels, and the coordinate values are reference relative to the top left corner. Figure 5 shows an enlarged view of a 40px x 40px window with values in certain cells that show the coordinates for those squares. It may be helpful to make a sheet like this for reference. It is easiest to have a drawing start at position 10, 10, because as we read our numbered grid we can simply add a “0” to the row and column number to obtain the coordinate. This leaves us with a 10px border around our art work, which we accounted for when adding the extra border to our window size.
Now let’s start coding our cherry image.
All of the Red in our cherry can be broken into six rectangular blocks (see Figure 2), and therefore can be drawn with six lines of code:
GraphicsWindow.BrushColor = "Red"
GraphicsWindow.FillRectangle(100,200,110,100)
GraphicsWindow.FillRectangle(90,210,10,80)
GraphicsWindow.FillRectangle(210,210,10,90)
GraphicsWindow.FillRectangle(110,300,100,10)
GraphicsWindow.FillRectangle(120,310,80,10)
GraphicsWindow.FillRectangle(140,320,30,10)
The dark red areas can be consolidated into seven lines of code. The pink areas have the most lines of code, because there are no large shapes that can be described. Therefore, the entire cherry can be represented with the following code:
GraphicsWindow.Width = 340
GraphicsWindow.Height = 340

GraphicsWindow.BrushColor = "Red"
GraphicsWindow.FillRectangle(100,200,110,100)
GraphicsWindow.FillRectangle(90,210,10,80)
GraphicsWindow.FillRectangle(210,210,10,90)
GraphicsWindow.FillRectangle(110,300,100,10)
GraphicsWindow.FillRectangle(120,310,80,10)
GraphicsWindow.FillRectangle(140,320,30,10)

GraphicsWindow.BrushColor = "DarkRed"
GraphicsWindow.FillRectangle(220,220,10,60)
GraphicsWindow.FillRectangle(120,200,20,10)
GraphicsWindow.FillRectangle(130,210,20,10)
GraphicsWindow.FillRectangle(150,260,20,60)
GraphicsWindow.FillRectangle(140,290,10,20)
GraphicsWindow.FillRectangle(170,280,10,30)
GraphicsWindow.FillRectangle(180,290,10,10)

GraphicsWindow.BrushColor = "Pink"
GraphicsWindow.FillRectangle(160,190,30,10)
GraphicsWindow.FillRectangle(150,200,30,10)
GraphicsWindow.FillRectangle(150,210,20,10)
GraphicsWindow.FillRectangle(180,220,20,20)
GraphicsWindow.FillRectangle(200,230,10,20)
GraphicsWindow.FillRectangle(210,250,10,30)
GraphicsWindow.FillRectangle(200,260,10,30)
GraphicsWindow.FillRectangle(190,270,10,10)
GraphicsWindow.FillRectangle(110,200,10,10)
GraphicsWindow.FillRectangle(110,220,40,10)
GraphicsWindow.FillRectangle(100,230,40,10)
GraphicsWindow.FillRectangle(100,240,30,10)
GraphicsWindow.FillRectangle(80,230,10,40)
GraphicsWindow.FillRectangle(90,240,10,30)
Notice that we have separated each colour group with an extra blank line. This makes it easier to read through the code to modify or change individual parts of the picture. For instance, to add or remove highlights (Pinks) we can easily find the Pink section of code and make any modifications.
Now that the cherry is complete, we can tackle the green leaf section in much the same. There are only a few places where colour can be grouped together, so as a beginner, just approach it row by row. For example, Row 12 will have two lines of code – one for the DarkGreen and one for the LimeGreen:
GraphicsWindow.BrushColor = "DarkGreen"
GraphicsWindow.FillRectangle(40,120,60,10)
GraphicsWindow.BrushColor = "LimeGreen"
GraphicsWindow.FillRectangle(100,120,30,10)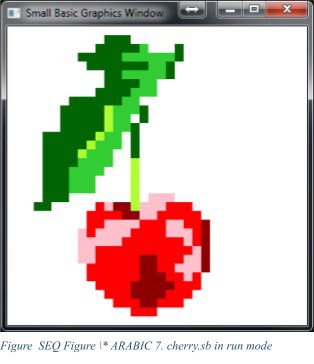
You could continue this way, but changing the BrushColor every other line is tedious, time-consuming, and creates lengthy, inefficient code. So, just as we did with the cherry, group the code for each colour, even if the shapes themselves cannot be described by a larger shape. Then use the light green for any highlights and for the stem. Full source code for the cherry image is included in the SourceCode folder in the file named cherry.sb. Figure 6 shows the result when you run this code.
There are many ways to draw your blocks; there is no one correct way. Planning beforehand helps you create logical steps using as few lines of code as possible. The time you spend planning saves time in the coding stage. Now that you know how to construct pixel images in Small Basic, try your own! A great place to start is to find some simple pixel art images on the internet and try to re-create them. Or, you can create your own graphics, getting as detailed as you want. If you want to see an example of a challenging picture, look at the BlueJay.sb code included with this module, and explained in the next section.
A Challenging Image – the Blue Jay
Included with this module is the full source code for the following image of a blue jay (see BlueJay.sb in the SourceCode folder). Figure 7 shows the original photo and the pixelated version. The code for this image was done “block by block” and “row by row”, meaning that each 10px block was placed individually, except where long strips of the same colour could be consolidated into a single row. What makes this image challenging is its size and the number of colours used.
To illustrate why coding efficiently is important, if you had a 32 pixel square image, it consists of 1024 individual pixels (32 x 32 = 1024). If you were to colour each block by first defining the BrushColor and then the pixel placement with FillRectangle, each of the 1024 blocks would require 2 lines of code, which would result in a total of 2048 lines of code! That is a lot! But like the cherry, the blue jay has some plain background; about 339 pixels, leaving 685 individual squares for the blue jay. That is still a lot; you are looking at 1370 lines of code (685 blocks at 2 lines each), which is why it’s helpful to condense the code wherever possible.
The final code for the blue jay is a total of 993 lines of code. The largest grouping of one colour is the blue colour (#1D4095); and there are several lines that group pixels into rectangles that are 10 pixels high and range from 20 to 70 pixels long. This saves a lot of coding. 993 lines of code is better than the 1370 lines it would take if we coded each block individually. Being efficient saved having to code 377 lines of code! This is why it is important to plan out your images beforehand.
The colours in this example primarily use hexadecimal values. A few of the colours are not named, that is, not in the list of 142 Small Basic colours). Hexadecimal values for colours can easily be found on the Internet; Google has a very user-friendly colour picker that gives a hex value that can be copied and pasted into your code. This way you do not need to experiment with values on your own. The blue jay image uses xx colours, and some are very similar in tone. When you are creating your own pictures, if two colours are very close together in colour, it saves time and code to combine them.
Now it’s your turn! Find an image and start “drawing”.
Conclusion
If you have completed the Pathfinder modules, you could develop your own pictures to include in your Pathfinder adventure game. A brief tutorial for how to include images from this module or the Small Basic: Introduction to Drawing module can be found in the short supplementary Pathfinder 6 – Including images. To reiterate, planning is very important when you start programming. Always draw out your ideas first before you start coding; you will save time, and you will be able to identify issues before they occur in your programming.
Enjoy making your own pictures and creating designs and patterns that represent who you are!
Microsoft Small Basic – Colour Charts

Resources
Additional Resources
- Small Basic Getting Started Guide
- Introducing Small Basic Full Guide (PDF)
- Online Tutorials
- Program Gallery – includes Small Basic examples for things specific to games, math and science applications, and graphics
Social Media Resources
As students advance, they can look to the following artists for inspiration:
Additionally, searching “pixel art” and “pixelation artists” provides many examples.