
Introduction
This module will introduce students to the Two-Eyed Seeing or Etuaptmumk Framework, created by Mi’kmaw Elder Albert Marshall. This framework is applied to many different disciplines from health to environmental science. It is “the gift of multiple perspectives” and Albert Marshall often describes it as “learning to see from one eye with the strengths of Indigenous knowledges and ways of knowing, and from the other eye with the strengths of Western knowledges and ways of knowing … and learning to use both these eyes together, for the benefit of all”.
This module will provide the learner with information on traditional Indigenous knowledge as an introduction in order to complete their story. Further learning can be found at the bottom of the lesson under the “Resources” section.
Students can use the knowledge taught in this lesson to carry with them in their everyday lives. It can be used to think about the impact of their everyday choices when it comes to the environment and the natural world (i.e. littering, proper recycling, plastic use, dumping into waterways/source, air pollution, etc.).
At the end of this module, your project can take many forms such as a linear descriptive story about the environment, an interactive narrative/fiction story with choices that impact the environment, an informative story that teaches others about our responsibilities to Mother Earth or any other type of story that includes both Western scientific knowledge and traditional Indigenous environmental knowledge.
Learning Goals
At the end of this module, students will have a better understanding of traditional Indigenous environmental knowledge as well as Western environmental knowledge and will use both to create a story to demonstrate our collective responsibilities to protect the environment. Students will be learning the basics of Twine and how to use the software to tell a story.
Vocabulary
Code - Instructions that a computer program uses to perform tasks.
Twine - A tool that allows the user to create interactive stories using code.
Passage - In Twine, a passage is a narrative unit, a building block for full stories.
Narrative - The art, technique, or process of telling and structuring a story.
Software - A general term for a program that operates on computer hardware.
Troubleshoot - A testing process to identify implementation problems.
Interactive Fiction - A nonlinear story where the reader directly influences the narrative.
Traditional Indigenous Knowledge - There is no single definition, rather, there are many that are centralized on themes of: generational knowledge, oral history, observed knowledge, cultural knowledge, traditions, spirituality, holistic perspective, harmony, preservation and respect (more definitions found here).
Mother Earth - The source of all life and the living being for which all spirits are connected; She provides all living things with nourishment, medicines, and a home.
Seven Generations Principle - Ancient Haudenosaunee philosophy from the Great Law of the Haudenosaunee which states “in our every deliberation, we must consider the impact of our decisions on the next seven generations”
7 Grandfather Teachings - (or Seven Sacred Teachings): Humility, Bravery, Respect, Honesty, Wisdom, Truth, Love. Often referred to as the “code of conduct” for Anishinaabe people and the teachings of each are traditionally passed down orally through generations.
Guiding Questions
- Can you list some ways that humans impact the environment? Is it always negative? What ways can we positively impact the environment?
- Why is it important for us to honour and respect the environment?
- Why is it beneficial to incorporate traditional Indigenous knowledge into Western perspectives of environmental science?
- What are our responsibilities as humans to protect Mother Earth for the next Seven Generations? How can we fulfill these responsibilities?
- How can we use the Seven Generations Principle and the 7 Grandfather Teachings to inform our decisions to protect the environment?
Curriculum Links
This module can be used across different curriculum’s including science, environmental science, geography, English, anthropology, and social science.
Materials
- Twine – download twine
- Paper
- Pencil/pen
- Any colouring mediums: crayons, paint, pencil crayons, markers, etc.
Optional (for planning the story):
- Sticky notes
- Word processing application
- Newspaper, magazines, etc. or any other materials used to create art
Non-Computer Activity
Watch two videos on climate change, one from an Indigenous knowledge perspective and one from a Western scientific perspective:
- Indigenous Climate Action: Indigenous Peoples & Climate Change
- Causes and Effect of Climate Change: National Geographic
After you have watched the videos, use your paper and colouring mediums to create a piece of art that incorporates both Indigenous and Western worldviews as it relates to the environment. Focus on the message of your artwork; this can be anything such as a simple drawing, abstract painting, photo collage, word collage, diagram, etc. If you are having trouble choosing an idea, try picking any topic related to the environment, climate change or the natural world that interests you and use this image below to help visualize your piece:

[This is an image of a diagram that outlines the similarities and differences between Traditional Ecological Knowledge and Western Science]
Source: https://www.edu.gov.mb.ca/k12/docs/support/sila_video/tek.pdf
Possible topics:
- Air pollution
- Water pollution
- Soil pollution
- Fossil fuels
- Biofuels
- Renewable energy
- Non-renewable energy
- Overfishing
- Overhunting
- Shoreline development
- Greenhouse gases & the Greenhouse effect
- Invasive species
- Initiatives to conserve energy
- The earth’s spheres
- Life cycle of plants and animals
- Pollination
- Deforestation
- Oil fracking
- Endangered species
- Weather cycles
- Pollution impact on food sources (e.g. wild rice, vegetable crops, farming, etc.)
- Pollution impact on life cycle of traditional/natural medicine (tobacco, sage, sweetgrass, cedar)
This project is meant to get you thinking about Two-Eyed Seeing and how we can incorporate the best of both Indigenous and Western worldviews into one vision as an approach to understanding and combating climate change to preserve Mother Earth.
Before you get started in Twine, it may be helpful to plan out your story’s characters, plot points, conflict (if there is one), and conclusion on a piece of paper, sticky notes or word processor. This is where you can use the resource links and video links to include information related to traditional Indigenous knowledge and Western knowledge to create a story line. Feel free to make it as simple or as detailed as you want, be creative and have fun!
Computer Activity
Twine is a tool for creating interactive fiction—a type of story that allows the reader to make choices on how the narrative unfolds. Imagine if a television show suddenly paused and asked you, the viewer, how the main character should act in a moment of peril, or what ending you would like to see. With Twine, we can create those interactive stories.

With this module, we’ll learn how to use the Twine software. By the end, you’ll have created your own individual passages using the storyline points you brainstormed during the previous activity.

Opening Twine for the first time, the screen will be mostly blank, so let’s fix that. First, select the button labeled + Story. Twine will ask what you’d like your story to be named. You can name your story whatever you like, and the name can be changed later.

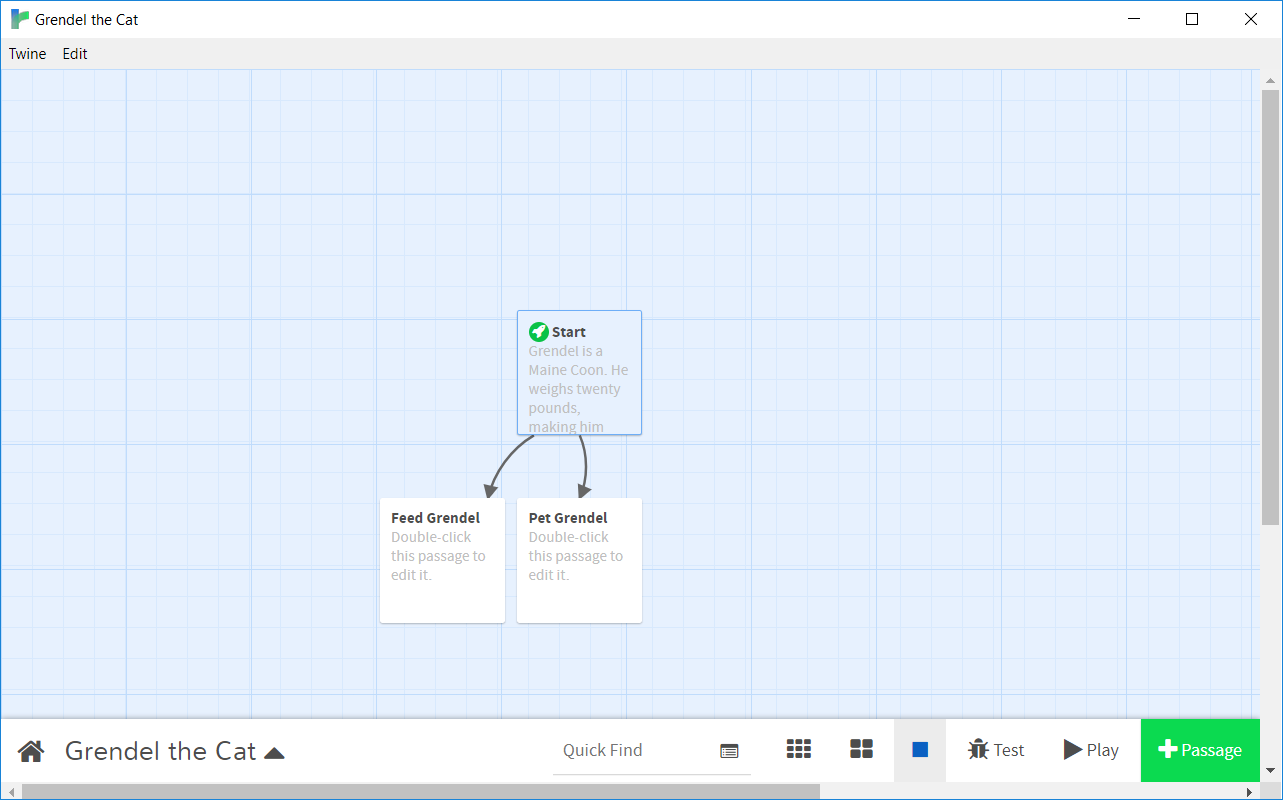
After naming our story, Twine immediately takes us to the story editor screen. Take a look at the little box named Untitled Passage, because this is where we’ll focus our attention. In Twine, a passage is a narrative unit, a building block to create full interactive stories. Go ahead and hover your mouse cursor over the box, then select the pencil icon that appears. Tip: Passages in Twine can also be opened for editing by double-clicking on the box.

Let’s name our passage. Passage names will be invisible in our finished story, so this name just helps remember its purpose for later. Although we could leave the name as the default Untitled Passage, it would become confusing after we add more. I named my passage “Start” because I intend for this passage to be the first one the reader encounters.
Next, let’s write some text we can work with. Your story can be structured however you want and you can choose to write any type of story (remember: narrative fiction with choices, descriptive story, etc.). This could be a good place to introduce the character(s) of your story (example below) and give a bit of background information on each character, or you can choose to introduce the topic of your story here if you wish. To create a new passage from this one, write the passage name inside double square brackets, as seen below:
![The passage screen in Twine showing text surrounded by [[brackets]].](https://stg.pinnguaq.com/wp-content/uploads/2020/04/twine-passage-screen-1024x639.png)
Close out of the passage, and Twine will automatically create a link to an additional passage. This new passage’s name will be the same as the text you placed inside brackets. Tip: Modifying text inside square brackets will break the connection between passages. If you want to separate the choice text from the passage name, insert a pipe symbol between the choice text and passage name by holding shift and \ at the same time: [[choice text|passage name]]

In the new passage, write a description for the player to read. You can choose to make it a consequence of the text from the previous passage. For example, if the character in the story threw a plastic bottle into a river, the next passage could follow the consequences of that action (i.e. could follow the path the bottle takes down the river and where it ends up).
Next, open your original passage (labelled start) and create a second, different choice. Format it the same way as the first choice using [[brackets]], but make the choice text different. Close the passage window, and Twine will create a third passage next to the second one. This is a great option for those who are choosing to write an interactive narrative story; this gives the reader options.
For those who prefer not to give options (i.e. linear story), you can continue building new passages using [[bracket]] on each passage you create.
Notice that Twine automatically creates lines and arrows between passages to track the story flow. Write some text in your third passage relevant to the passage title of your story. Next, let’s test our story: hit the Play button in the lower right-hand corner of the Twine window.

You should now have a story where the player picks between two choices, and then arrives at an ending. For those who chose to write a linear story, your passages will only have 1 option to choose to move forward in the story. If your story doesn’t work the first time, that’s OK! We can fix that by troubleshooting, a type of problem solving where we do tests to identify issues.
- Are your [[brackets]] typed correctly, with opening and closing double brackets?
- Does the choice text inside the [[brackets]] match the connecting passage’s name?
- Is the capitalization consistent between choice text and passage names?
Just with what we’ve learned so far, you can create a full branching story. Twine automatically saves your work, but you can also export your story as its own file to send to others. In the lower left-hand corner, click on the arrow next to your story’s name, then select Publish to File. This saves your story as an .html file any web browser can open.

Many excellent Twine stories have been made with only choice text and passages. However, Twine also gives us sophisticated tools to infuse our interactive stories with complex logic. For more ways to enhance your story, try using the Twine coding system to create effects like moving/disappearing text and more by exploring the Harlowe Manual here!
Conclusion
If you’ve completed your story, feel free to export the file and share it with friends and family! For more information on creating more complex stories in Twine, click on the Twine Guide link in the resources section below to learn how to add images, videos, music or even random games such as a coin flip and more!
Resources
*Please keep in mind, the language used in some of these resources is outdated: the preferred term is “Indigenous”*
- University of Toronto (OISE) website with several links for further learning on traditional Indigenous environmental knowledge – Deepening Knowledge: environmental studies webpage
- Definitions of traditional environmental knowledge (non-exhaustive list) – Definitions
- Government of Manitoba teacher resource “Education for a Sustainable Future” Indigenous perspectives – Aboriginal Perspectives of Sustainable Development
- Climate Change in Great Bear Lake – Video
- Sila Alangotok – Inuit Observations on Climate Change – Full video
- Teacher guide for Sila Alangotok video – Traditional Ecological Knowledge guide
- Environmental Education and Indigenous Knowledge Webinar by Megan Bang, Associate Professor in Education and Indigenous Studies at Northwestern University – Video
- More information about Two-Eyed Seeing
- Two-Eyed Seeing Ted Talk by Rebecca Thomas video
- Twine documentation – Guide
- Official Twine Twitter account – TwineThreads
- Seven Generations Principle video
- Seven Sacred Teachings – Interactive webpage/resource for students and educators
Link to Related Lesson Plans
Inuit Principles of Conservation:
Share Your Work With Us! We want to see the awesome things you’re all creating with Pinnguaq. Share online with us and tag @pinnguaq on Facebook, Twitter or Instagram for your work to be featured. Don’t forget to include the hashtag #LearnWithPinnguaq! Keep tuning into Pinnguaq for more lesson and fun activities!
You might also like
Inuit Principles of Conservation: Inuit Leadership
 Grade 10 – Grade 12
Students will learn about the expectations expressed in the Inuit worldview around stewardship, environmental responsibility and a respectful relationship with nature.
Creating Art Inspired by Traditional Métis Dot Art
Primary – Secondary
Learn how to create Métis dot art by using traditional tools as well as the digital art software Autodesk Sketchbook!