Introduction
In this tutorial we will learn how to make digital fantasy maps using Inkscape. We will upload the maps we drew from the Fantasy Map Making Tutorial and trace over them using bezier curves. Inkscape uses vector graphics that will allow us to upload our finished drawings into Scratch where we can add code and resize our images.
Vocabulary
- Vector Graphics – Vector graphics are images whose data is stored as relationships between points on an xy-plane, points which are connected by lines and curves to make simple polygons and more complex shapes.
- Bezier Curve – In Inkscape, a path can be drawn using the “Draw Bezier Curves” tool (hotkey: B). A path has two endpoints with nodes. Each node has a control point or “handle” that can manipulate to make the point between each path either smooth (diamond-shaped node) or jagged (square-shaped node).
A bezier curve showing the endpoints (nodes) and control points (handles).
Two Bezier curves joined by a smooth node.
Two Bezier curves joined by a corner node.
- Scalable Vector Graphics (SVG) – A markup language used to describe vector graphics.
Materials
Non-Computer Activity
See Fantasy Map Making Tutorial
Computer Activity
Uploading Hand-Drawn Maps
To be able to trace the map in Inkscape, we first need to scan them onto our computer. If you do not have a scanner, a photo of your map will do.
We will need to know the dimensions of the photo that you will upload into Inkscape. To find this, open up the folder where your photo is saved and hover your mouse over the file to see the dimensions.

Or you can right-click on the file and click Properties. Under the Details menu, you will find the dimensions in pixels.

Drawing Paths in Inkscape
We will be using the “Draw Bezier curves” tool (hotkey: B) in Inkscape and tracing over an image of our hand-drawn fantasy maps.
- Upload the image of your map by right-clicking the image and selecting “copy”. Paste the image into Inkscape by right-clicking anywhere on the document and selecting “paste”. Quick tip: On your keyboard, press the Ctrl + C keys to copy and Ctrl + V keys to paste.
- Adjust the document dimensions to fit the image by pressing Ctrl + Shift + D. This will open up a Document Properties window. Under Custom size change the Units from millimetres to pixels by selecting “px” in the drop-down menu. For the width and height, enter the dimensions found in the previous section.

- Our image is automatically added to the first layer. We want to draw over our image so we need to create a new layer by opening the Layers menu by pressing Ctrl + Shift + L or by clicking Layer at the top menu and then Layers . Press the + icon.

- We don’t want to edit the first layer so lock it using the Lock icon.

- Use the Zoom tool on the toolbar located on the left of the document, this will help us to see the points on the image we are tracing.

- Select the Draw Bezier curves tool on the toolbar. This tool lets us draw a continuous line connected by nodes that we can move and adjust. Click any point on your map outline to start tracing the shape. If you make a mistake, you can press Ctrl+ Z on your keyboard to undo the last node.

- Once the outline is traced, we will make the outline thicker by adjusting the stroke properties. Select the Select tool at the top of the toolbar and click your outline. A box should appear around the shape that you clicked on showing that it is selected. Press Ctrl + Shift + F to open the fill and stroke properties. There are three tabs: Fill, Stroke Paint, and Stroke Style. Click Stroke Style. Change the units to px by clicking the second drop-down menu and selecting px. Finally, set the size to 3.00.


- To hide the photo underneath, go to the layers tab (Ctrl + Shift + L) and click the eye next to layer 1. This will close the eye and hide the layer underneath layer 2.

- We no longer need the original photo on the first layer so we will delete it. Delete Layer 1 by clicking it, and selecting “Delete current layer”.

Editing in Scratch
- To be able to code and use our map in Scratch, we will need to export our work as an SVG file. Go to the top left corner and click File > Save as. Choose the location you would like to save your file and a title. Tip: save it somewhere you can easily find later.

- Now we can paint and code our map in Scratch by adding it as a sprite. Open up the Scratch Desktop or online version and hover your mouse over the Choose a Sprite button at the bottom right side of the screen. Click the first option on this menu: Upload a Sprite.

- We can customize our map by going to the costumes tab. You may need to resize your map to fit the stage. To group all the continents and islands to resize them, press Ctrl + A. A box will appear showing that you’ve selected all the items. Click the Group button.

- Click the handles on any of the corners of your image, hold the mouse button down and drag it until the image fits the stage area.
- To add a gradient effect to the shapes on your map, click the paint bucket fill tool and then the color selector. Within the color selector menu you have four different pattern options. Select one of the patterns and then choose the two colors you want to fill in. Try them out to give the illusion of dimension and to add a mix of colors.

- Add a background color. Hover over the Choose a Backdrop button at the bottom right of the screen. Select Paint.

- Draw a rectangle that fills the checkered drawing area. select the color you wish to use as a backdrop then select the Rectangle tool. Click and drag your mouse across the checkered background to draw a big rectangle. It should fill as much of the drawing space as possible.

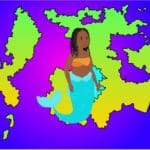
- Here’s the final product!

Conclusion
We want to see the awesome things you’re creating! Take a photo or video and share your work with us by emailing media@pinnguaq.com or tagging @pinnguaq on Facebook, Twitter, or Instagram. Don’t forget to include the hashtag #LearnWithPinnguaq! You can also upload your project to the Pinnguaq Studio.
Resources
This might include (but is not limited to) websites, books, games, apps, organizations or companies that produce relevant work, YouTube videos, or content that Pinnguaq produces.
- Inkscape Guide
- Inkscape Guide: Bezier Curves
- Fantasy Map Making
- Working with Vector Graphics Art in Scratch
- Creating Art in Inkscape


